You're in a sample review, tape in hand, and the garment in front of you doesn't match the number in the tech pack. Someone else measures the same back and gets a different value, and you're both sure you're right. That disagreement usually isn't carelessness. It's an incomplete across back measurement, a width recorded without its vertical height and without a flag that says whether it's a body value or a finished garment value.
Table of Contents
- Which Across Back Landmark You Are Measuring
- How to Measure Across the Back
- How Across Back Changes by Size
- Body Width Ease and the Flat Garment
- Checks and Lock-In Before the Next Sample
Which Across Back Landmark You Are Measuring
Say one person measures shoulder joint to shoulder joint while another measures between the armholes lower down. Both tapes are level, both readings are honest, and the numbers still disagree. They're measuring different landmarks that share a similar name.
The ASTM D5219 terminology defines “across back shoulder width” as the horizontal distance from the top of one shoulder joint to the top of the other shoulder joint, measured with the arms down. That arms down condition matters because it fixes posture, so a fit model, a sample reviewer and a factory checker can repeat the same position.
Names That Sound Alike
Related labels describe different anatomical locations, and you shouldn't substitute one for another. A point-to-point value, a width taken several inches below the shoulder and a flat garment value follow different contours of the upper torso. Their ordering can even change across a size range, which is why a familiar label can send a factory the wrong width.
Across-back names that are not the same measurement
| Name | Where the tape sits | Use it for |
|---|---|---|
| Across back shoulder width | Top of one shoulder joint to the other, arms down | Shoulder fit and sleeve position |
| Point-to-point shoulder | Shoulder tip to shoulder tip | A different shoulder span; do not swap it in |
| Across back 5 inches down | Straight across the back 5 inches, or 12.7 cm, below the shoulder reference | Upper-torso width used in misses grading |
| Back width | A lower or differently defined back level | Armhole balance; not a shoulder substitute |
| Garment cross back | Seam to seam or edge to edge at a stated height | Finished spec, not a body measurement |
Consumer instructions often place the tape roughly below the base of the neck, while a garment spec uses a stated cross-back height. Either approach can work in production only if you write the height down. Pick one landmark now, use its exact name, and carry that name through every step that follows.
A width without a named height is not a complete spec. It's a number another person can reproduce in the wrong place.
How to Measure Across the Back
Good numbers start before the tape moves. If posture, clothing or landmarks shift between readings, you'll chase variation that has nothing to do with the pattern.
Set the Body First
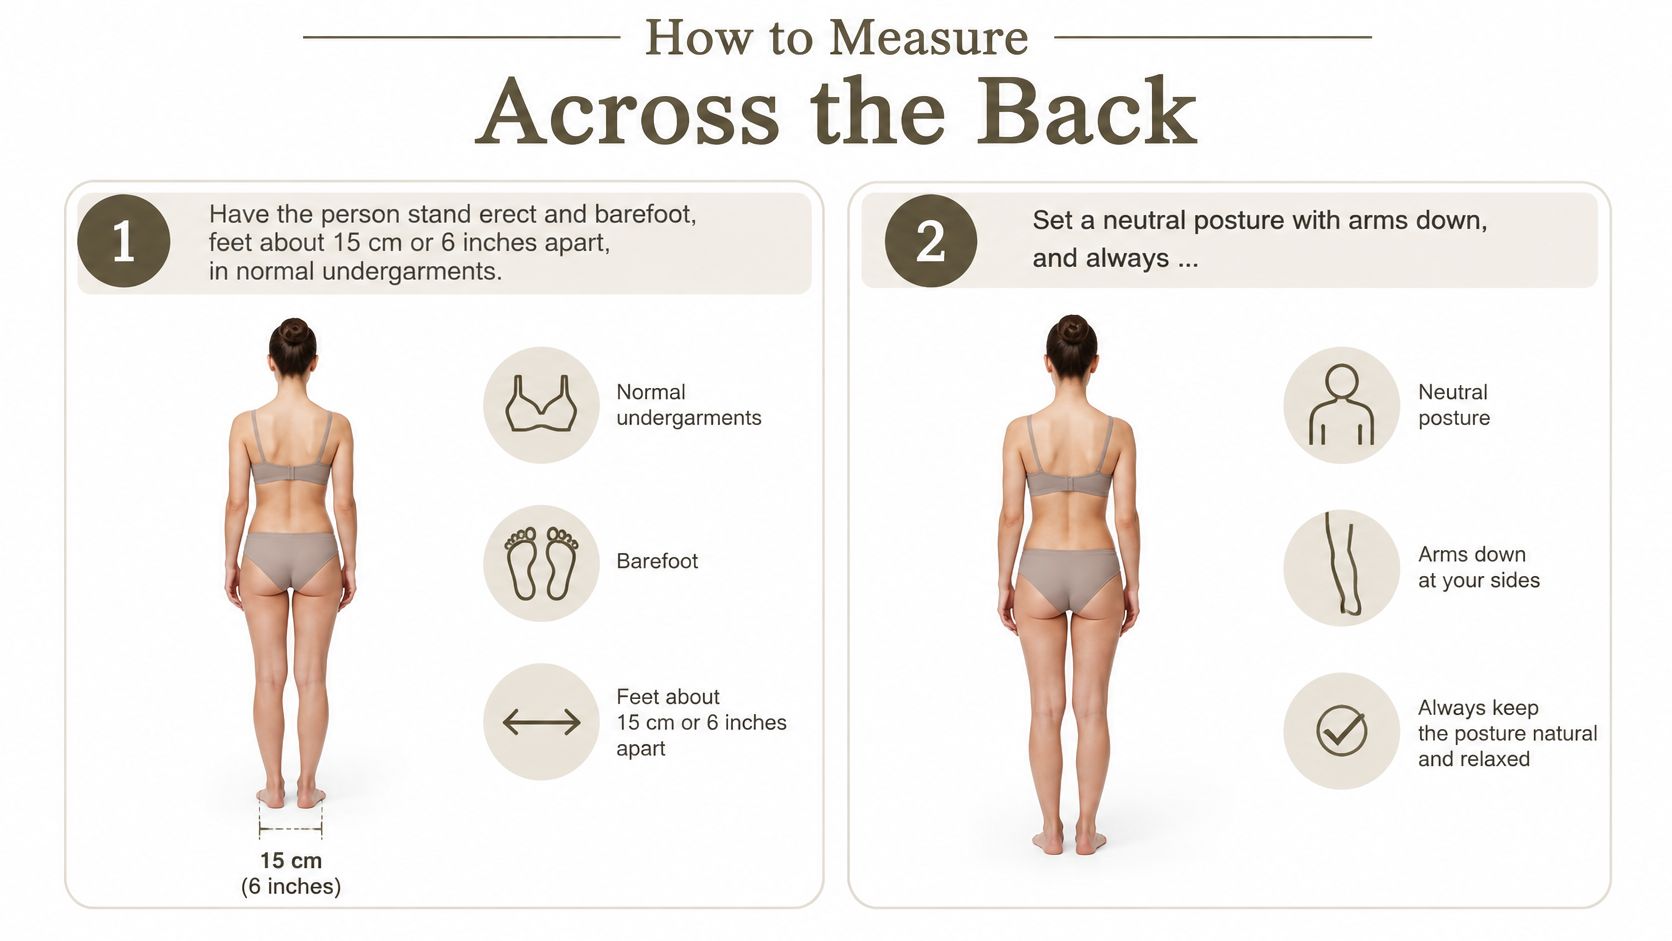
- Stand the person erect and barefoot: The ASTM D6458 boys' sizing sample sets feet approximately 15 cm (6 in) apart, wearing only normal undergarments. Shoes, a hoodie or a thick bra strap change what the tape crosses.
- Set a neutral posture: Keep arms down and shoulders relaxed, and always measure from the same side under the same conditions. Raised shoulders shorten the apparent span, and a twisted torso moves one landmark forward.
- Find your landmarks by touch: For a back break-point measure, locate the posterior arm-torso separation points where arm meets torso at the back. For across back shoulder width, find the tops of the shoulder joints instead. Don't drift to a shoulder seam or strap because it's easier to see.
Formal tailoring uses the same discipline of named landmarks and repeatable posture, which is why a fitting guide for judges from Judicial Attire is a useful reference when you're training someone to measure a person rather than a garment.
Place the Tape and Read It
- Go straight across, not around the curve: Hold a calibrated flexible tape horizontal between the two points. If it dips at the spine or follows the shoulder blades, you're recording surface length, not horizontal width.
- Keep it level without compression: The tape should touch lightly and stay snug, not indent tissue. Read and record the value in centimetres for production.
- Repeat at least twice: If readings differ materially, don't average a bad pair. Reset posture, relocate the landmarks and measure again.
Recording rule: If the second reading doesn't match, your landmark or posture moved. Averaging hides that problem instead of fixing it.
Watch for the slips that shift a reading. A tape angled down toward the waist, a fit model holding a breath with shoulders lifted, or an endpoint placed on a garment seam instead of the body will all produce a plausible but unusable number. Measure the body you named, at the height you named.
Close the job with one complete recording line in your tech pack: landmark name, vertical height from your neck or shoulder reference, body value in centimetres, and who measured it. That line belongs with the other points of measure covered in this guide to spec sheet essentials for fashion designers, so the factory doesn't have to guess which width you meant.
How Across Back Changes by Size
A block graded from the smallest size to the largest needs a changing across-back width. Upper torsos widen with size, but the amount of change depends on where across the back you measure. A width without a named vertical height, and without saying whether it describes the body or the garment, is an incomplete spec: different legitimate landmarks produce different numbers.
Across-back change across published size spans
| Dimension and population | Small end | Large end | Total change |
|---|---|---|---|
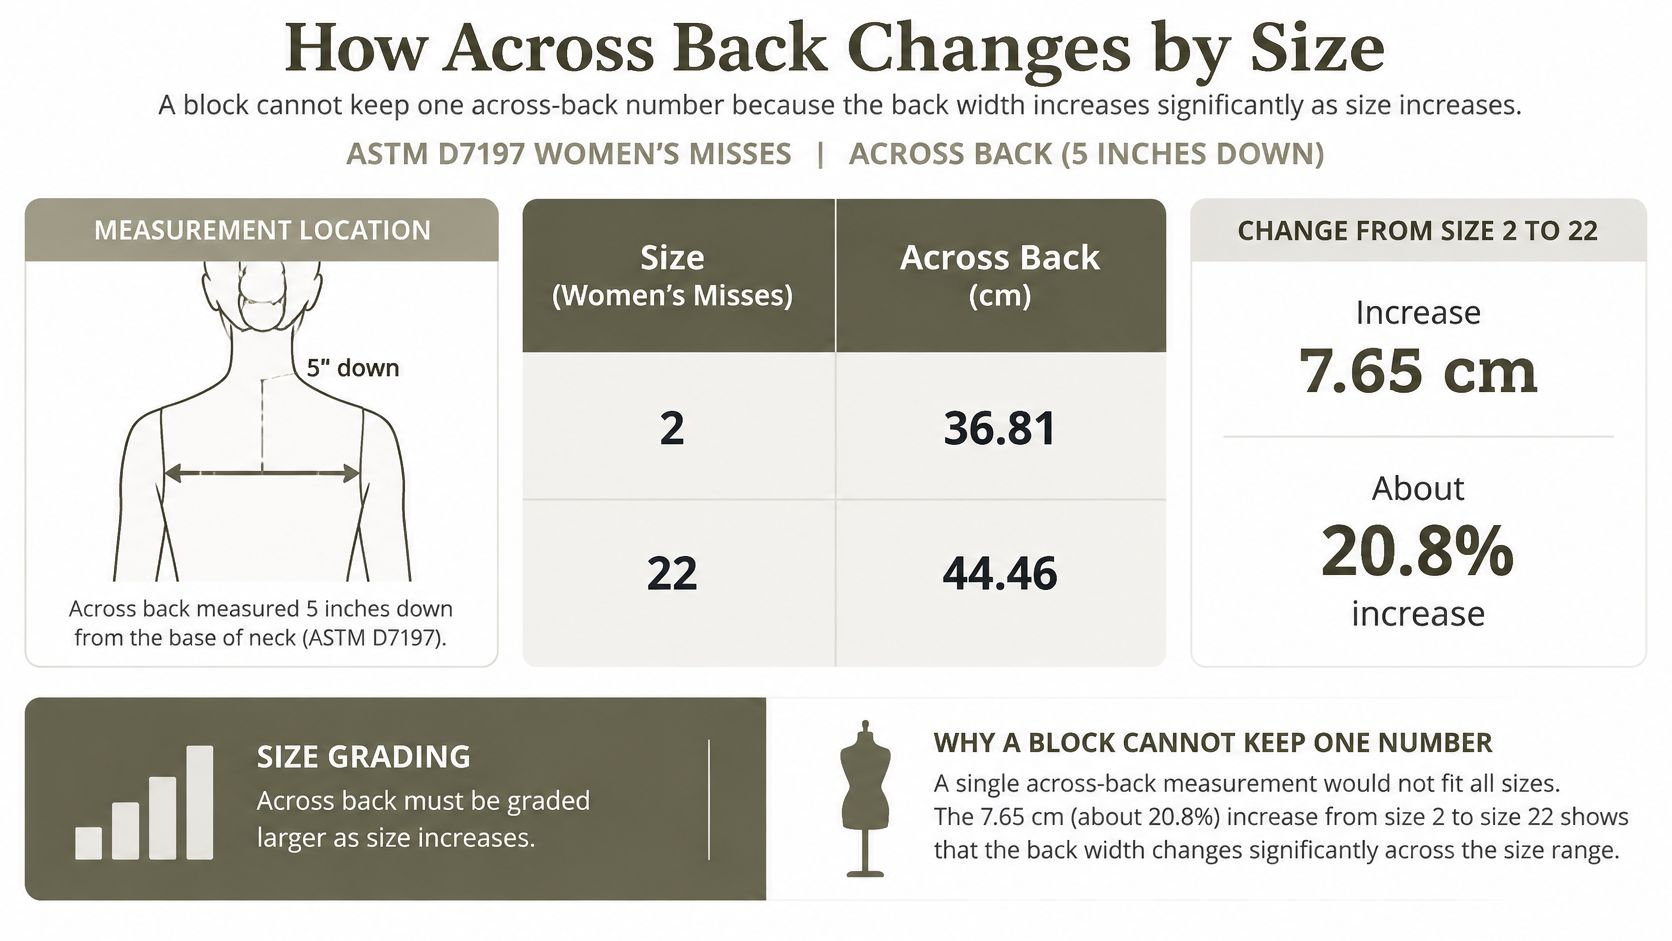
| Misses across back 5 inches down, size 2 to 22 | 36.81 cm | 44.46 cm | 7.65 cm, about 20.8% |
| Misses point-to-point shoulder, size 2 to 22 | 37.76 cm | 44.13 cm | 6.37 cm, about 16.9% |
The ASTM D7197 women's misses table shows “across back 5 inches down” increasing from 36.81 cm at size 2 to 44.46 cm at size 22. That is a total change of 7.65 cm, or approximately 20.8%. Point-to-point shoulder width on the same table grows less across that size span. At size 2, the 5-inch-down value is 0.95 cm smaller than point-to-point; at size 22, it is 0.33 cm larger.
What the Two Growth Rates Mean for Grading
The measurements change at different rates because they sit at different vertical levels and follow different body contours. Use the 5-inch-down increment to grade the shoulder, and width may land in the wrong place. The same problem occurs if you apply the shoulder increment to a lower-back measurement. Grade the named landmark across the size run, rather than pushing the difference into the armhole at the largest size.
The size designation itself is generally based on body measurements, while secondary dimensions such as back shoulder width can help refine fit. Treat across back as one fit dimension, not the whole size decision. Shoulder slope, scapular prominence, and posture can still affect fit even when the width matches, so check the graded block on bodies as well as against the chart.
Keep the landmark consistent when you compare sizes. “Across back” alone does not tell a factory whether the measurement is point-to-point or taken lower on the back, or whether it describes a body or a finished garment. Record the vertical height and measurement type with the width. It is the difference between giving the factory a usable grading point and asking it to infer which line on the body you meant.
Body Width Ease and the Flat Garment
Say a woven shirt and a knit tee start from the same body across back measurement. They shouldn't end with the same finished width, and the tech pack should show why. The body number is the starting line. Ease is a separate decision.
First, label the value as body or finished garment. Then name ease on its own lines for fabric stretch, arm reach, layering and silhouette. The ASTM D7878 petite table listing supports treating body tables as baselines that must be considered alongside fabric type, movement ease and styling, and its separate shoulder and back-width dimensions show why your spec must state exactly which one you're using.
Keep the Conversion Visible
Don't add ease to a body value, compare that total with a factory flat measurement, and leave the conversion undocumented. The factory will measure a garment, not your fit model. If your sheet only shows the final target, nobody can tell whether a mismatch came from the body landmark, the ease allowance or the sewing.
What to record when across back becomes a garment spec
| Product | Start from | Ease to name separately | Flat check |
|---|---|---|---|
| Fitted woven shirt | Body across back at a stated height | Movement and a little silhouette | Same endpoints, body plus named ease |
| Stretch knit tee | Body across back at a stated height | Stretch recovery, not a woven ease | Do not compare a stretched tape with a relaxed flat |
| Jacket or overshirt | Body across back plus the layer underneath | Layering and reach | Flat at the same height after ease is listed |
| Relaxed silhouette | Body across back | Silhouette ease kept off the body column | Target equals body plus only the ease you wrote |
A jacket worn over a shirt needs its layering allowance called out, because the body underneath isn't bare. A relaxed woven needs silhouette ease called out, so a reviewer doesn't trim intentional volume as a mistake. A stretch knit must not inherit a woven ease value, since the fabric itself supplies part of the movement room and must recover afterward.
For the flat-sample check, lay the finished garment on a flat surface and smooth it without stretching. Bring it to the stated cross-back height, measure seam to seam or edge to edge straight across at the same endpoints, and record the value in centimetres. Compare it with body across back plus the named ease, and accept it only within the tolerance set for that product class. These are the kinds of undocumented conversions behind many factory sample rejections caused by tech pack mistakes.
Name the failure mode plainly on the sheet. Replacing across-back shoulder width with back width can narrow or widen the armhole and restrict reach even when chest circumference is correct. The chest can pass while the wearer still can't lift both arms comfortably.
Checks and Lock-In Before the Next Sample
The common assumption is that “across back” names one place on every body and every garment. It doesn't. The America Today how-to-measure guideline for suppliers sits in a setting where consumer guides commonly describe across back as a body measurement taken between the armholes, roughly 3 inches below the base of the neck, while garment guidance places it at a defined cross-back height from seam to seam or edge to edge. Other technical definitions use the arm-scye level or a point halfway between upper and lower scye levels.
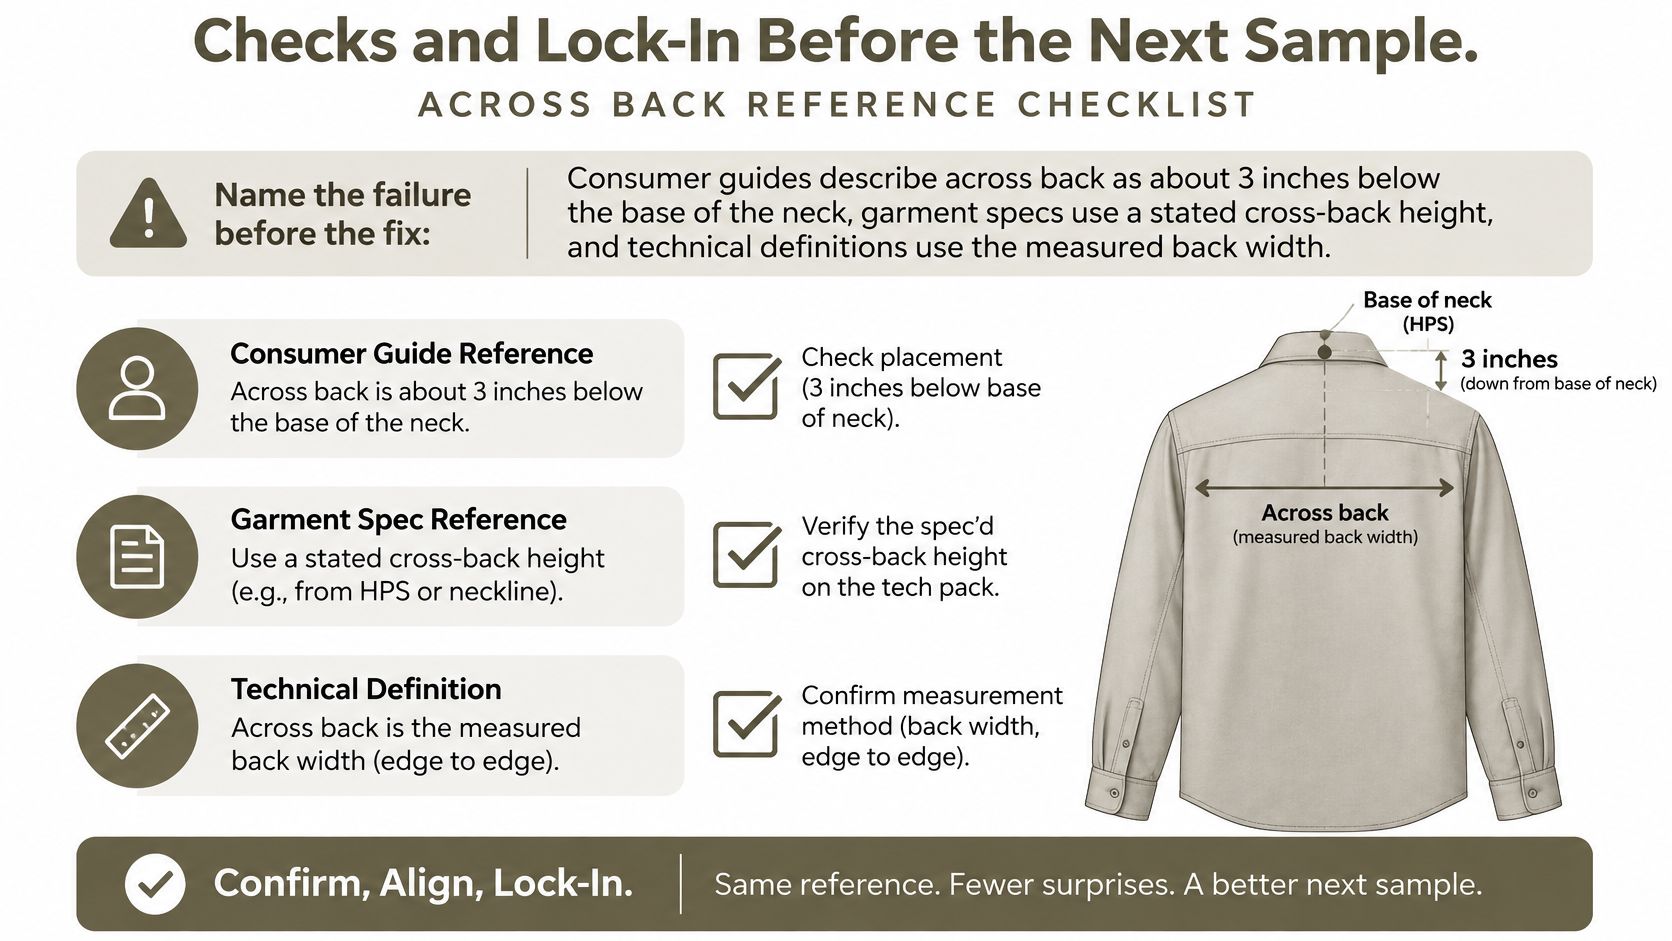
Two people can follow those instructions correctly and still record different values because of vertical landmark, posture, tape tension, or body versus garment. Width without height isn't reproducible enough for factory communication. Write the height beside every width, every time.
Read the Symptom Before You Change the Number
- Tight reach with a correct chest: Check whether back width was substituted for across-back shoulder width, narrowing the armhole area.
- Flat spec matches but the model binds: Check whether ease was never added, so the factory correctly sewed a garment to a body number.
- Two factories disagree on the same sample: Check whether one measured at the arm-scye level and the other at a midpoint between scye levels.
- Shoulders look right but sleeves twist: Check front and back balance and sleeve position, not only total width.
Don't send a revised guess when the fit model and flat sample disagree. Send a landmark sketch with the number, showing endpoints and height, and ask the factory to measure from that sketch. A new number without a new landmark definition just moves the argument to the next sample round.
Run the Pre-Send Check
Confirm you measured from the same side of the body, with arms down and the tape level. Confirm you have two readings that agree within your tolerance, the height written beside the width, ease on its own line with its reason, and tolerance named by product class. Run this alongside your full tech pack checklist before you send so the across-back line doesn't pass locally while another point of measure contradicts it.
Approve the sample only when the across-back line names its height and states body or garment. If either field is blank, the spec isn't locked.
Lock the measurement as six fields in your points-of-measure list: measurement name, vertical height, body or finished flag, value in centimetres, ease with its reason, and tolerance. Our generated tech packs include points of measure, such as sleeve length and shoulder width, in centimetres, so those fields sit in a consistent table instead of scattered notes. That consistency is part of what clients point to when they say, “Two seasons of tech packs in the time one used to take.” Maya R., Head of Product at an apparel group, put the time saving that way.
Grade from the size span that matches your customer, not from one fit-model reading stretched across the range. Keep front and back balance in view because this measurement also affects sleeve position, arm mobility and reach. When shoulder slope or posture is the open question, use a wear test or a 3D check rather than asking one width to certify the whole upper back. A person can match your across-back target and still need a different shoulder angle.
Do the final read as a factory checker would. Can you find the endpoints from the words alone, place the tape at the stated height, and tell whether you're checking a body target or a finished garment? If you can't, the factory can't either. Fix the fields now, while the correction is still a line in a document instead of another physical sample.
Turn your locked across-back fields, including landmark name, height, body or finished flag, ease and tolerance, into a complete factory-ready tech pack with Genpire. Build the measurement table alongside your concept, construction details and size specs in one workspace, then share that single clear spec with your factory before the next sample is cut.