Your sample fits, the silhouette looks right, and the factory is asking for the rest of the sizes. You open the pattern file and face a deceptively simple question: how much should each piece grow? Adding width everywhere might preserve the outline on screen, but it won't necessarily preserve the fit on a person.
Understanding pattern and grading starts with separating garment shape from size changes. The useful question isn't just whether the next pattern is larger. It's whether its shoulder, bust, waist, hip, and length relationships still suit the bodies you're dressing.
Table of Contents
- Pattern Making and Grading Side by Side
- Why Size Labels Do Not Mean the Same Measurements
- How One Base Pattern Becomes a Full Size Range
- When a Single Grade Rule Stops Fitting
- What a Graded Pattern Specification Must Contain
- Common Grading Errors and How to Fix Them
- Approve Grades Before Bulk Production
Pattern Making and Grading Side by Side
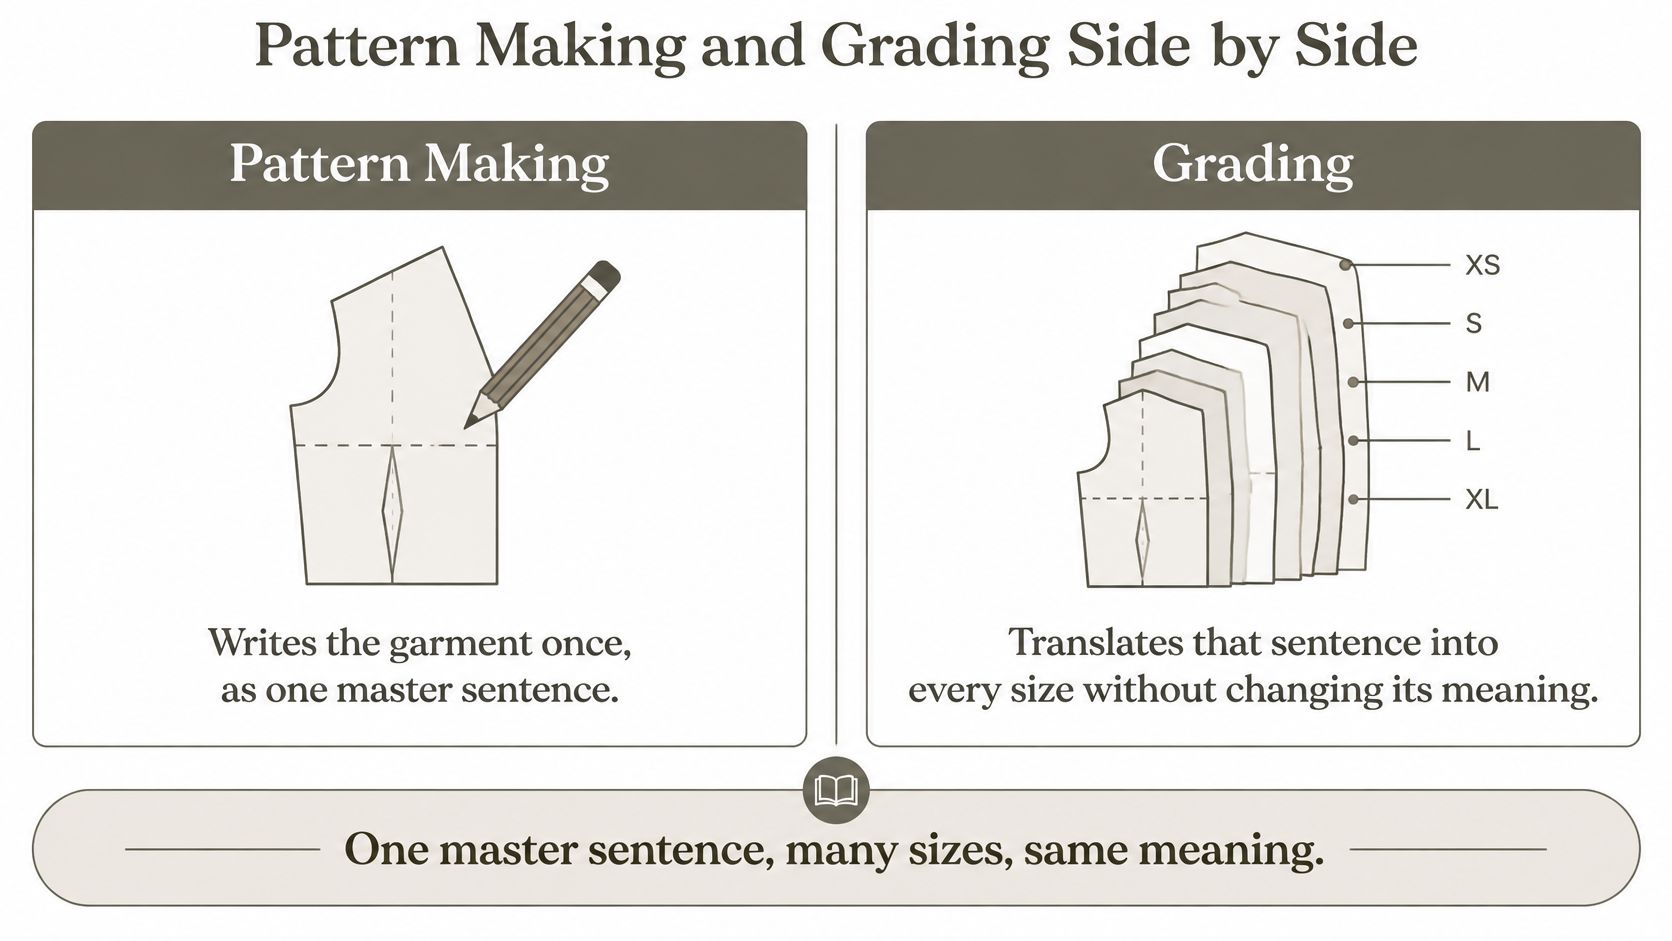
Pattern making writes the garment as one master sentence. Grading translates that sentence into every size without changing its meaning. The words may take up different amounts of space, but the design should remain recognizable.
A pattern maker develops the base pattern in a selected size, then tests its shape through a fit sample. They adjust details such as shoulder slope, dart position, sleeve pitch, and balance until the garment works on the intended body. Grading starts with that approved shape, not an unresolved draft.
Specification is the accompanying set of instructions. It tells the factory what to cut, assemble, measure, and approve, rather than leaving those decisions to interpretation.
Pattern making, grading and specification compared
| Stage | What It Produces | Question It Answers | Main Output |
|---|---|---|---|
| Pattern making | One validated base pattern for one size | How should this garment be shaped on the body? | Drafted block and named pattern pieces |
| Grading | A complete size range built from the base | How does each size differ from the base? | Nested pattern set and grade rules |
| Specification | Factory instructions for building and checking | How must it be built, measured and approved? | Tech pack with points of measure, construction and components |
Consider a fitted shirt. Moving the bust dart to suit the base fit model is pattern making. Moving the dart and surrounding edges appropriately through the size range is grading. Recording how the factory measures the finished chest is specification.
These aren't interchangeable fixes. If the base shirt twists because its balance is wrong, changing the size label won't correct it. If only the outer sizes fail, repeatedly altering the base may damage a fit you've already resolved.
Before grading: Confirm that the base fits the target body, named pieces have compatible seams and grain lines, and measurement locations are agreed.
Walk adjoining seams along their stitching lines, checking intended ease and notch positions. Then compare the approved sample with the target body's measurements. An attractive flat pattern isn't sufficient evidence that the base is ready.
Why Size Labels Do Not Mean the Same Measurements
A size label identifies a position within a sizing system. It doesn't tell you the actual body measurements unless you also know which chart the brand uses.
The historical measurements below, reproduced in The People-Sentinel's account of clothing-size inconsistency, compare women's size 14 and size 18 in the 1920s and 1967, showing how the same labels could describe different bust, waist, and hip measurements.
Women's size 14 and size 18 measurements, 1920s and 1967
| Size and Year | Bust (in) | Waist (in) | Hip (in) |
|---|---|---|---|
| Size 14, 1920s | 32 | 27 | 35 |
| Size 14, 1967 | 36 | 27 | 38 |
| Size 18, 1920s | 36 | 28 | 39 |
| Size 18, 1967 | 38 | 31 | 42 |
Read across the rows rather than treating the label as a fixed quantity. The bust, waist, and hip haven't shifted together in a uniform proportion. A historical label therefore can't serve as a dependable shortcut for drafting or approving a contemporary garment.
Compare charts before comparing samples
Say a factory receives a shirt marked medium and selects its familiar medium block. The brand may intend a different shoulder width, torso length, or bust-to-waist relationship. Both teams can follow their own charts accurately and still produce a disputed sample.
Separate body measurements from finished garment measurements when resolving that disagreement. The body chart describes the customer; the garment specification includes the space or stretch relationship needed for the intended fit. A relaxed shirt shouldn't be rejected merely because its finished chest exceeds the customer's bust measurement.
Before approving the sample, ask the technical team to place the brand's chart beside the chart used to develop the pattern. Compare measurement definitions as well as values: a waist measured at the natural waist isn't interchangeable with a garment waist measured at a dropped seam.
- Identify the chart: Record its owner, revision, target customer, and measurement units.
- Confirm the landmarks: Agree where bust, waist, and hip are measured.
- Separate fit allowance: Document the intended relationship between body and garment.
For a quick check today, write down the bust, waist, and hip assigned to the labelled size. Confirm that those body measurements match the chart named in the tech pack before judging the sample.
How One Base Pattern Becomes a Full Size Range
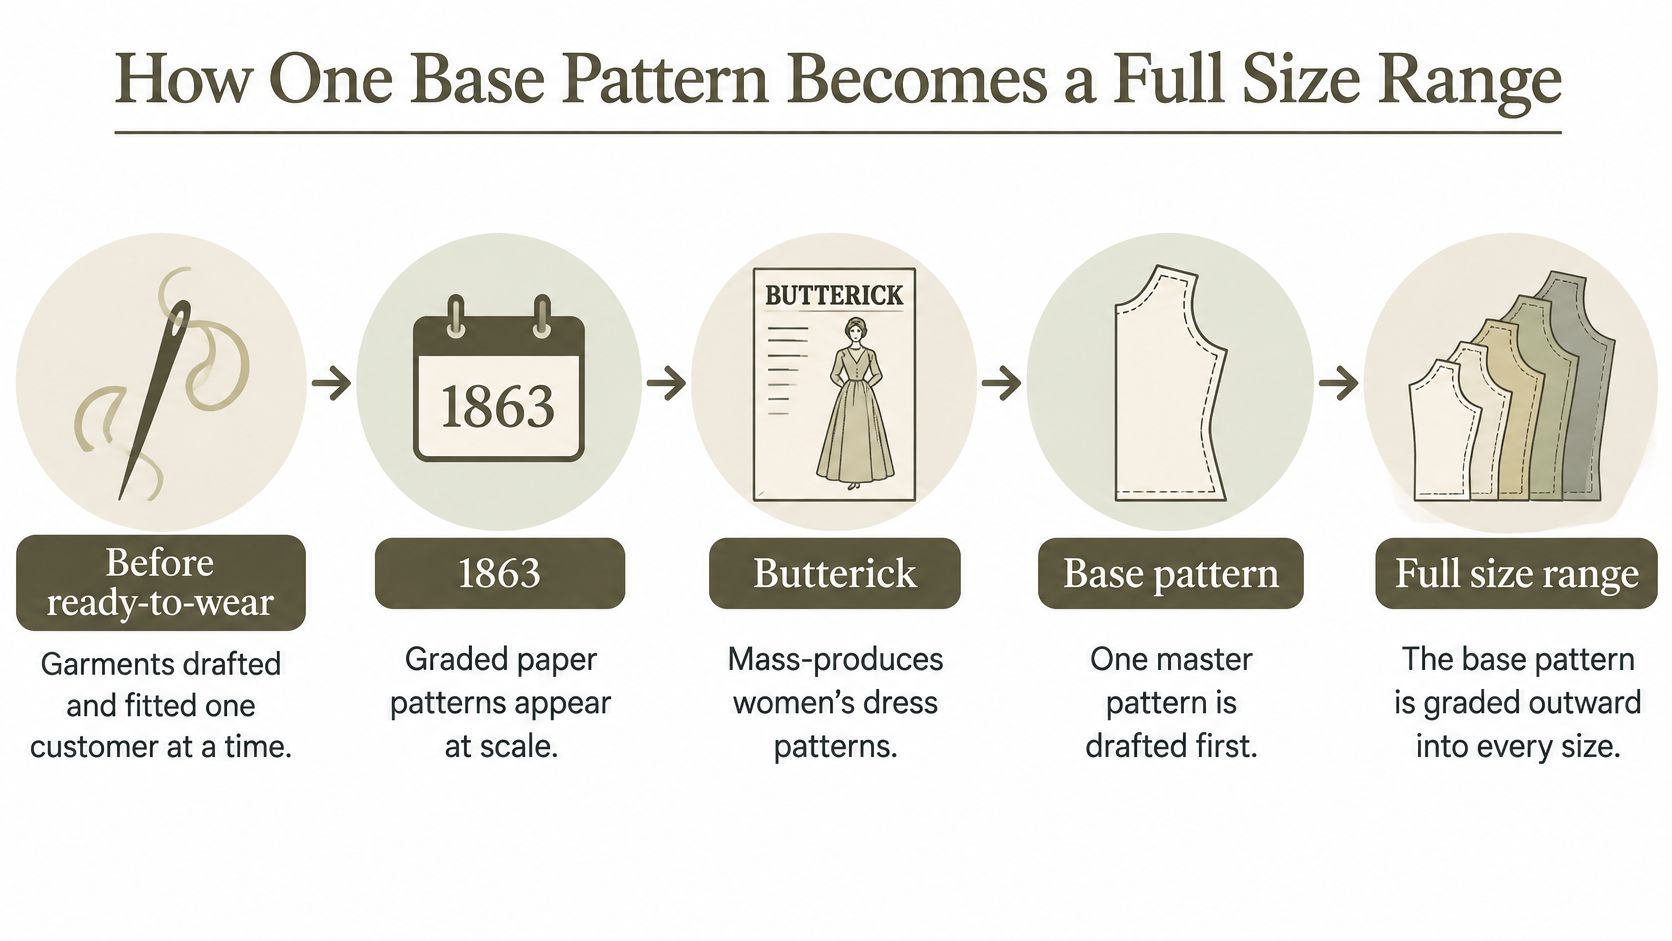
Before ready-to-wear production, tailors and dressmakers drafted and fitted garments for individual customers. According to the history of pattern grading, graded practical paper patterns appeared at scale in 1863, and Butterick was mass-producing women's dress patterns by 1866.
That shift made it possible to reproduce a design in standardized sizes without drafting each customer's garment from scratch. The underlying task remains controlled pattern adjustment, not photographic enlargement.
Build the range in a controlled sequence
Confirm the base size and chart. Match the approved pattern revision to its fit record and intended body measurements. Check that the starting shoulder, bust, waist, and hip relationships describe the target customer, rather than accepting a familiar sample-size label.
Mark the grade points. Identify the cardinal points where movement controls shape, including shoulder ends, armhole landmarks, side seams, waist positions, and hem corners. Include shaping features such as darts and panel junctions; check their positions against the body's landmarks before assigning movement.
Set horizontal and vertical increments separately. Horizontal movement contributes to circumference changes, while vertical movement changes lengths and landmark positions. Determine these from the target chart and fit intent, checking whether torso or sleeve growth is justified by measured bodies.
Move the points and redraw the lines. Apply the approved increments in pattern-grading software, then blend curves and reconnect edges. Walk the resulting stitching lines, preserving intended seam ease, and check whether the new shape still provides appropriate room over the body.
Nest the sizes. Display the graded pieces over one another so you can inspect how points and curves progress. Investigate unexpected crossings or abrupt changes, but don't force every contour into equal spacing merely to make the nest look tidy; compare suspect areas with the target measurements.
Export the pattern and grade table together. Include size identification, named pieces, notches, grain lines, and the rule information needed to reproduce the grade. Verify the exported dimensions against the approved chart and keep unresolved fit questions visible for sampling.
Check the garment, not just the outline
A circumference change must be distributed across the relevant pieces. On a panelled bodice, that means deciding how much change belongs at each panel and side seam, not placing the entire increase at the outer edge.
The distribution affects silhouette. Adding width only at the side seam may leave inadequate room over a prominent bust even when the total circumference looks correct. The cutter must consider where the wearer needs the space.
A clean nest is a geometry check, not a fit approval. Smoothly spaced lines can still describe the wrong proportions.
Horizontal and vertical increments don't have to match, and neither must remain identical throughout the range. Finish by checking seam compatibility at each size and comparing the resulting garment measurements with the chart's intended body-to-garment relationship.
When a Single Grade Rule Stops Fitting
Matching circumference doesn't guarantee good fit. A garment can meet its chest and hip specifications yet sit badly because the wearer needs a different torso length, shoulder structure, or distribution of volume.
A study of the body–garment relationship describes multiple body forms within a nominal size and notes the use of a ±1-inch tolerance, a 2-inch total range around a measurement criterion, to classify subjects as the same size. That classification tolerance isn't a universal garment-production tolerance.
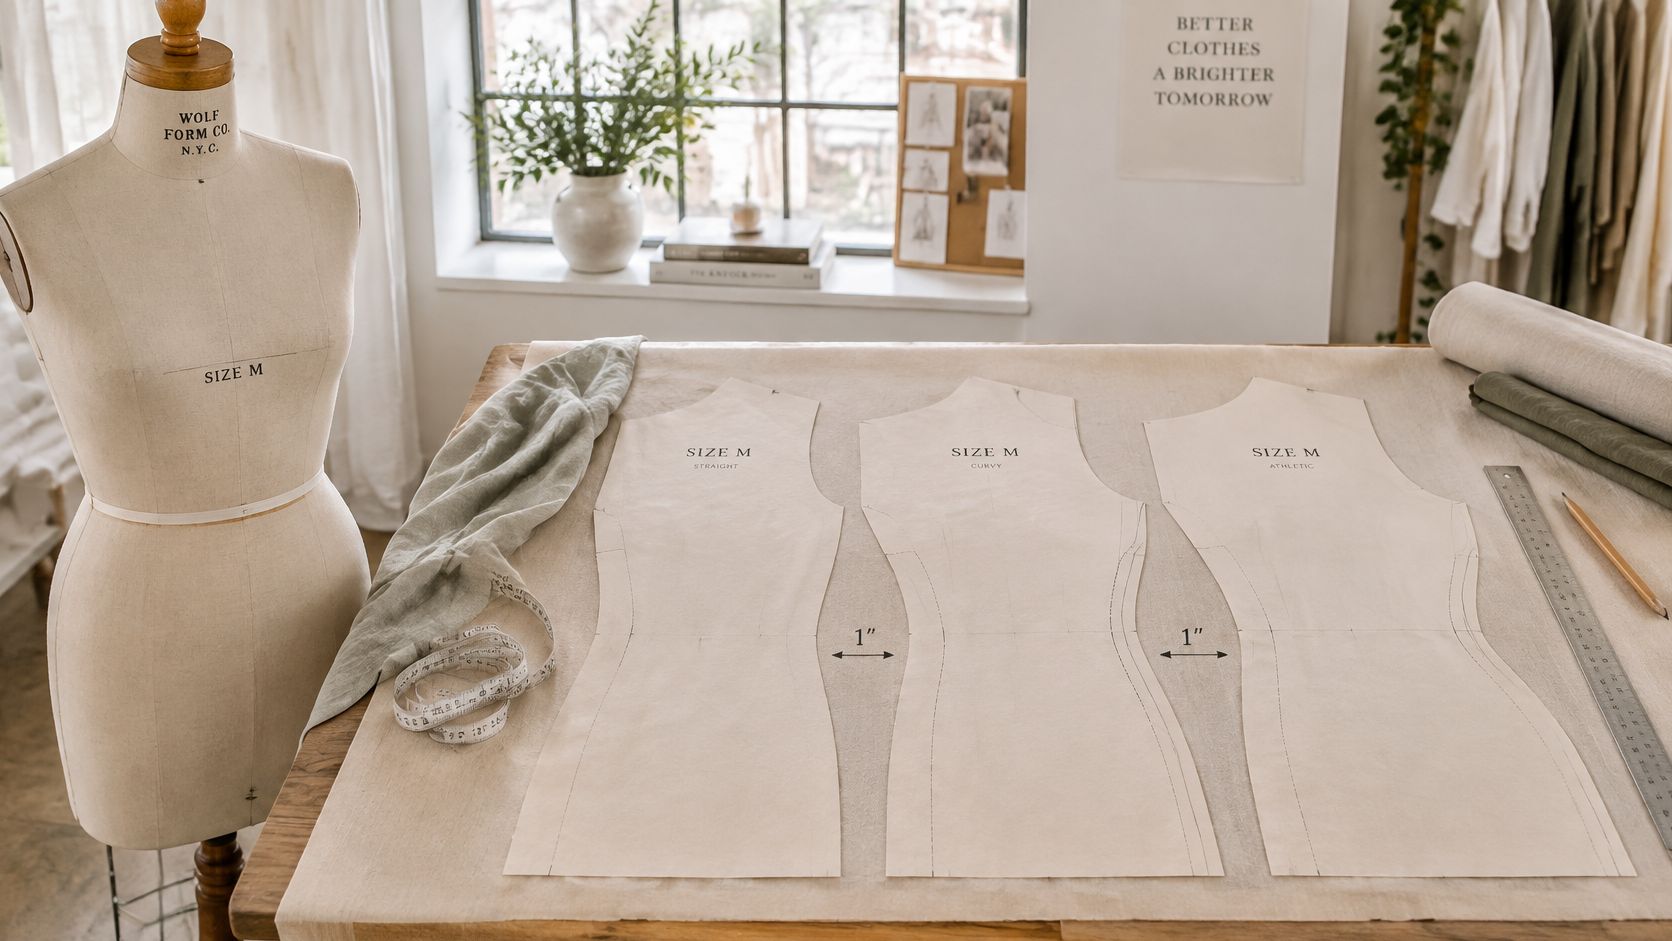
Consider wearers with similar bust circumferences. One may have a fuller bust and narrower back; another may have broader shoulders and less front projection. The garment needs different front-to-back shaping even though the tape measure gives a similar total.
Distinguish size growth from shape change
A single-axis grade treats a complex fit problem as movement along one main dimension, typically girth. If the cutter also adds length automatically as girth increases, the resulting garment may become too long without providing the shaping the wearer needs.
At larger sizes, inspect armhole depth and contour, shoulder position, front balance, and available ease. An enlarged armhole may gape, while an unchanged front-length relationship may pull the hem upward over the bust. Neither problem is reliably solved by adding more circumference.
Use a target-population workflow:
- Define the body chart: State which customers and fit intentions the range serves.
- Prioritize shape factors: Identify whether shoulder breadth, torso length, bust projection, or hip prominence most affects this garment.
- Grade with those relationships: Keep circumference and length decisions separate.
- Test the range: Evaluate the smallest, base, and largest sizes through physical fittings or appropriately configured 3D simulation.
- Record the evidence: Keep body measurements, garment measurements, and fit observations together.
Decide when another block is justified
Don't create a separate block because a sample needs a local correction. First establish whether the problem comes from construction, measurement, fabric behavior, or the grading assumptions.
A different block becomes appropriate when a recognizable customer segment repeatedly requires structural changes rather than small adjustments. Examples include a consistently shorter torso or a different bust-to-waist relationship that shifts shaping and balance.
Set acceptance criteria for those relationships before fitting. If a segment falls outside the agreed fit tolerance, develop a separate block or fit family rather than stretching one grade indefinitely. That decision should follow the measured bodies you're serving, not the convenience of keeping a single pattern file.
What a Graded Pattern Specification Must Contain
A graded pattern needs instructions that another technical team can reproduce. A factory shouldn't have to infer point movement from a screenshot of nested outlines or reconstruct the intended fit from a sample alone.
The TextileTuts explanation of pattern grading describes point-by-point horizontal and vertical rules and notes that ASTM D5219 standardizes body-dimension terminology, including landmarks such as natural waist, high hip, and inseam, without prescribing a universal grading interval. Shared vocabulary helps teams communicate, but each brand and block still needs its own approved rules.
Package geometry with measurement instructions
- Nested pattern set: Supply every approved size with consistent piece names, grain lines, notches, and clear seam-allowance treatment. The factory needs to distinguish the stitching line from the cutting line.
- Grade-rule table: Identify each named grade point, its X and Y movement, the applicable size transition, units, and coordinate direction. Explain how movements are distributed across panels, armholes, and shaping features.
- Points of measure and tolerances: Define how the finished garment is positioned and measured. State whether a dimension is a flat width, full circumference, straight measurement, or curved measurement.
Keep pattern points and garment points of measure, often shortened to POMs, distinct. A side-seam point may move in both directions, while the finished chest POM reflects the combined geometry of several pieces.
For organizing the broader document, use the spec-sheet essentials for fashion designers to check that measurement instructions sit alongside the other production requirements.
Include what affects the finished result
- Bill of materials: Identify shell fabric, lining, interfacing, trims, and components. The approved material matters because stretch, recovery, and bulk affect fit.
- Construction notes: Specify seams, closures, linings, and assembly details that influence dimensions or shape.
- Validation comments: Record the fitted size, sample revision, observed issue, approved correction, and responsible reviewer.
A practical grade-table header is Named point | X increment per size | Y increment per size | Applicable size transition | Approval status. State the units explicitly, and put finished-garment tolerances against their relevant POMs rather than confusing them with permitted variation in digital point movement.
Mark unconfirmed entries as pending fit approval and prevent release until they're resolved. Don't let software-generated values look approved merely because the cells are filled.
Keep the specification under version control, with one approved release shared by design, technical, and manufacturing teams.
This is particularly important for digital and AI-generated tech packs. A plausible base-size drawing doesn't establish the geometry of the other sizes; the explicit rules and validation records must travel with it.
Common Grading Errors and How to Fix Them
Inherited grade increments deserve an audit, not automatic trust. A peer-reviewed analysis of women's sizing charts examined 40 charts and found that only 17% of the examined measurements were useful for forming grade rules.
That finding doesn't mean every established rule is wrong. It means a rule's familiarity isn't evidence that it describes your current customer. Test the assumption behind the increment before spending another sample round correcting its consequences.
Grading symptoms, causes and fixes
| Symptom | Likely Grading Cause | Fix |
|---|---|---|
| Armhole pulls or gapes in larger sizes | Shoulder and armhole increments copied from the base | Re-grade the armhole with separate upper-torso increments and check on a fit model |
| Length wrong only in larger sizes | One vertical increment applied to every size | Set length increments by size range and verify torso length on a fit model |
| Measurements match the chart but fit fails | Horizontal increments inherited from an old chart | Audit increments against current measured body data |
| Nested sizes overlap or cross at seams | Grade points not balanced across the seam | Redraw the seam ratio and re-nest all sizes |
| Samples differ across sizes though specs match | Grade rules missing from the specification | Export the grade table and measure the smallest, base and largest samples |
Treat the causes as diagnostic leads, not conclusions. Before changing a grade, rule out sewing error, fabric substitution, shrinkage, and inconsistent measuring technique. A production fault can resemble a pattern fault when you inspect only the finished garment.
Apply the correction at the right stage
If every fitted size shows the same shoulder problem, investigate the base pattern. If the base works but the problem increases through the range, inspect the relevant grade points and how their movements interact.
If different people produce different results from the same files, examine the specification and revision history. The discussion of tech-pack mistakes behind rejected factory samples can help distinguish a missing instruction from a faulty grading decision.
Avoid fixing an armhole by eye without checking its sleeve. Changing one seam can affect cap shape, notch alignment, and intended ease at the adjoining piece.
Before approving the correction:
- Fit the larger sizes: Observe movement, posture, and garment balance on a representative fit model.
- Check body relationships: Compare armhole position and torso length with the target chart and wearer.
- Reconcile the files: Confirm that grade-table increments match the actual movements in the nested pattern.
Document why you changed the rule. Otherwise, the next technician may restore the inherited increment and recreate the same fault.
Approve Grades Before Bulk Production
Approve the range, not just the sample-size appearance. Release the grade only when the technical team can answer yes to each condition:
- Chart identified: The target body chart is named, dated, and attributed in the specification.
- Files reconciled: The grade table agrees with the nested pattern throughout the range.
- Fit evidence recorded: The smallest, base, and largest sizes have been evaluated through physical samples or 3D simulation, with comments saved.
- Tolerances stated: Each measurement point has an explicit acceptance tolerance.
If a condition fails, return the affected work for correction rather than transferring the uncertainty to bulk cutting. Record who must resolve it and what evidence will close the issue.
Through our sample-making process, you can order samples without committing to bulk production. Sampling is a separate transaction; bulk risk is committed only when you place the bulk purchase order.
Our workflow connects prompt-based concept and tech-pack generation, editor revisions, RFQs, quote review, sample ordering and approval, bulk production, and production tracking. That continuity doesn't replace fit validation on real bodies.
Before authorizing production, ask your supplier or internal team: Which body chart supports this grade? Which points carry tolerances? Which sizes were fitted physically? Require specific answers in the approval record.
We help turn product concepts into technical specifications and carry them through sampling and manufacturing. Visit Genpire to develop your garment brief, organize its production requirements, and arrange a sample before committing to bulk production.