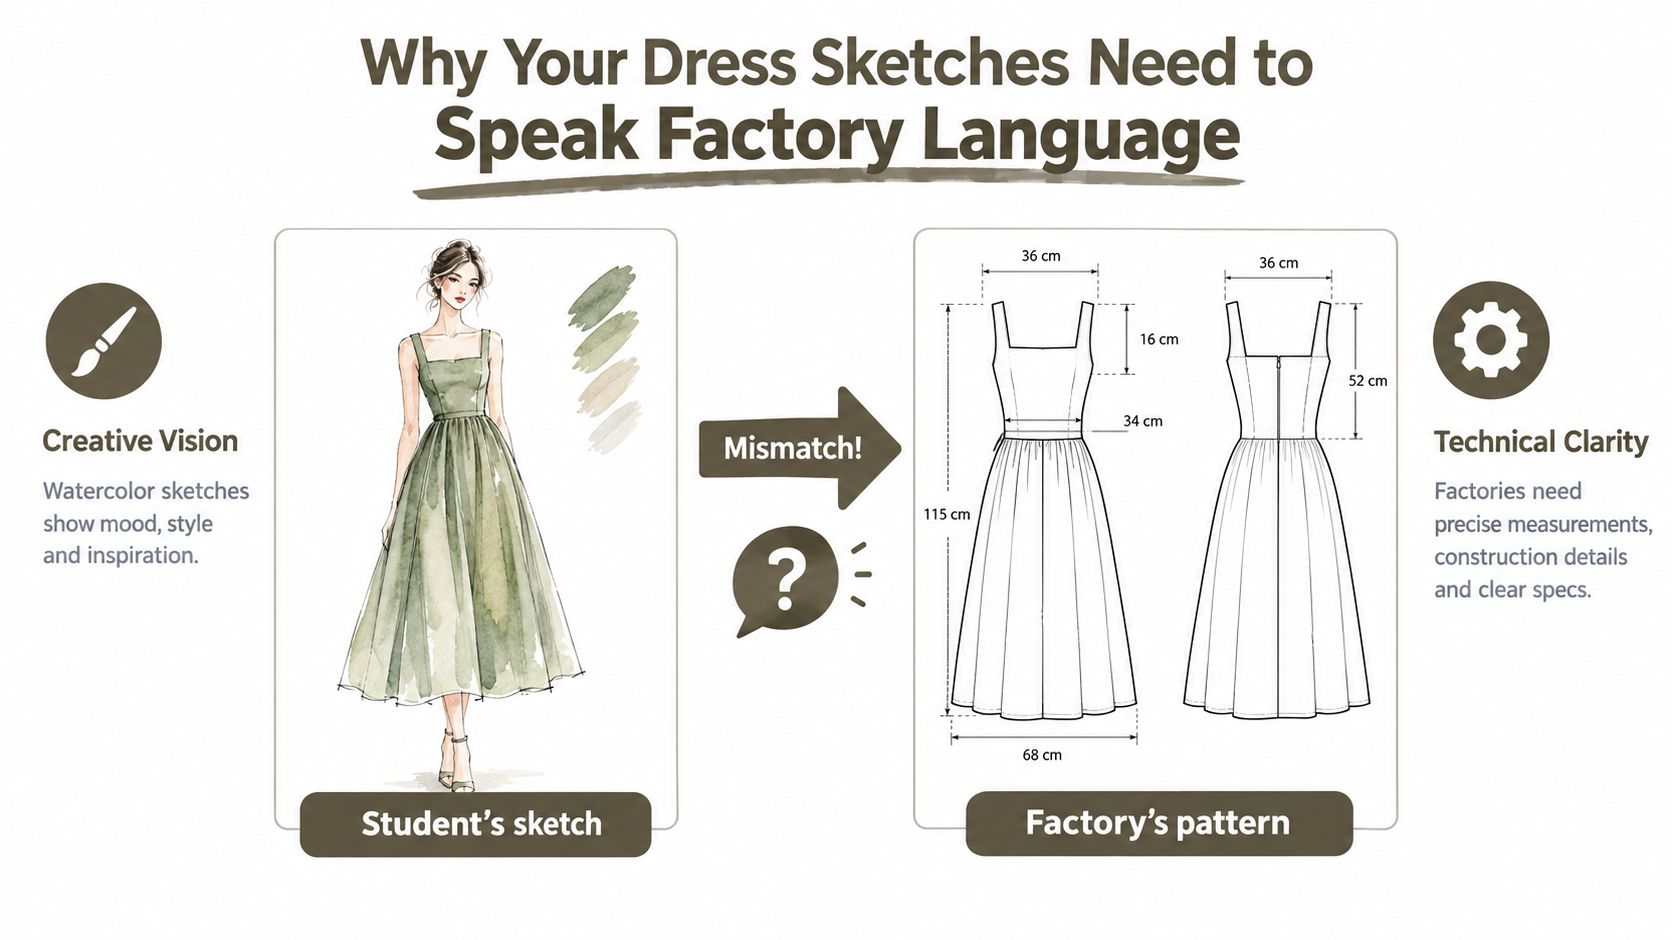
You've spent three days painting a beautiful watercolor of a midi dress. The neckline is elegant, the fabric appears to float, and the proportions look perfect on the page. Then the sample arrives from the factory. The waist sits too high, the back closure is missing, and the soft drape you imagined has become a stiff, boxy shape.
That result doesn't mean you can't design. It means your fashion sketch and your production instructions are speaking different languages. Dress sketches for fashion designing need to express the idea attractively, but they also need to communicate enough construction information for another person, or an AI tool, to reproduce the garment accurately.
Table of Contents
- Why Your Dress Sketches Need to Speak Factory Language
- Setting Up the Right Croquis and Proportions
- Sketching Multi-View Dress Concepts
- Turning Sketches into Technical Flats
- Packaging Sketches for Tech Packs and AI Tools
- AI and Traditional Workflows Side by Side
Why Your Dress Sketches Need to Speak Factory Language
A fashion illustration and a technical flat serve different purposes. Your croquis communicates mood, proportion, styling, and the way you want the dress to live on a body. It can show movement, color, texture, and attitude. A technical flat removes most of that performance and presents the garment as a clear, usually symmetrical view that helps a pattern maker understand how it's built.
Fashion sketches became practical commercial tools long before digital design software. Between 1520 and 1610, more than 200 collections of dress engravings, etchings, or woodcuts were published to show clothing by nationality and social rank, establishing an early prototype for modern fashion illustration. By the late nineteenth and early twentieth centuries, fashion houses worked with illustrators while couturiers draped garments on live models, then sent collection drawings to clients. Historical research on fashion drawing and sketching shows how the sketch moved from artistic record to commercial communication.
Three audiences must understand the same dress
A finished design handoff has to work for three different readers:
- Pattern makers need seam locations, shaping, balance, and garment relationships.
- Production managers need closures, trims, finishing, fabric behavior, and details that affect assembly.
- AI generation tools need clean views, consistent geometry, and unambiguous visual instructions.
A watercolor alone may communicate the neckline beautifully while hiding whether it has a facing, binding, collar stand, or lining. A flat may show the closure clearly but fail to communicate the softness or visual character that made the design compelling.
The strongest workflow keeps both. Start with the expressive croquis, then translate the selected design into front, back, and side flats with construction notes. A useful spec sheet essentials guide for fashion designers can help you organize the information that belongs beside the drawing.
Practical rule: Use the croquis to sell the idea. Use the flat to prevent someone else from inventing the garment.
The following workflow preserves the personality of your dress while making its silhouette, construction, and finishing intent readable on the factory floor.
Setting Up the Right Croquis and Proportions
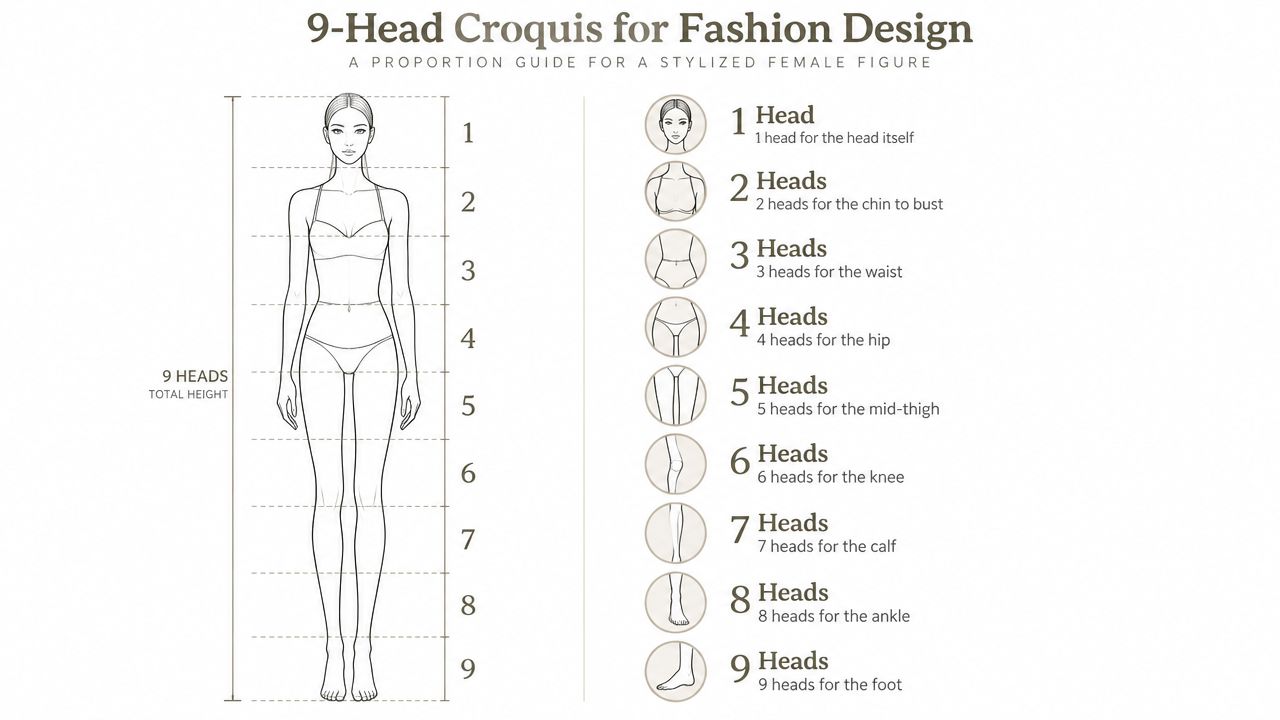
A reliable croquis starts with a repeatable measuring system. In fashion illustration, the head unit provides that system. You measure the figure by repeating the height of the drawn head down the body, rather than guessing the length of each section independently.
A stylized fashion figure commonly uses a 9 to 10 head proportion. The 9-head approach is a practical starting point because it gives students enough elongation for a fashion presentation while keeping the figure easy to reproduce across a collection. A guide to mastering fashion dress drawing also recommends this proportion range for stylized dress drawing.
Build the figure before you draw the dress
Use this sequence:
- Draw the head unit. Treat its height as your measuring tool, not as a final portrait.
- Mark the vertical stack. Place the head at the top, then extend the body using repeated units. The head occupies the first unit, the bust area sits below the chin, the waist follows, and the remaining units continue through the hip, thigh, knee, calf, ankle, and foot.
- Place the waist. For the standard beginner croquis, the waist sits about 2.5 heads from the top. Keep this mark stable each time you reuse the template.
- Draw the centerline. This line controls balance and helps you see whether the figure is standing, leaning, or twisting.
- Add the shoulder and hip lines. These lines establish posture before you add the outline.
- Block the limbs with simple strokes. Avoid drawing fingers, facial features, or fabric details until the balance is convincing.
The ideal croquis is narrow and elongated, with a width-to-height relationship of about 1:3. That ratio belongs to the stylized figure, not to the finished garment. A wide ball gown or oversized sleeve can extend beyond it, but the underlying figure should remain consistent.
Check posture before adding fabric
Look at the figure as a set of alignment points. The ears should relate consistently to the shoulder edges. The hip bones should be level unless you deliberately want a contrapposto pose. The weight should be distributed clearly, or the dress will appear to lean for reasons unrelated to its design.
Beginners often shrink the head to make the legs look longer. Don't. A smaller head changes every measurement below it and creates inconsistent proportions from one design to the next. If you want a longer editorial figure, enlarge the overall template or move to a 10-head structure, but don't change the measuring unit halfway through a collection.
For additional practice with gesture, silhouette, and figure presentation, study these essential techniques for fashion illustration. If you're working digitally, keep your croquis as a locked layer so your dress changes without disturbing the proportion system. Designers comparing digital workflows can also review CAD alternatives for fashion designers in 2026.
Sketching Multi-View Dress Concepts
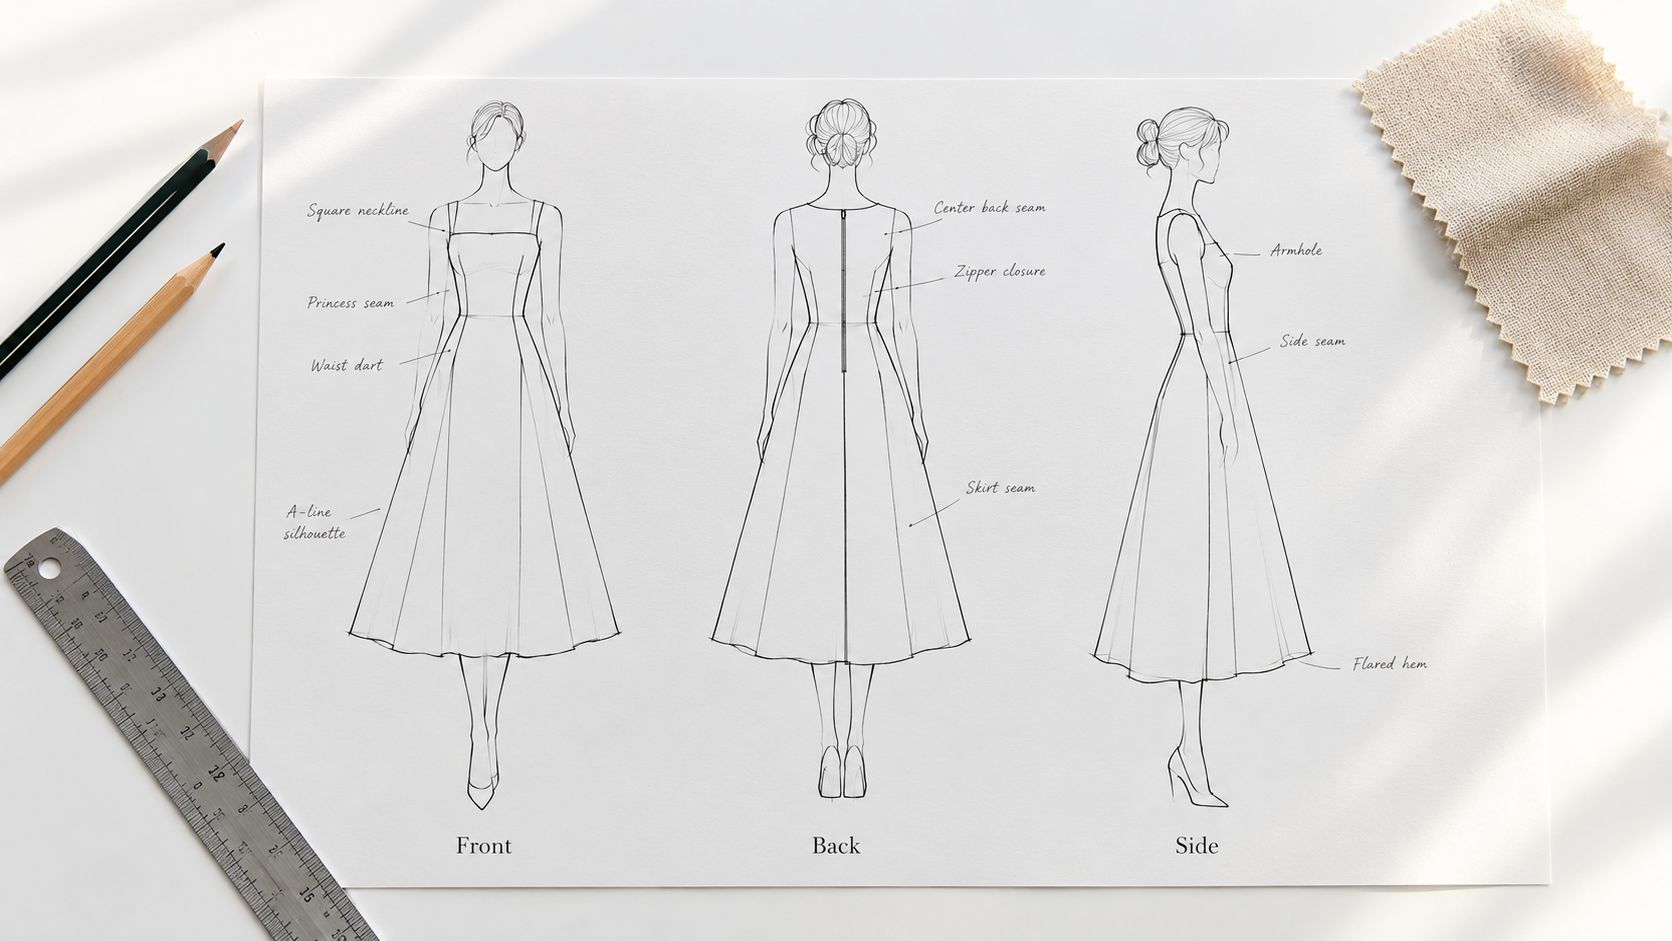
A single front view can make a dress look finished when it's still full of unanswered questions. The back may need a zipper, the side may reveal a dramatic volume change, and the armhole may not match the shape suggested from the front. A multi-view concept exposes those decisions before they become sampling problems.
Start by naming the silhouette in plain language. Is it an A-line, sheath, or fit-and-flare dress? Write that choice beside the sketch. Then lock the major identity points before you repeat the dress across views:
- Overall length
- Neckline shape
- Sleeve or armhole treatment
- Waist position
- Hem relationship to the floor
- Main volume or shaping feature
Transfer the silhouette, not the pose
The front view carries the design statement, but the back and side views must share its proportions. Reuse the same head placement, centerline height, and floor line for all three views. If the front figure is elongated while the side figure is compressed, the dress can appear to change length even when the written design says it doesn't.
Use faint construction lines underneath the drawing, then place darker final lines over them. A clean technical presentation needs a clear distinction between temporary guides and confirmed garment edges. Pencil scratches, repeated contours, and accidental overlaps make a pattern maker wonder whether a line represents a seam, a fold, or an abandoned idea.
Let structure show through placement
A shoulder seam should sit at the actual shoulder point unless you're designing a dropped or extended shoulder. A side seam should appear only where the garment edge or construction line makes sense. If it disappears behind the body in the front view, show its consequence in the side or back view rather than forcing a dark line through the figure.
Keep the hem parallel to the floor in a technical view. If the design has an intentional high-low hem, show the difference clearly and label it. Gathers, pleats, and drape need directional folds. Random shading suggests texture, but directional folds explain how the fabric is being pulled, released, or supported.
Before moving to a flat, check the drawing from a distance:
- Can you identify the silhouette without reading the notes?
- Are the hems level and consistent across views?
- Do the armholes and sleeve attachments correspond?
- Does the back closure appear somewhere?
- Are gathers, pleats, and draped sections shown with purposeful lines?
The same logic applies when you digitize your shirt sketch, even though a dress usually involves more shaping and volume. If a line doesn't communicate body structure, garment structure, or fabric behavior, remove it or explain it.
Turning Sketches into Technical Flats
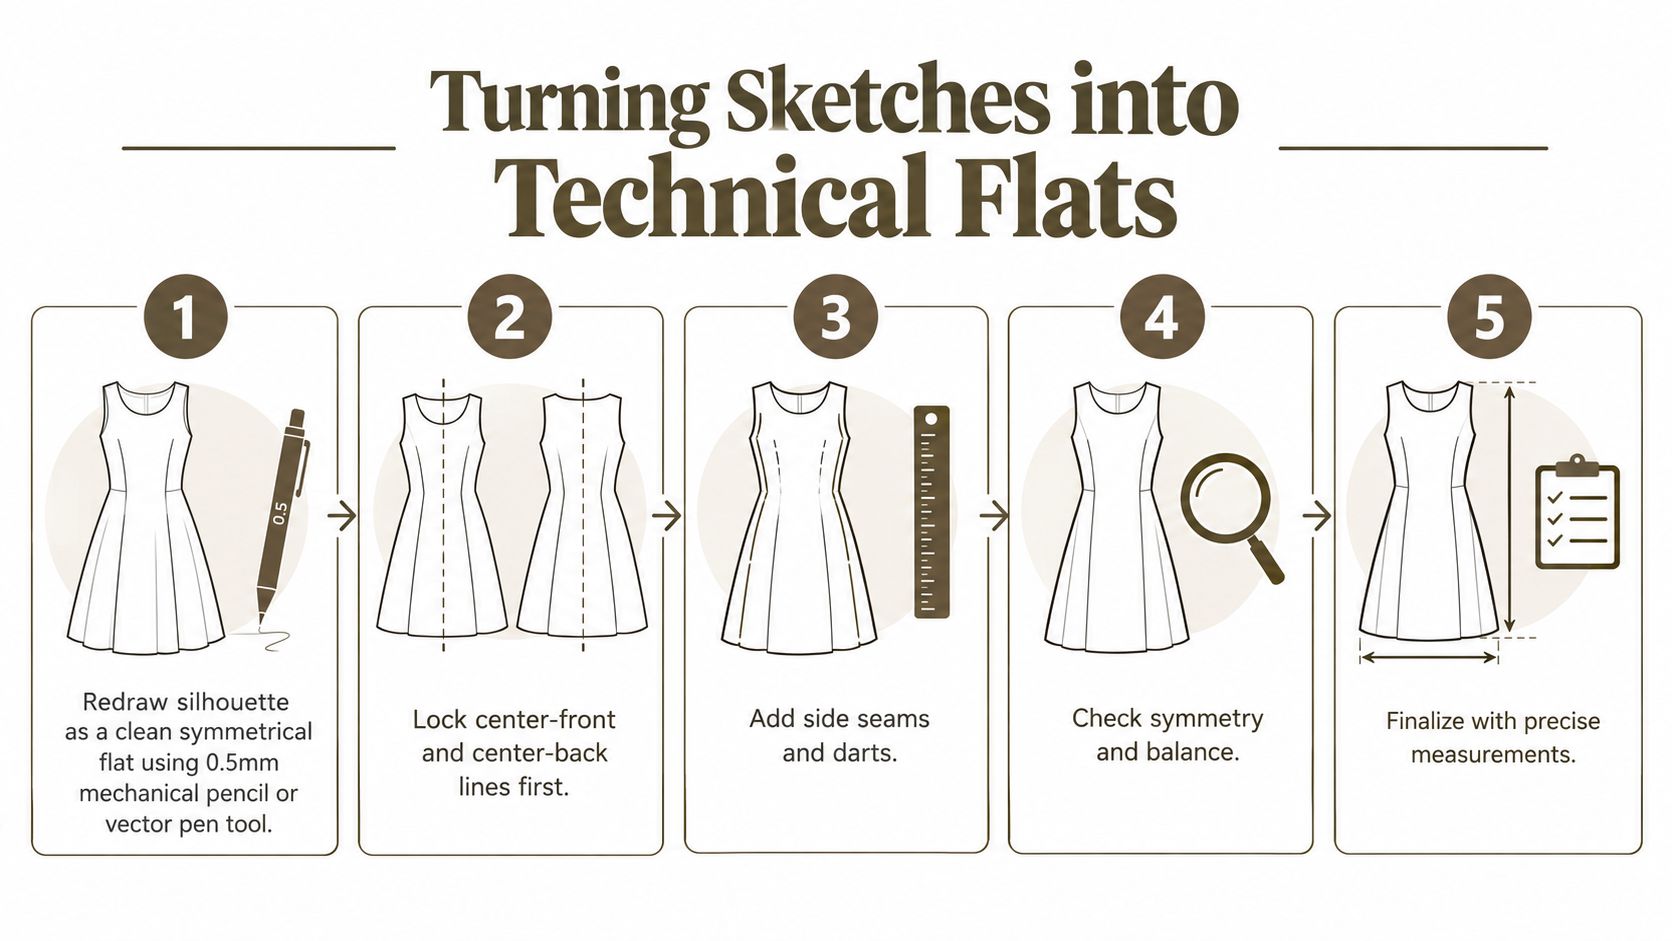
A technical flat is not a smaller fashion illustration. It's a construction document. Begin by redrawing the chosen silhouette as a clean, symmetrical shape, using a 0.5 mm mechanical pencil or a vector pen tool. Lock the center front and center back first, then build outward to the side seams.
Build the flat in controlled passes
Work from large decisions to small ones:
- Block the shape. Draw the outer silhouette, neckline, armholes, sleeves, and hem.
- Refine the balance. Mirror the left and right sides where the garment is symmetrical. Confirm that the waist, hip, and hem relationships make sense.
- Add construction. Draw princess seams, bust darts, French darts, waist darts, pleats, vents, panels, and yokes.
- Add finishing. Include topstitching, facings, linings, bindings, hems, closures, labels, and hardware.
- Annotate the decisions. Use numbered callouts with leader lines that correspond to the bill of materials.
The technical flat must show how the garment is shaped. For example, a 1.5 cm princess seam needs a clear seam path from its starting point to its endpoint. A 2 cm bust dart needs a dart intake and direction that a pattern maker can interpret. A French dart or waist dart shouldn't be represented by decorative lines that stop before the actual shaping point.
Make measurements and symbols unambiguous
Use parallel offset lines when you need to show seam allowances. Mark notches as small triangles. Draw the grainline as a long arrow parallel to the center front. These marks belong to the production conversation, not the fashion pose.
Closures need complete descriptions. A note such as “buttons” leaves too much open. A clearer instruction might read, “7 mm button, 2.5 cm spacing, 5 buttons.” For a back closure, specify “concealed zip, 40 cm, center back.” Add the placement, length, and type wherever the information affects pattern or assembly work.
Topstitching should identify distance and location, such as 3 mm from the edge. A hem note should state the depth, such as 4 cm, and identify whether the section is faced, turned, blind-stitched, or finished another way. If the garment is lined, show the lining layer and state where it ends.
Before the flat enters the tech pack, inspect it as if you're a factory receiving it without a phone call:
- Are front and back symmetrical where intended?
- Are any annotations missing?
- Does every symbol have one meaning?
- Do callout numbers match the BOM?
- Can another person tell which lines are seams, folds, stitch lines, and garment edges?
If you're choosing an iPad workflow, compare drawing programs carefully to find the right iPad creative app. Once the illustration becomes a specification, a structured handoff such as moving from Illustrator to a tech pack helps prevent design intent from getting lost between files.
Packaging Sketches for Tech Packs and AI Tools
A good sketch can still fail if the receiving team can't identify the correct version. Treat each dress as a controlled design record. Create a dedicated folder using the style number, season, and revision, then keep the croquis, flats, callouts, swatches, and specification files together.
Your preview files and production files have different jobs. Export flats as 300 dpi PNG files for presentations and quick previews, then retain vector PDF or AI files for production editing. Use one canvas size throughout a collection, such as A4 or 11 x 8.5 inches, and place a consistent header block at the top.
Put the essential identity on every page
The header should contain:
- Style name and style number
- Designer name
- Date
- Revision
- Scale
- Fabric or swatch reference
- View label, such as front, back, or side
A factory shouldn't have to open several folders to determine whether a drawing is current. Use a filename such as SS26_104_Front_v03.png, then apply the same logic to the back view, detail page, and measurement sheet.
Organize the tech pack in a stable order:
- Cover page
- Mood board
- Front and back flats
- Side flat
- Detail callouts
- Bill of materials
- Measurement specification sheet
- Colorways
- Revision log
The order helps different people find their work quickly. A designer may begin with the mood board, while a production manager may go directly to the BOM and revision log.
Prepare clean inputs for AI
AI tools respond more reliably to clean visual inputs than to crowded screenshots. Export important crops as transparent PNG files with a minimum canvas of 1024 x 1024 pixels, and remove metadata that could confuse a generator. Keep the garment centered, separate from unrelated reference images, and label the view in the filename.
Add a short design-intent note to each style. Describe the silhouette, target customer, fabric character, and construction risks. For example, explain that the dress is a softly structured fit-and-flare style, intended for a customer who wants movement through the skirt, with a risk around maintaining the neckline shape in a fluid fabric.
That note serves two readers. A pattern maker uses it to understand priorities and challenge unrealistic assumptions. An AI prompt system uses it as context for generating or revising visuals. Neither reader should have to infer the entire design from color and pose alone.
AI and Traditional Workflows Side by Side
AI-assisted dress design is useful, but it doesn't remove the need for a disciplined sketching process. Traditional croquis and flats give you control over proportion, seam placement, and construction language. AI can generate varied silhouettes quickly, visualize an atmosphere, and help you explore fabric direction before you commit to a production drawing.
The difference becomes clearer when you compare the workflow by task.
| Criteria | Traditional Sketching | AI-Assisted Workflow |
|---|---|---|
| Speed to first concept | Slower at the beginning, especially while building drawing confidence | Fast for exploring multiple silhouettes and visual directions |
| Control over proportions and silhouette | Direct control over every line, measurement, and relationship | Useful for variation, but outputs may shift proportions between views |
| Accuracy of technical details | Strong when the designer understands flats and construction | Requires manual checking and refinement |
| Cost of revisions | Revisions take drawing time, especially for detailed flats | Early visual changes can be quick, but incorrect details create cleanup work |
| Readability by factory partners | Clear when views, annotations, and construction symbols are complete | Readable only after the output is converted into a controlled technical handoff |
Where traditional drawing remains strongest
Human-drawn flats are better suited to decisions that depend on manufacturing reality. A designer can deliberately place a seam where a pattern can support it, indicate how a dart transfers into a panel, and notice that a trim would interfere with a closure.
A pattern maker can also question the drawing. That conversation matters. If the sleeve cap, armhole, and shoulder line don't relate correctly, a human reviewer can flag the issue before sampling.
Where AI earns its place
AI is valuable during open-ended exploration. It can help you compare a sheath dress with an A-line version, test alternate sleeve volumes, or visualize how a matte fabric differs from a reflective one. It can also produce mood imagery for a client presentation when you haven't yet selected the final construction.
AI commonly fails in ways beginners may miss:
- Seam lengths can change between front and back views.
- Trims may appear attractive but have no clear sourcing or attachment method.
- Buttons, zippers, and closures can move or multiply.
- Fabric folds may look persuasive while ignoring grain, tension, or support.
- A generated silhouette may smooth over the difficult construction decision instead of solving it.
Treat the tool like a junior concept artist. Give it a precise brief, inspect every output, and keep responsibility for the final technical drawing. A hybrid workflow can begin with a prompt or rough sketch, use AI to expand visual options, then return to the designer for proportion control, construction editing, and factory-ready flats.
Genpire offers one example of this hybrid approach. Its platform can turn prompts, sketches, or reference images into multi-view product concepts and structured production assets, with an AI Editor for revisions and exports to SVG, PDF, and Excel. Whatever tool you choose, the same standard applies: the final file must communicate the garment rather than merely resemble it.
The best dress sketches for fashion designing carry both sides of the work. They show why the dress should exist, then explain how another person can build it. Start your next style with a consistent croquis, create matching views, convert the chosen design into a detailed flat, and package every revision so no factory partner has to guess.
If you're ready to turn dress concepts into coordinated multi-view visuals, technical specifications, and production assets, explore how Genpire connects sketch-based design with factory-ready documentation. Upload a sketch or describe the garment, then use the resulting views and construction details as a controlled starting point for your next tech pack.