You've got a tape in one hand, a fit model shifting her weight in front of you, and a spec sheet that just says "neck to waist." You take a reading, your patternmaker asks "front or back," and you realize the number you've written can't answer her. That happens because a neck to waist measurement isn't one length. It's a specification you have to define before the tape touches the body.
Table of Contents
- Which Neck-to-Waist Length Your Garment Needs
- Tools and Landmarks to Set Up First
- Waist Landmarks That Change the Number
- How to Take the Measurement Step by Step
- Common Mistakes and How to Fix Them
- Recording the Measurement for Tech Packs and Fit
- Confirm the Measurement Before You Cut
Which Neck-to-Waist Length Your Garment Needs
Neck to waist is three measurements, not one. A front neck-to-waist, a back neck-to-waist and a side neck-to-waist can differ by several centimetres on the same body because each follows a different surface. Use the wrong one and the bodice balance is wrong before you cut.
| Measurement | Start Point | End Point | Use It For |
|---|---|---|---|
| Front neck-to-waist | Front neck point at the base of the throat | Marked waist level, tape follows the front torso | Front-neck bodices, blouses, V-neck and wrap designs |
| Back neck-to-waist | Back neck point at the prominent vertebra | Marked waist level, tape follows the back torso | Racerbacks, open-back and low-back designs |
| Side neck-to-waist | Side neck point where the neck meets the shoulder line | Marked waist level, tape follows the side seam | Jumpsuits, one-piece garments and side-seam fit |
Define the measurement before you collect it. The ISO 8559-1 sizing framework distinguishes the front neck point, back neck point, neck-base line, waist level and the specific path between them, so neck to waist isn't interchangeable with center-front length, center-back length or side-neck-to-waist length. ISO's framework is also based on body measurements rather than garment measurements, so don't substitute a finished-garment length for the wearer's value.
Name the start landmark, tape path and waist level in every spec. A label that says only "neck to waist" can produce three incompatible lengths in one factory, especially in supplier handoffs and AI-generated patterns.
Practical rule: If the garment is a front-open top, use the front value. If it closes at the back or sits on the side seam, switch to the matching row and write the chosen variant into the spec before measuring.
Use a complete tech pack template page by page guide so that choice lives with the points of measure, not in a separate note someone can lose.
Tools and Landmarks to Set Up First
Don't improvise your kit while the subject is standing there cooling off. Set it out first, then mark the body.
- Flexible tape in centimetres: Check that the end clip isn't bent and the first centimetres are legible.
- Fine pencil or fabric marker: Use small dots, not broad lines that blur the endpoint.
- Second person or full-length mirror: You need a side view you can't get while holding both tape ends.
- Fitted clothing or bodysuit: No folds, hoodies or excess ease under the tape.
- Stool nearby: Useful for the measurer to get eye level with the waist mark without crouching and pulling the tape.
The Three Neck Landmarks
Find the front neck point at the base of the throat where the collarbones meet. Find the back neck point at the prominent vertebra at the base of the neck, which you can feel when the subject drops her chin briefly, then returns to level. Find the side neck point where the neck meets the shoulder line, at the point a shoulder seam would start.
Mark each one with a small dot. A visible dot means you, your helper and anyone remeasuring later start the tape in exactly the same place.
Choose the waist level before the tape goes on, and match it to the garment's waistline seam. The narrowest torso point suits most fitted styles, while a loose or drop-waist garment may need a lower waist level.
Your prep check is simple. The subject is barefoot, hair tied back, in close-fitting clothing, with a clear view of the full tape path from neck to waist.
Waist Landmarks That Change the Number
The waist isn't a fixed anatomical line you can assume. It's a level you choose, and four choices are in common use.
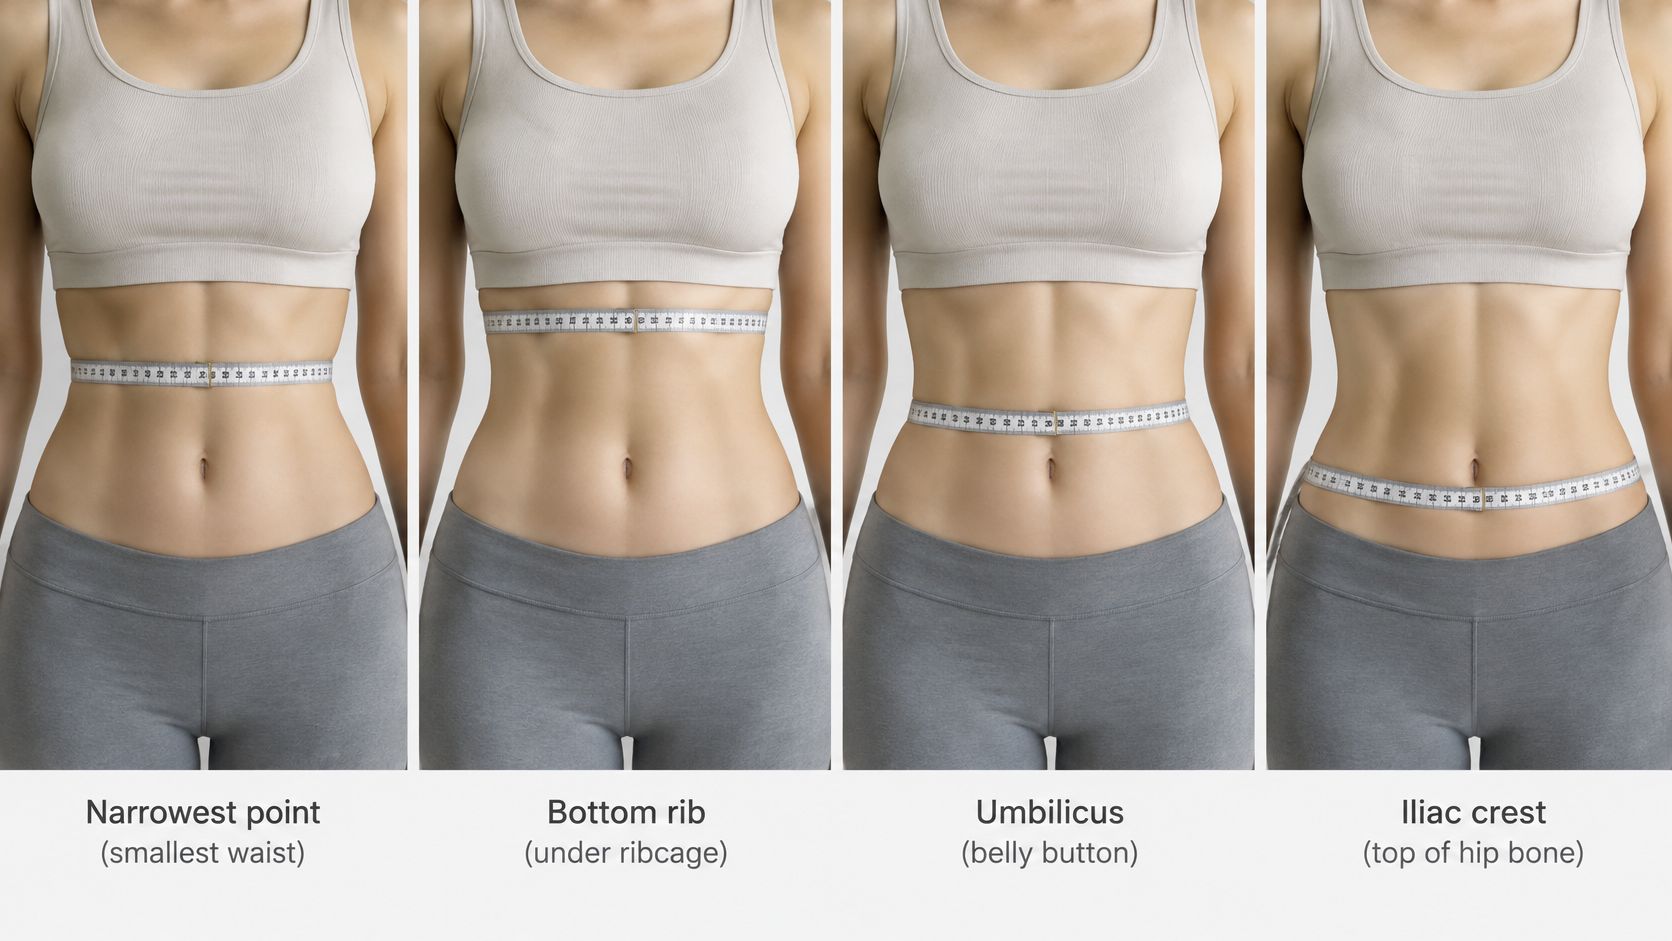
| Waist Landmark | Where It Sits | Height Versus Narrowest Point | Best Suited For |
|---|---|---|---|
| Narrowest torso point | Level of smallest torso circumference | Reference | Fitted bodices and dresses with a defined waist |
| Bottom rib | Lowest rib, above the waist | Above the reference | High-waisted and empire-line styles |
| Umbilicus | Navel level | Below the reference | Low-rise and drop-waist garments |
| Iliac crest | Top of the hip bone | Lowest of the four | Low-slung trousers and jumpsuits |
These competing landmarks are the narrowest torso point, the bottom rib, the umbilicus, or the iliac crest in authoritative protocol definitions summarized in a review of waist and neck measurement protocols, which is why two people can report different neck-to-waist lengths while both follow apparently reasonable instructions. That review also notes the NIH protocol requires erect posture, relaxed abdomen, normal expiration, minimal tape pressure, and repeated measurements.
Say a dress sample pulls at the bust and the waist seam rides up. If one measurer used the bottom rib and the pattern was drafted to the narrowest point, the bodice is too short. The sewing isn't the problem. The endpoint moved.
On a straight figure or a fuller midsection, the narrowest point may be hard to see at all. Don't hunt for an indentation that isn't there.
Choose the lowest consistent landmark that suits the garment, mark it, label it in the spec, and use the same one at every fitting.
This discipline matters most for made-to-measure pieces, dresses, jumpsuits and one-piece products designed for bodies without a pronounced waist indentation.
How to Take the Measurement Step by Step
Consistent waist placement and tape geometry decide whether your number holds up. The CDC NHANES Anthropometry Procedures Manual requires the waist tape to remain horizontal and parallel to the floor, sit snugly without compressing skin, and be read to the nearest 0.1 cm at the end of normal expiration, using a second viewpoint or mirror to verify alignment. Apply that same control here.
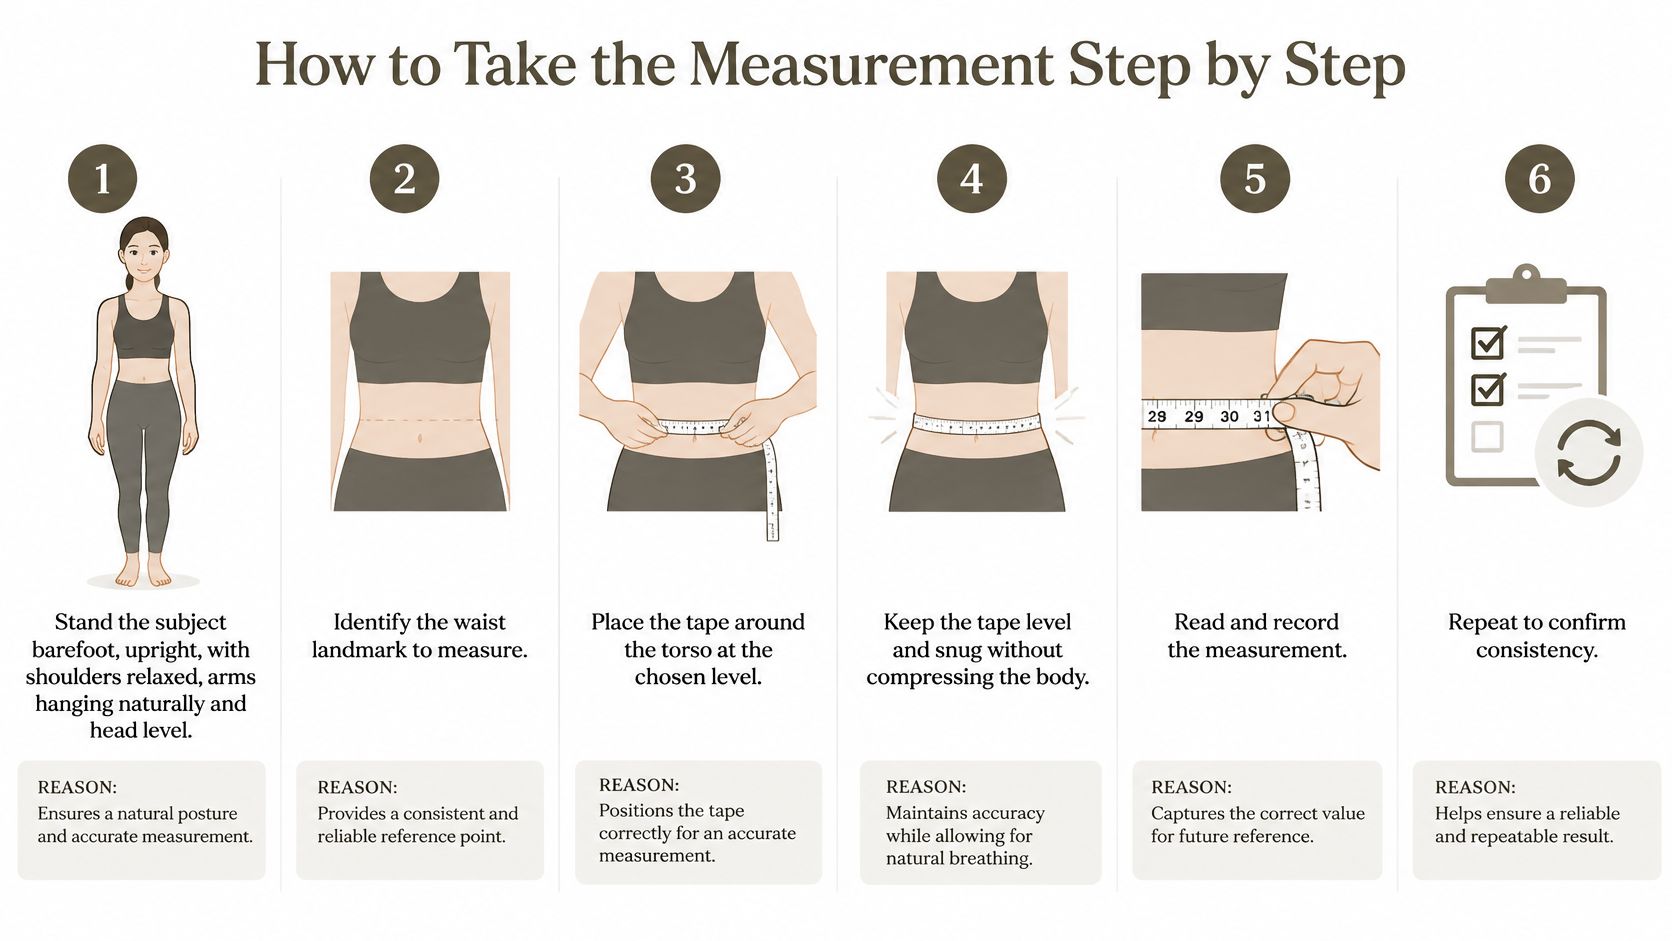
- Set the posture. Stand the subject barefoot and upright, shoulders relaxed, arms hanging naturally and head level. A tilted head or a slouch shortens the front path.
- Mark the neck points. Locate the front and back neck points for your chosen variant and dot them. Don't rely on memory once the tape is in your hands.
- Mark the waist level. Place the waist mark at your defined landmark and confirm it from the side view. The mark can drift when the subject shifts weight.
- Run the tape on the defined path. Place the end at the neck point and follow the body surface to the waist mark, keeping the tape horizontal at the waist and snug without compressing skin. Don't let it droop or cut diagonally.
- Read at the right breath. Read the value to 0.1 cm at the end of a normal breath out, not after a deep inhale that lifts the chest and changes the path.
- Repeat twice more. Take three readings total under identical posture and breathing. Neck flexion, shoulder elevation and uneven weight distribution can change a single reading even when the marks look right.
- Judge the repeats, don't average blindly. Accept repeats within your tolerance band, set before sampling. Re-landmark and remeasure any outlier instead of averaging an obvious positioning error.
If You're Measuring Yourself
Stand before a full-length mirror, hold the tape end at the neck point with one hand and check in the mirror that the tape sits level at the waist mark. Take all three readings in the same posture and breathing state. It's slower, but it's the same logic used for getting your ceremony gown fit right, where a vertical length taken in a slouch won't match the garment on the day.
A clean result is three readings within a tight band, taken on marked landmarks, that you can write into the spec without qualifiers. If abnormal spinal curvature prevents standard positioning, flag it in the record rather than treating the value as a normal reading.
Common Mistakes and How to Fix Them
The mistake that ruins most numbers is a tape pulled tight or left sagging. Both look plausible while you're doing them, and both change the path by visible centimetres.
| Common Mistake | What It Changes | Fix |
|---|---|---|
| Tape pulled tight or left sagging | Compresses or inflates the path by visible centimetres | Keep it snug, horizontal and just touching the skin |
| Head tilted or shoulders hunched | Shortens the front path or shifts the back neck point | Reset posture and check from the side |
| Tape cuts diagonally across the torso | Adds length as the tape leaves the waist mark | Level the tape at the waist and check from front and side |
| Measured over bulky clothing | Adds ease the garment does not have | Measure in fitted clothing or a bodysuit |
| Waist mark placed by guess | Shifts the endpoint by several centimetres | Mark the defined waist level and have a second person confirm it |
| Finished garment length used as body value | Describes the product, not the wearer | Measure the body and store the garment length as a separate record |
Posture errors come first because they move the landmarks themselves. Tape errors come next because they change the path between correct landmarks. Reference errors, like measuring over clothing or copying a garment length, corrupt the record even when your hands did everything right.
Two habits catch most of this before it reaches the spec.
- Photograph from the side: Take a photo during the measurement so the tape path can be checked later without standing the subject again.
- Re-landmark before the final reading: Have a second person relocate the neck points independently, since a shifted landmark is the error the first measurer rarely sees.
When one reading differs from the others by more than your tolerance, stop. Re-landmark and remeasure rather than averaging the outlier into the spec.
Recording the Measurement for Tech Packs and Fit
A number without its definition is not transferable. Copy this metadata beside every neck to waist measurement in your spec.
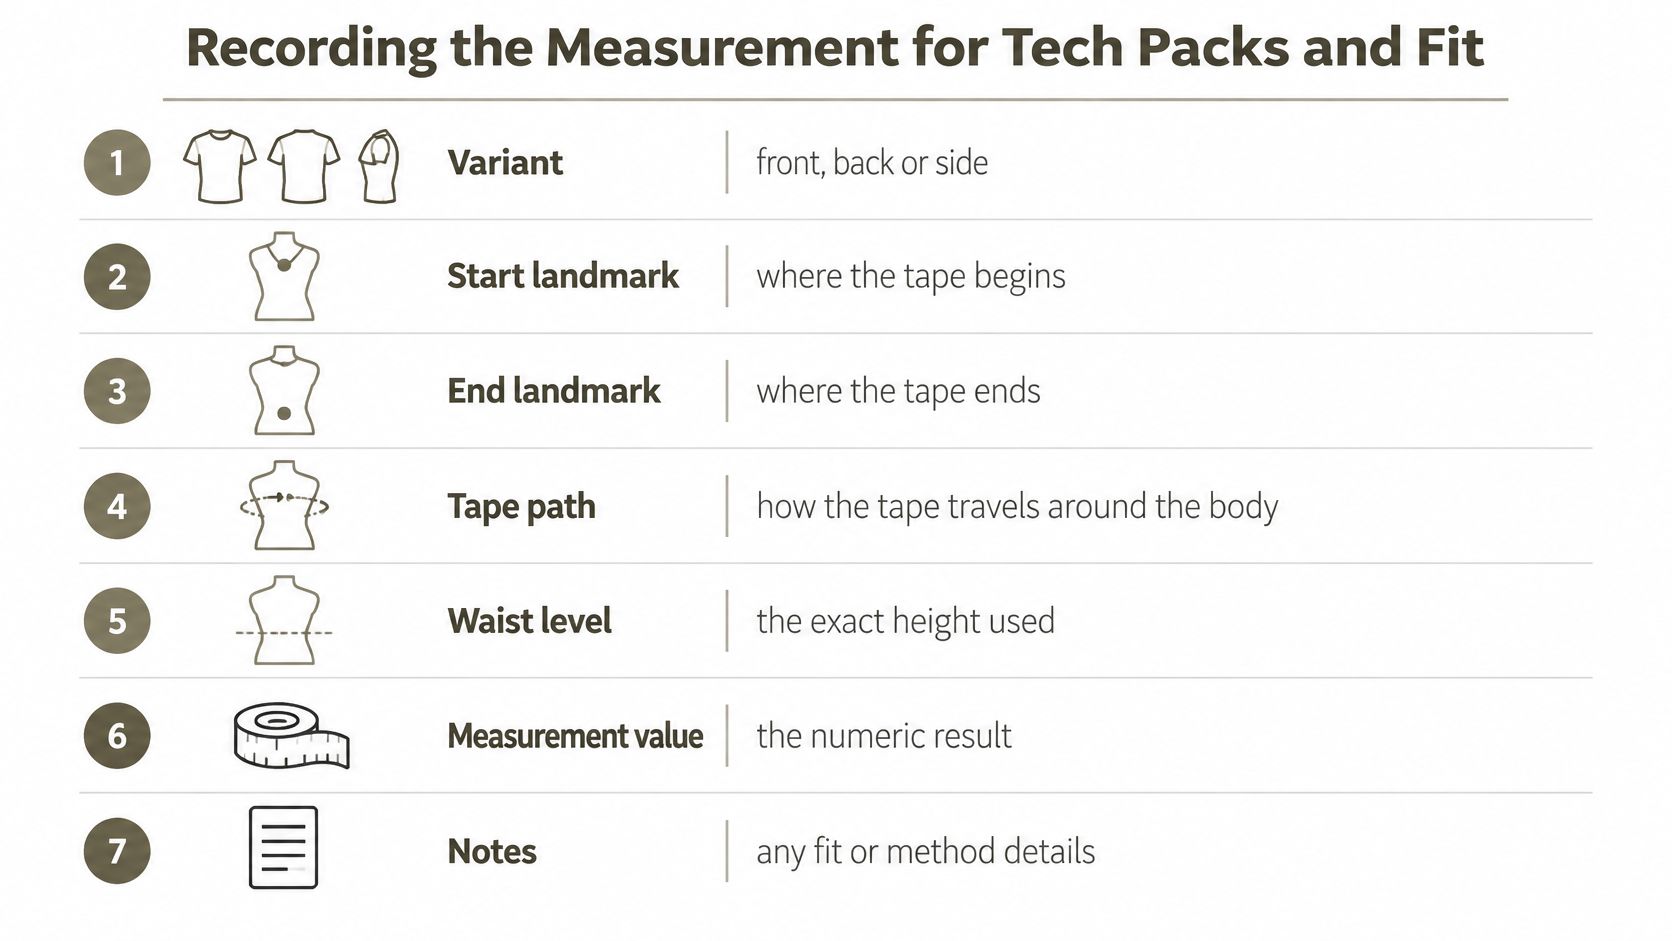
- Variant: Front, back or side
- Start and end landmarks: The exact neck point and waist level used
- Tape path: Whether it followed the body surface on front, back or side
- Waist landmark: Narrowest point, bottom rib, umbilicus or iliac crest
- Conditions: Posture, breathing state and garment state during measuring
- Value and unit: Recorded in centimetres, with measurer and date
- Tolerance and confidence: Your repeatability band and a note on landmark certainty
Keep this structure consistent with your wider spec sheet essentials for fashion designers, so factories read every point of measure the same way. In our generated tech packs, points of measure such as sleeve length and shoulder width are included in centimetres, which is the unit discipline this field needs too.
Now the limit you have to respect. A neck-to-waist value doesn't predict fit on its own, a point reinforced by Scientific Reports research on 3D body shape diversity showing 3D scans capture circumferences, heights, widths, and arcs more thoroughly than traditional three-measurement systems. A garment can match a size chart on vertical length and still pull, rise or collapse because bust or chest projection, abdomen shape, shoulder slope, posture, torso curvature and ease change how fabric hangs.
Pair the length with a front-to-back balance note and a short body-shape description. That turns one linear number into a fit profile a factory can grade. The same caution applies when reading consumer guidance such as SEYANTE robe sizing advice, where a chart length only works when the wearer's other dimensions sit inside the chart's assumptions.
Keep the body value separate from any finished-garment length. A tech pack that mixes the two describes the product, not the wearer, and no one downstream can tell which one to grade from.
Confirm the Measurement Before You Cut
Run these checks before the number leaves your desk. They take minutes and they prevent a wasted sample round.
- Variant named: Front, back or side is written on the spec, with both landmarks recorded.
- Repeats inside tolerance: All readings sit in the band, and any outlier was re-landmarked and remeasured, not averaged.
- Waist checked from the side: A second person reviewed the waist level from a side view, since a drifted waist mark is the error most often missed.
- Body and garment kept separate: The body value and any garment length sit in different fields.
Then send the value with its full metadata and the matching garment sketch, so the factory reads the same path you intended. Our tech pack checklist before you send covers the handoff checks that sit around this one.
That discipline compounds. A nine-person DTC outerwear team using Genpire runs 4x collections per year, needs 1.4 sample rounds and has 22% lower landed cost per unit, outcomes that start with specs a factory doesn't have to reinterpret.
Do one thing today. Write the variant, the landmarks and the tolerance on the spec before the next sample is cut.
Turn your next neck to waist measurement into a structured, factory-ready spec with defined landmarks, tape path and tolerance built into the tech pack, not scribbled beside it. Genpire generates multi-view concepts and production specifications from your sketches and references, so your factory measures the same body you did.