Your sketch looks convincing, but the first sample doesn't. The shoulder slips backward, the sleeve twists, and the waist feels tight even though the measurement matches your chart. Before changing the silhouette, you need to know which decision caused each problem, and where that decision sits on the pattern.
Good pattern making in fashion design means turning an idea into instructions that another person can cut, sew, fit, and reproduce. Treat the pattern as a record of decisions, not just a collection of shapes.
Table of Contents
- What Pattern Making Does in Fashion Design
- Core Concepts Behind Every Pattern
- Tools and Measurements You Need Before Cutting
- How to Draft a Flat Pattern Step by Step
- Draping Versus Flat Drafting Compared
- Grading for Real Body Shapes, Not Just Sizes
- Turning Patterns into Tech Packs and Samples
- Choose Your Learning Path and Next Step
What Pattern Making Does in Fashion Design
Pattern making turns a garment design into precise two-dimensional pattern pieces that are cut and sewn into a three-dimensional garment. A sketch is the architect's rendering. The pattern is the construction drawing that tells the builders where every wall goes, how the parts connect, and which dimensions must remain consistent.
The U.S. Bureau of Labor Statistics defines fabric and apparel patternmakers as workers who “draw and construct sets of precision master fabric patterns or layouts,” a role that can also include marking and cutting fabrics and apparel. Its May 2021 U.S. estimate counted approximately 3,220 workers, with a mean annual wage of $64,070. These are U.S. occupational figures, not a measure of global patternmaking capacity.
What the pattern controls
A patternmaker resolves questions that a drawing usually leaves open:
- Fit: Where does the garment sit on the body, and where does it need room or shaping?
- Fabric use: How do piece shapes, grain direction, print placement, and cutting restrictions affect the layout?
- Construction: Can the sewer assemble the pieces in a sensible order, using the intended seams, closures, and finishes?
These decisions interact. Moving a side seam may improve the silhouette but change pocket placement. Narrowing a sleeve may look cleaner at rest but restrict reaching. A smaller cutting layout isn't useful if it puts a piece off-grain and makes the garment twist.
Make decisions traceable
Suppose you're developing a fitted blouse with a concealed placket. The pattern must accommodate the closure, provide enough room across the upper back, and position the bust shaping correctly. Tracing the outline of the sketch will not resolve any of those requirements.
Record what changed, why it changed, and which pieces changed with it. A note such as “added back width for reaching, retained front width” is more useful than “made larger.” It gives the next patternmaker or factory technician a reason to preserve the alteration.
Practical rule: A beautiful outline isn't a production pattern until someone else can understand how to cut and assemble it without guessing.
Pattern making is a technical specification discipline. Drawing skill helps communicate the design, but fit judgment, geometry, and construction knowledge determine whether it works.
Core Concepts Behind Every Pattern
A block, also called a sloper, is a basic fitted pattern used as a starting point for style development. Think of it as the master template a tailor copies before adding a collar, changing a neckline, or introducing flare. Keep the original intact and develop the style on a copy.
Blocks aren't interchangeable across every garment. A fitted woven bodice, a stretch top, and a structured jacket need different assumptions about material, support, and wearing room. Before trusting a block, establish what body profile and garment type it was built for.
Read the pattern by function
Core pattern terms and what they control
| Concept | What It Controls | Practical Example |
|---|---|---|
| Block (sloper) | Basic fitted base pattern used to develop styles | A bodice block adapted for a blouse, dress, and jacket, with appropriate fit changes |
| Grainline | Direction in which the piece lies relative to fabric threads | Centre front placed on the lengthwise grain to help the front hang straight |
| Seam allowance | Fabric added beyond the stitching line | Space outside a side-seam stitching line for joining and finishing |
| Fit ease | Extra room needed for movement and comfort | Room beyond body measurements so the wearer can sit and reach |
| Design ease | Extra volume chosen for the silhouette | A relaxed jacket carries volume beyond its movement requirements |
| Dart | Shaping fold that removes fabric to follow the body | A bust dart shapes the bodice over the chest |
| Notch | Alignment mark between pieces that must match | A sleeve-cap notch corresponds to its designated armhole position |
Grainline establishes cutting orientation. On ordinary straight-grain pieces, place the marked line parallel to the selvage. A centre-front line isn't automatically a fold line, so mark “cut on fold” separately when that's intended.
Seam allowance belongs outside the stitching line. Fit and seam-length checks should refer to the stitching line, because that's where the garment joins. Comparing cut edges can mislead you around curved seams.
Separate shaping from volume
Fit ease and design ease answer different questions. Fit ease allows the wearer to breathe and move. Design ease creates the chosen silhouette, such as a roomy sleeve or oversized body.
For stretch garments, the relationship can include negative ease, where the garment relies on fabric extension. Don't transfer that assumption to a firm woven fabric. Likewise, adding width everywhere won't fix a misplaced bust point or incorrect shoulder angle.
A dart creates local shaping. Its intake controls how much fabric is removed, while its position determines where that shaping acts. The sewn dart tip usually stops short of the body's fullest point rather than ending directly on it.
Markings aren't decoration. They're instructions for preserving the shape while someone else handles the pieces.
Every piece should carry its name, size, style identifier, grainline, cut quantity, and material designation. Identify mirrored pairs, fold placement, and interfacing where relevant. With that information present, you can read the flat pattern as a set of assembly instructions rather than guessing from its outline.
Tools and Measurements You Need Before Cutting
Measurement quality is a fit risk before you draw anything. A review of apparel sizing and measurement methods reports an average aggregate error of about 13.2% for manually taken measurements by non-experts and notes that brands use different measurement tables for different populations and markets. That figure isn't an error allowance to add to a pattern. It's a reason to verify inputs.
Essential pattern making tools by purpose
| Tool | Purpose | When You Need It |
|---|---|---|
| Flexible tape measure | Taking body and garment measurements | Every project, from first measurement to final check |
| Clear drafting ruler and set square | Drawing straight lines and right angles | Flat drafting of blocks and pattern pieces |
| French curve and hip curve | Drawing smooth armholes, necklines, and crotch curves | Flat drafting of curved seams |
| Pattern paper or kraft paper | Drafting reusable master patterns | Flat drafting and pattern storage |
| Dress form | Draping and checking fit on a stand | Draping and stand-based fit checks |
| Muslin or toile fabric | Testing fit before cutting final fabric | Test garments for every development method |
| Pattern software | Digital drafting, grading, and piece layout | Production work and repeat styles |
Use a repeatable capture protocol
- Measure in a relaxed, standard posture over light underwear appropriate to the garment.
- Establish reference points, including the natural waist, shoulder point, and neck base.
- Record each value with its measurement path, unit, and reference points.
- Cross-check related dimensions, including bust, chest, waist, and front and back lengths.
- Flag implausible or inconsistent values for remeasurement rather than averaging them away.
ClothME's guide to take consistent measurements for apparel sizing is a useful companion when setting up that protocol. Record posture, underwear, footwear where relevant, and scanning conditions with the measurement set.
Connect inputs to coordinates
Bust height and bust separation locate the bust point and influence dart placement. Shoulder length and slope position the shoulder endpoint, which affects the armhole. Back width and body depth help establish upper-body distribution, but sleeve pitch also requires observing how the arm naturally hangs.
For trousers, crotch depth influences the vertical crotch level; front and back rise measurements inform balance. Waist circumference affects the waistband length, while waist shape affects its contour. Don't treat those as the same problem.
Digital capture doesn't remove interpretation. When evaluating clothing design software, check whether you can inspect measurements and edit the affected geometry.
Stop drafting when cross-checks fail. Remeasure first, and require a physical fitting sample for close-fitting bust and shoulder work rather than trusting a plausible-looking digital result.
How to Draft a Flat Pattern Step by Step
Start with a simple woven bodice before attempting a lined jacket or complicated trouser. You need to learn how a controlled alteration changes the garment, not how to troubleshoot several unfamiliar construction problems at once.
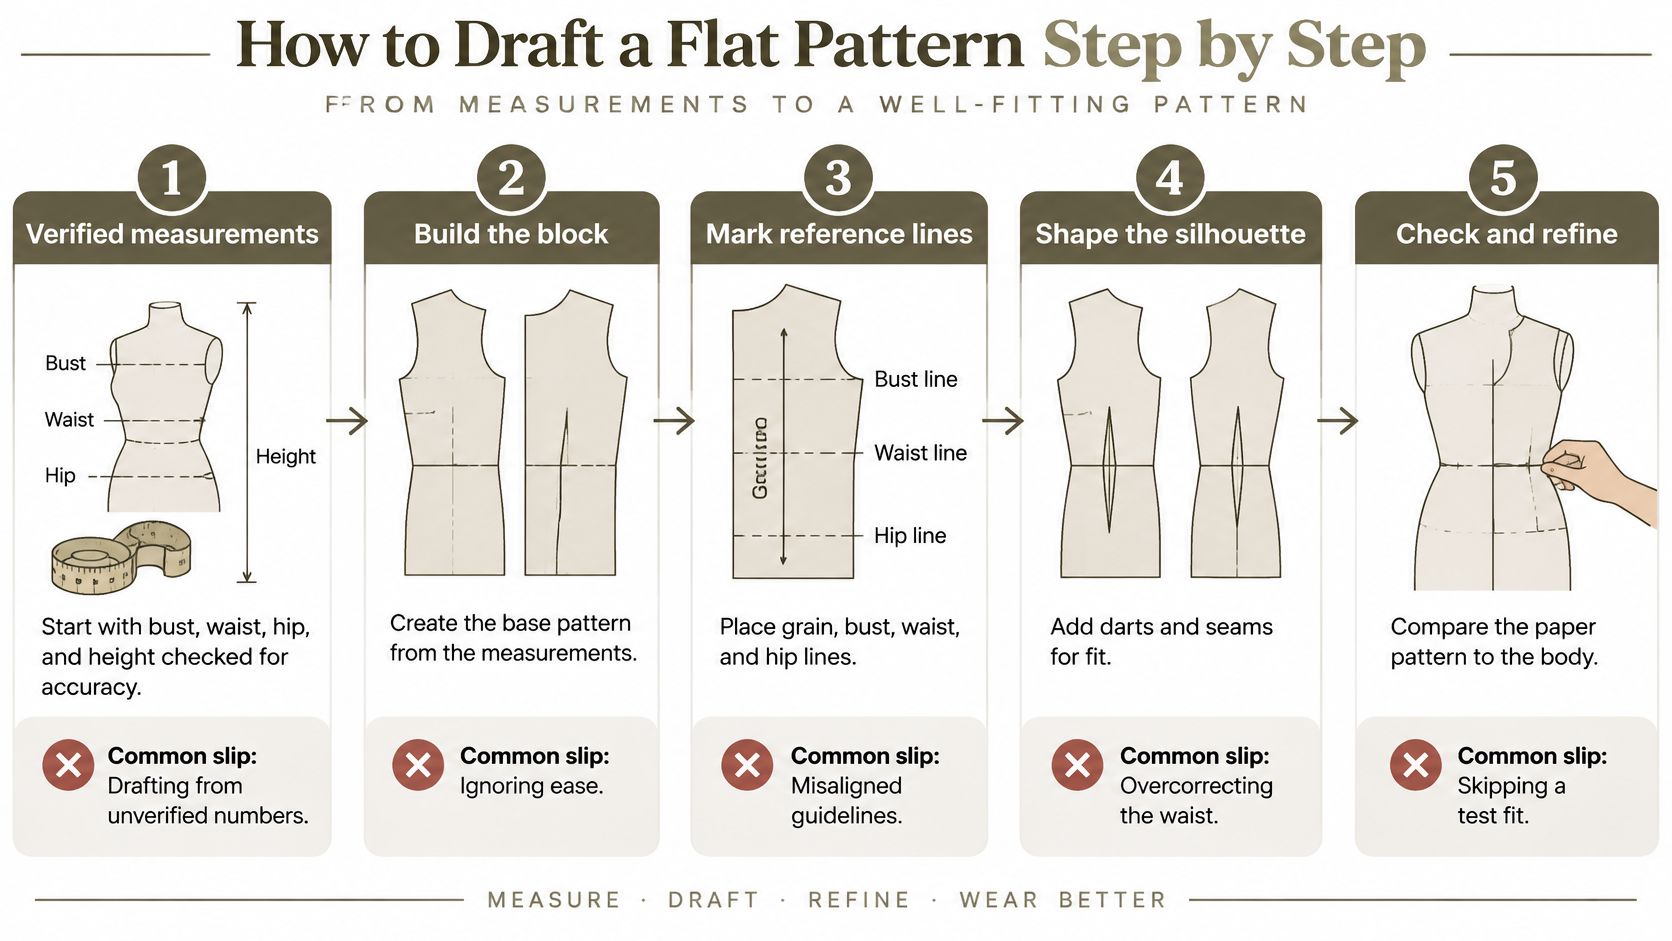
The overview below groups the work into broad stages. The numbered procedure adds the cutting, fitting, and master-pattern checks that make the draft usable.
Build and develop the draft
Start from verified measurements. Prepare bust, waist, hip, back length, shoulder width, and the additional measurements required by your drafting system, so every construction point has an identified input. The common slip is mixing body measurements with finished-garment measurements, which can add or remove ease unintentionally.
Select the closest suitable base block. Match the block to the intended body profile, fabric behaviour, and fit before developing the style, because a distant starting point creates unnecessary correction work. Don't choose a block merely because its size label looks right.
Draw the block and establish reference points. Mark centre front, centre back, bust point, waist, hip level, shoulder, and armhole using the chosen drafting method, then check that horizontal guides and vertical baselines are coherent. A frequent mistake is drawing an attractive armhole curve before verifying shoulder slope and upper-body balance.
Develop the style lines without losing shaping. Move darts into seams, adjust the hem, or introduce panels while retaining the shaping needed to accommodate the body. When rotating a dart, pivot around the bust point and preserve its intake; erasing the old dart and drawing a new seam doesn't transfer that volume.
Prepare, test, and correct
Add allowances and complete the markings. Establish the stitching lines first, then add allowances appropriate to the intended assembly and finishing methods so the sewer can build the garment as specified. Check that every matching notch has a corresponding mark, rather than marking only the piece you're currently drawing.
Cut and sew a representative toile. Choose test fabric with weight, stiffness, stretch, and drape close enough to the final material to reveal relevant problems. Lightweight cotton may help test basic balance, but it won't reliably predict a heavy jacket's bulk or a fluid dress's hang.
Fit systematically and mark corrections. Inspect shoulder position, neckline, bust, waist, side seams, and hem balance, then test reaching, sitting, and bending where appropriate. Don't correct only the most visible wrinkle, because pulling at the waist may originate in insufficient length above it.
Transfer every approved correction to a clean master. Update the paper or digital pieces, walk adjoining stitching lines, true the curves, and check openings, facings, and closures so the corrected garment can be reproduced. The common failure is fixing the toile while leaving the original pattern unchanged.
Check the master before cutting again
Walking a seam means comparing adjoining stitching lines progressively, as though the pieces were being sewn together. Check between notches, not only from endpoint to endpoint. A sleeve cap may include intentional ease, but an unexplained mismatch in a fitted panel seam needs correction.
Close darts on paper when checking the edge they intersect. This reveals whether the seam forms a smooth line once the dart is sewn. Also check intersecting seams in their assembled position, especially at underarms, waist joins, and hem corners.
Keep a revision note beside the master: the fit problem, the approved alteration, and the affected pieces. If you changed an armhole, inspect the sleeve; if you moved a neckline, inspect the facing or collar.
The finished master should have complete labels, matched reference marks, clean stitching lines, and a tested toile without unintended pulling. Don't mistake normal design folds for fit faults, but don't approve strain just because the garment can be fastened.
Draping Versus Flat Drafting Compared
Draping versus flat drafting by criterion
| Criterion | Draping | Flat Pattern Drafting |
|---|---|---|
| Best starting point | Sculptural, asymmetric, cowl, or bias designs | Tailored, symmetrical, or multi-piece garments |
| Fit feedback | Visible on the stand as fabric is pinned | Calculated first, then verified by muslin fitting |
| Speed for a simple garment | Often slower because shaping is done by hand | Usually faster once a suitable block is established |
| Repeatability | Requires careful recording of fabric positions and shaping | Straightforward to copy and adjust from a controlled master |
| Skill foundation | Fabric behaviour and an eye for shape | Geometry and measurement accuracy |
| Cost of a mistake | Quick to re-pin, but consumes test fabric | Paper is inexpensive, but an unchecked error can affect connected pieces |
Drape when fabric behaviour is the design. Draft flat when controlled geometry is the priority. Neither method removes the need to test the garment on its intended wearer or a representative fit model.
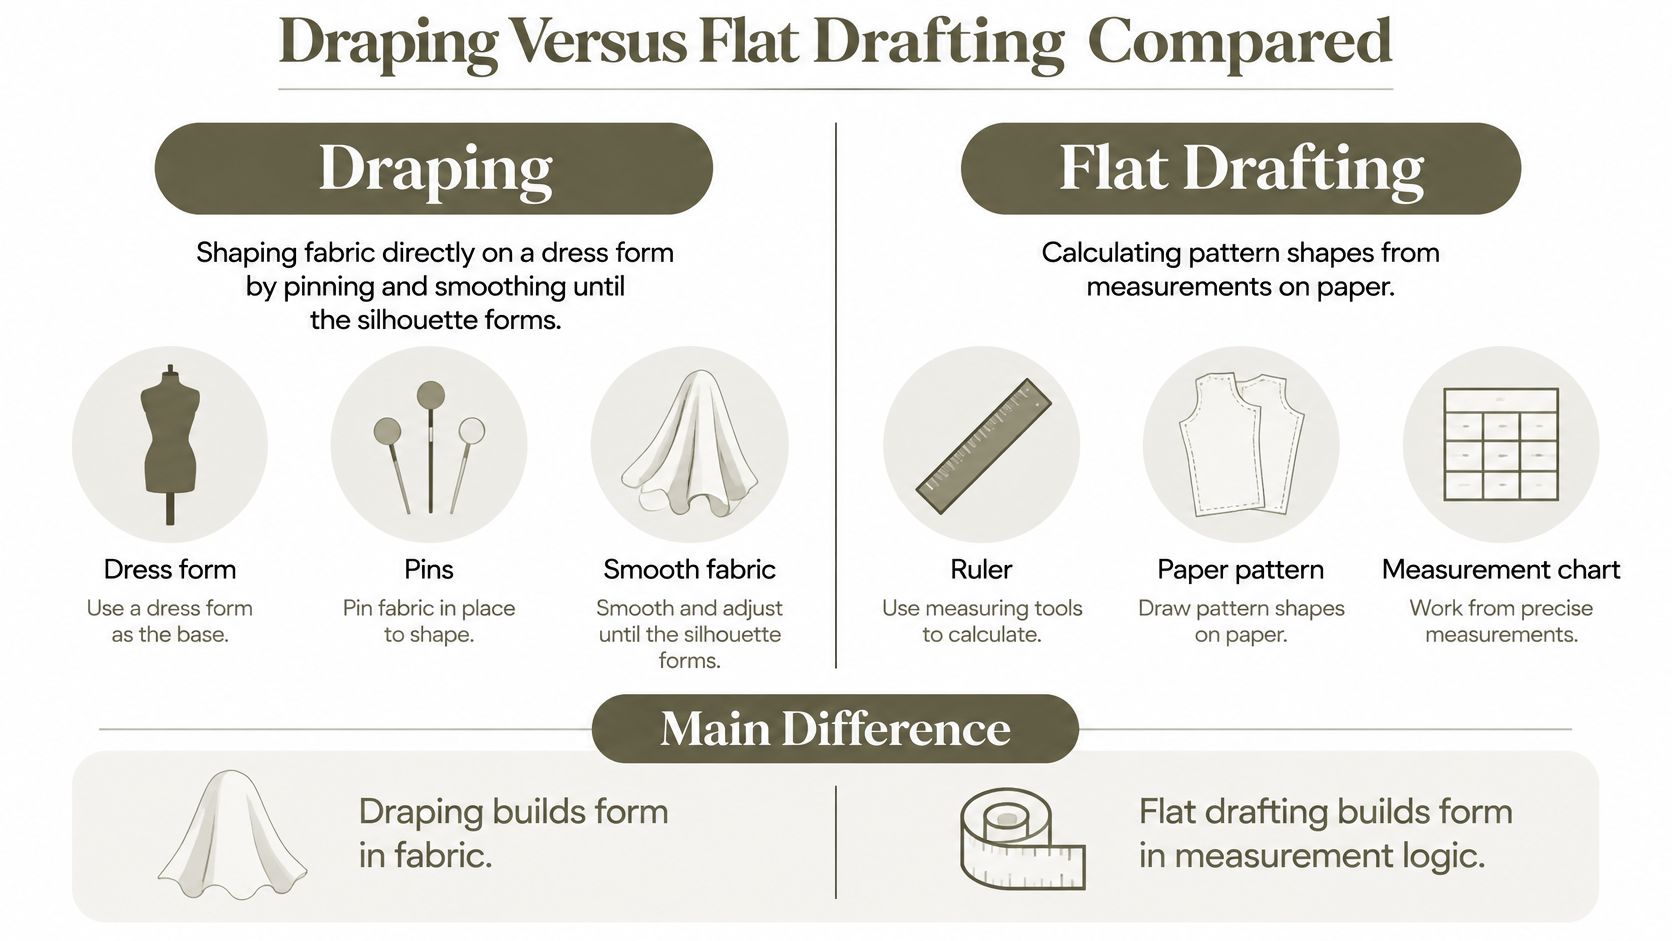
Draping means shaping fabric directly on a dress form by pinning, smoothing, and releasing it until the silhouette develops. Flat drafting means constructing pattern shapes from measurements on paper or digitally. Draping resembles sculpting clay; flat drafting resembles preparing an architectural plan.
Choose for the difficult part of the garment
For an asymmetric cowl dress, the difficult question is how fabric falls around the body. Draping lets you move fullness, adjust the neckline, and see how gravity affects the result. Mark grain and balance lines before lifting the fabric from the stand, or you'll struggle to preserve the shape.
For a fitted shirt, flat drafting provides a clearer method to control matching fronts, sleeve relationships, collar dimensions, and consistent seam positions. You can examine the geometry directly rather than repeatedly measuring a pinned arrangement.
The methods differ most in how you discover shape:
Combine them without losing control
A useful professional approach is to draft the stable base, then drape the unusual area. For example, establish a fitted dress foundation on paper and develop its asymmetric overlay on the stand. Transfer the overlay to paper, mark its attachment points, and test the complete assembly.
The stand is a limitation as well as a tool. It doesn't breathe, sit, or raise its arms, and its proportions may differ from the intended wearer. A smooth result on the form isn't proof of movement comfort.
Bias work needs particular care. Support the fabric as intended, let it settle before finalising the hem, and avoid forcing stretched edges back into an arbitrary paper shape. Preserve the intended hang while checking that the garment remains practical to cut and assemble.
Choose the method that exposes the garment's hardest problem earliest, not the method that makes the first draft look finished fastest.
For your next project, identify that problem before choosing tools. If it's falling volume, start on the stand. If it's precise relationships between structured pieces, start with a flat block.
Grading for Real Body Shapes, Not Just Sizes
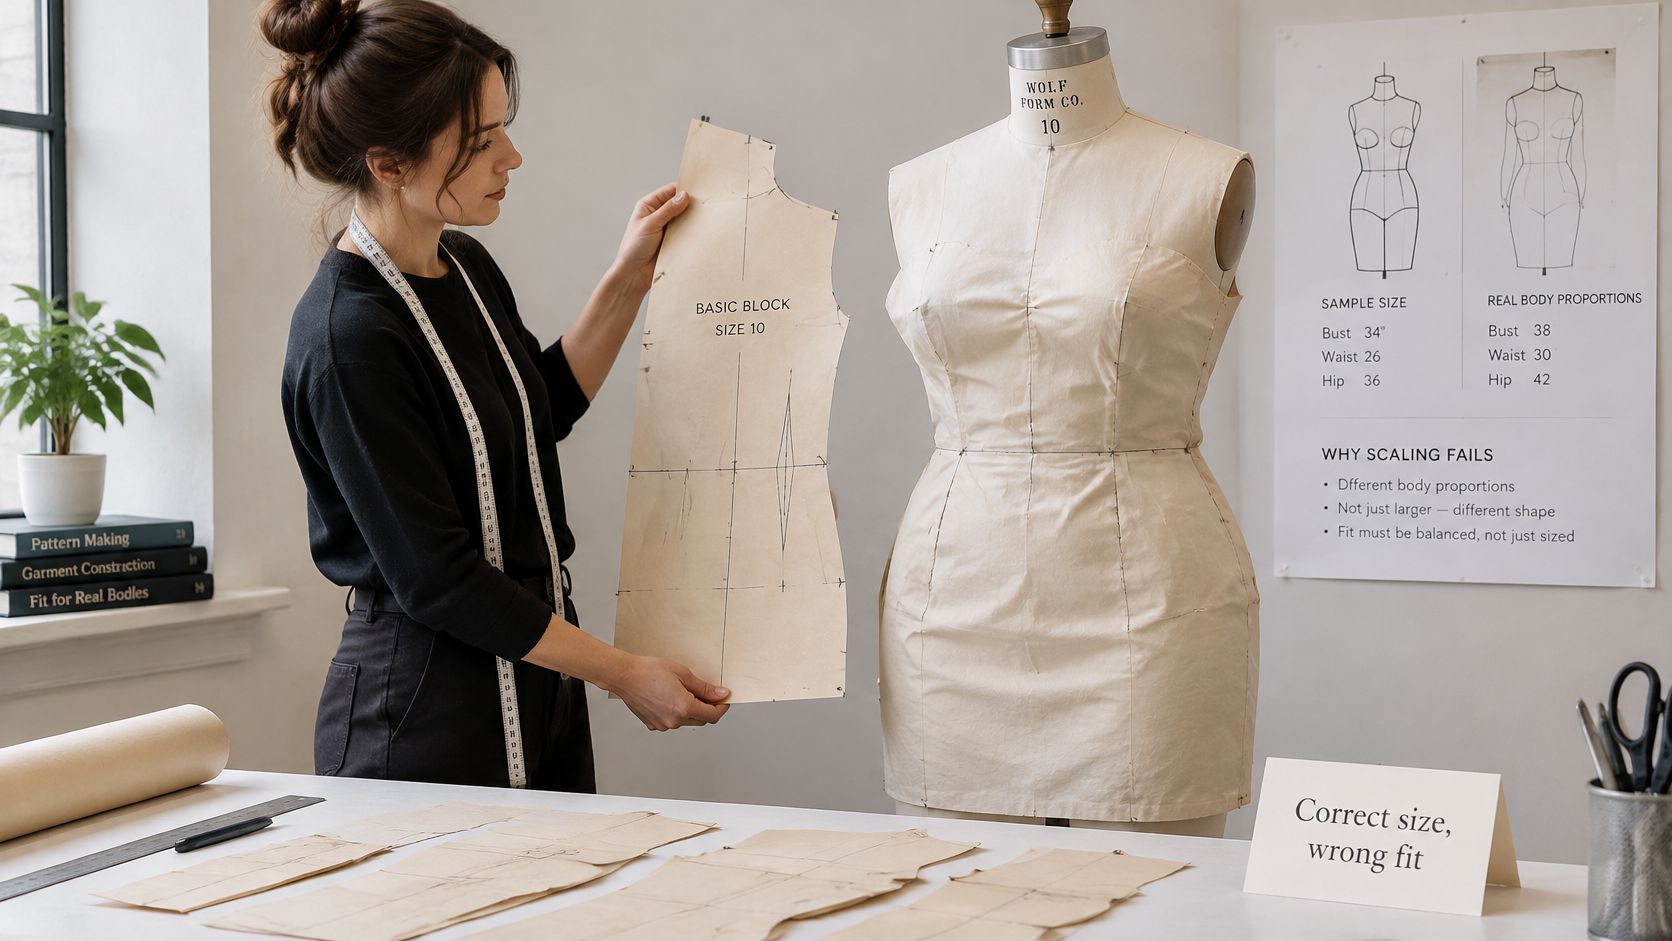
Proportionally enlarging a sample pattern is a poor substitute for grading. Bodies don't increase uniformly in every direction, and wearers with the same nominal size can need different distributions of length, width, and shaping. Correct labels don't guarantee correct fit.
An ASTM-published Australian sizing study analysed 54 body measurements from 1,330 women across six capital cities and developed 36 categories, combining 12 sizes with three body shapes per size. The practical lesson is to organise pattern development along both a size axis and a shape axis, rather than expecting a single block to serve every proportion.
Define the population before the grade
Select the intended customer population and establish which measurement definitions your team will use. ISO 8559-1 provides standardised anthropometric definitions for developing size-and-shape profiles and related measurement systems. Consistent definitions matter because a measurement name alone may not specify its landmarks or path.
Map the target measurements onto an appropriate base block, then define how critical points move during grading. Keep the distinction between changing overall size and correcting a different body proportion.
- Size rules: Specify controlled movement at points such as the shoulder, underarm, waist, hip, and hem.
- Shape rules: Specify how front and back distribution, prominence, posture, or pelvic shape changes the block.
- Validation: Fit representative garments within each intended shape group, including movement tests appropriate to the product.
A dress form can help compare the block's balance and silhouette, but it must represent the profile you're developing.
Alter the region responsible
Say a wearer needs more room over the abdomen but not across the back. Increasing the entire waist circumference evenly can add unwanted back volume while leaving the front short. Examine front length and front arc distribution before spreading the adjustment around the garment.
For upper-body garments, check front and back balance, shoulder slope, and bust position before making broad circumference changes. For trousers, assess crotch depth, front and back rise, and seat shaping rather than treating every drag line as insufficient hip width.
Body measurements are the starting point, not the finished specification. Material behaviour, movement requirements, and styling still determine the final garment dimensions. Validate those choices separately, so you don't disguise a block-shape problem with unnecessary looseness.
Turning Patterns into Tech Packs and Samples
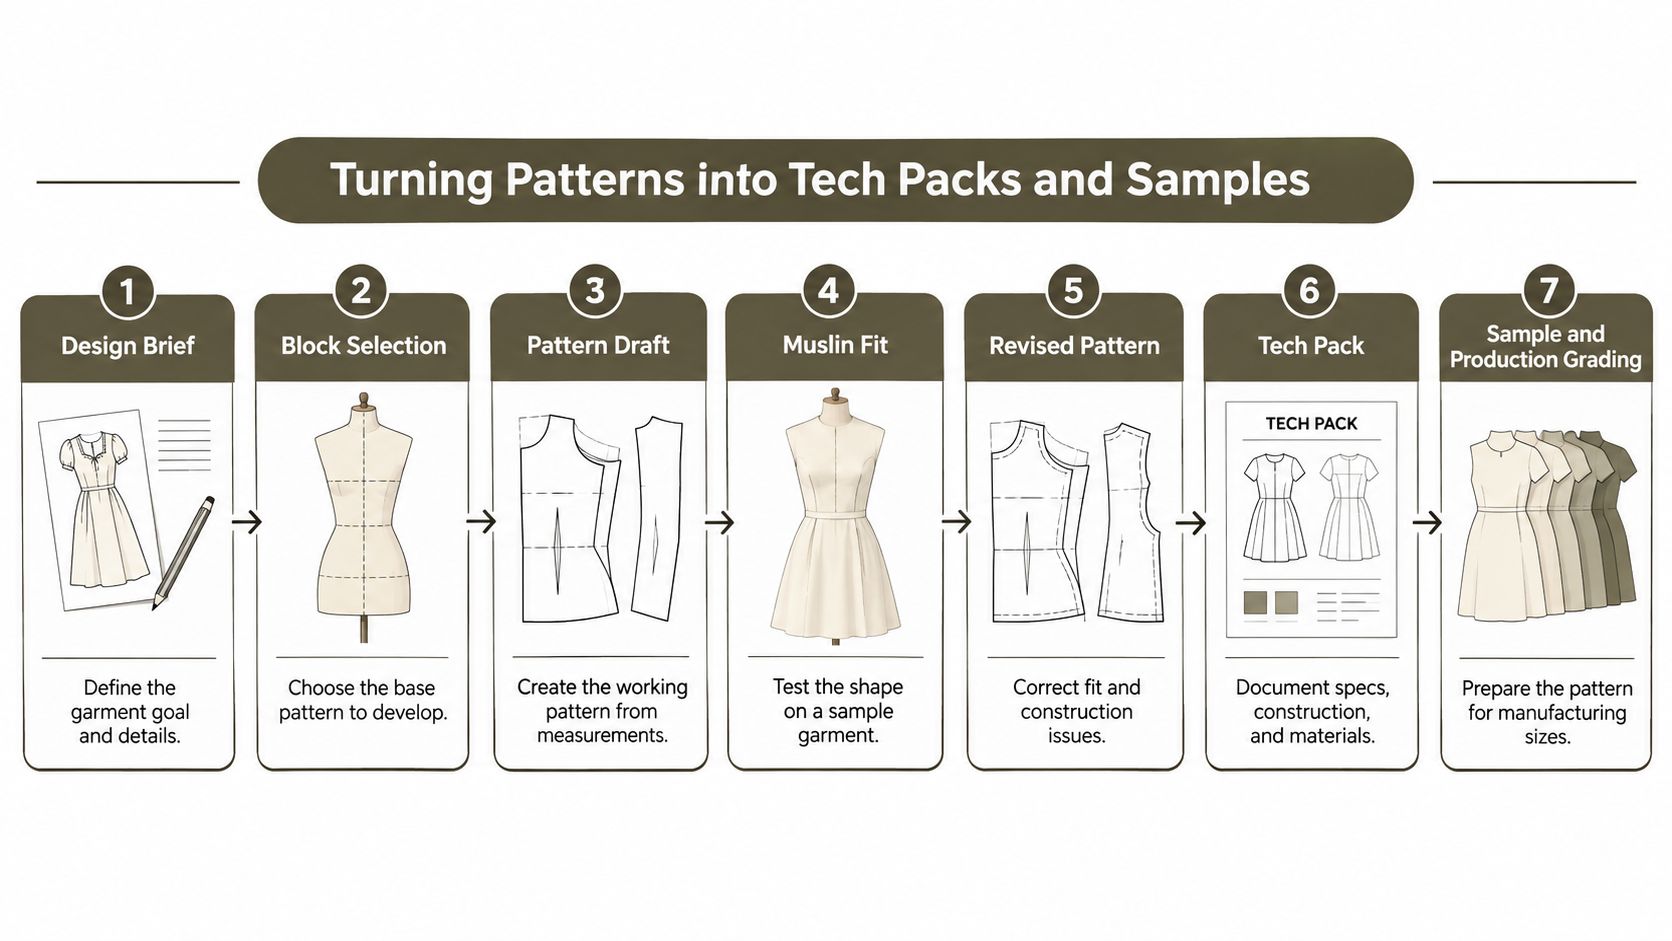
Use a controlled development sequence: design brief → block selection → pattern draft → muslin fit → revised pattern → tech pack → sample and production grading. Resolve the garment's purpose, prove its shape through fitting, and document the approved decisions before expanding them across the size range.
The workflow is easier to manage when each stage has a clear deliverable.
Document what the factory must reproduce
A tech pack carries instructions that aren't fully expressed by pattern outlines. Include garment points of measure, measurement methods, material specifications, assembly details, and the components needed to build the product.
At Genpire, our generated tech packs include points of measure, such as sleeve length and shoulder width, in centimetres. Construction details cover seams, stitching, closures, and linings; component details cover trims, hardware, labels, zippers, and buttons. Our templates are adapted by product category, so the specification structure follows the product rather than forcing unrelated items into a generic form.
For apparel, a knit top and a structured jacket need different measurement lists and construction instructions. The jacket needs information about internal support and lining that a simple top may not require. Define where each measurement starts and ends, whether the garment is measured flat, and whether the value represents a full circumference or a flat width.
Preserve relationships during revisions
A study of traditional and parametric patternmaking workflows found that traditional methods can be faster for initial data entry, while parametric methods are more efficient when patterns require repeated alteration. That trade-off matters when a base must support ongoing fit development rather than a single draft.
Parametric patternmaking treats measurements, dart intake, seam positions, and feature locations as connected variables. Store those relationships, including shared seam lengths, notches, grainlines, and correspondence points, rather than retaining only disconnected outlines.
If a panel seam moves, its partner piece needs a compatible update. If a pocket shifts, the placement reference and technical drawing need revision too. Faster drafting isn't much help if the factory receives conflicting files.
Approve a coherent handoff
Before releasing a sample request, check:
- Revision alignment: The pattern, specification sheet, and technical drawings carry the same approved revision.
- Measurement coverage: Every required point of measure is defined, with values in centimetres and an explicit measuring method.
- Construction agreement: Seam allowances and piece shapes support the specified assembly.
- Feedback traceability: Sample comments identify the affected region and requested change, not merely “improve fit.”
Judge the digital workflow by lower rework during fit development, not by how quickly it produces an attractive first outline. The factory should receive a coherent instruction set that matches the garment you've approved.
Choose Your Learning Path and Next Step
Use print drafting textbooks for block construction, sewing-school classes or short courses for supervised fitting, software trials for digital editing and grading, and a dress form for fabric experiments. Choose resources that make you produce and inspect garments, not just watch demonstrations.
Build skills through finished exercises
- Draft a bodice block and sew a toile. Learn to connect body landmarks to pattern positions.
- Draft a skirt and a sleeve. Concentrate on curved seams, balance, and corresponding notches.
- Drape a simple cowl or bias shape. Observe what happens when you release fabric instead of controlling it entirely with seams.
- Grade a block into neighbouring sizes, then test it on a different body shape. Separate grading errors from proportion differences.
- Write a garment tech pack. Include measurement methods, construction instructions, and component details.
Use each exercise's relevant completion test: a toile without unintended pulling, matching paper references, and instructions another person can follow. If you're also developing a range, this guide to designing a fashion collection without experience can help organise the broader work.
The U.S. Bureau of Labor Statistics projects fabric and apparel patternmaker employment to decline by 15% between 2025 and 2035, approximately 500 jobs. Pair drafting with digital revision, fit analysis, and technical documentation rather than learning outline creation alone.
Start the bodice block this week. Record each measurement, retain the first draft, and write down every alteration you approve during fitting.
Genpire connects product concepts, technical specifications, and sample development so you can carry documented pattern decisions into a physical garment. Our sample-making process includes tech pack review, material sourcing, and expert sample construction. Visit Genpire to develop your garment's specifications and prepare it for sampling.