You've approved the tote bag concept, chosen a muted palette, and sent the render to a factory. Then the questions arrive: What thread should they use? How are the straps reinforced? Is the base coated, lined, or both? You thought the design was finished, but the people making it still have to make design decisions.
A product design document closes that gap. It connects the product you intend to create with the instructions, checks, and approvals people need to manufacture it consistently.
Table of Contents
- What a Product Design Document Is and Why It Matters
- Product Design Document vs PRD and Tech Pack
- The Core Sections Every Product Design Document Needs
- How Requirements Trace from Customer Need to Test
- Keeping a Released Spec Under Change Control
- Turning Design Intent into Manufacturing Intent
- Documenting AI-Generated Design Decisions
- Worked Example of One Canvas Tote from Brief to Spec
- Check Your Document Before the Factory Sees It
What a Product Design Document Is and Why It Matters
A factory receives a polished render of a canvas tote. The silhouette looks clear, but the production manager can't identify the stitch type, thread weight, strap attachment, or hardware finish. If the factory fills in those details independently, you may receive a well-made sample that isn't the product you intended.
A product design document is a controlled source of product requirements, drawings, materials, construction details, and quality criteria. It should let someone who wasn't in the design room build the approved product, even at another supplier or in another country.
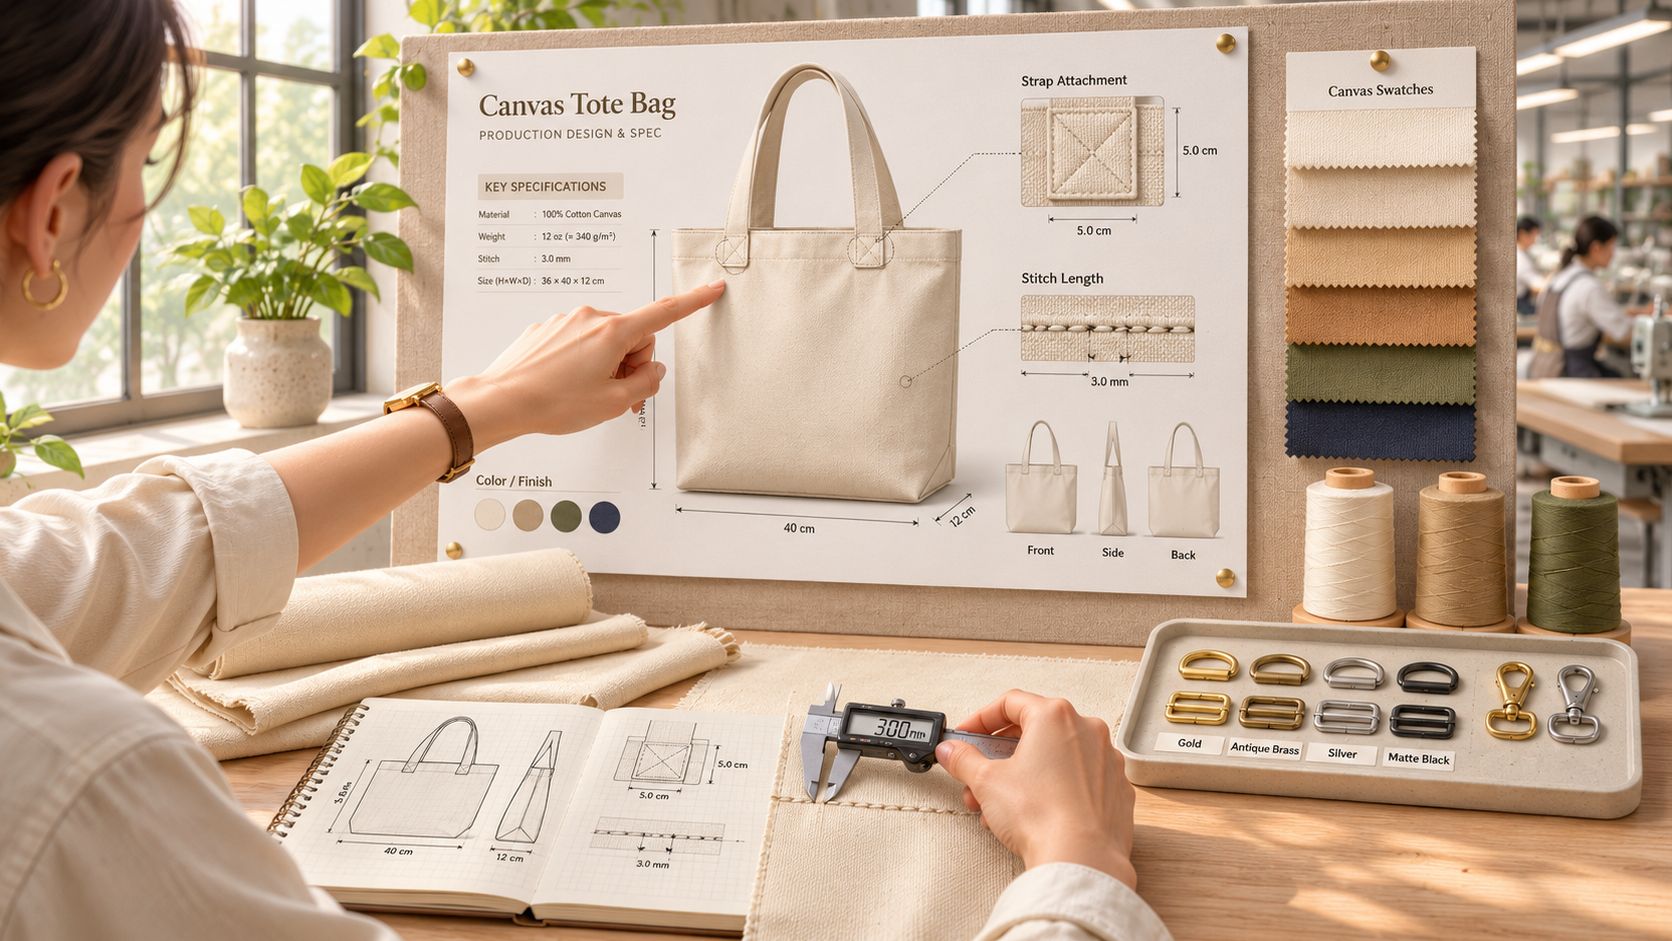
Think of a photograph of a finished dish versus a recipe card. The photograph communicates appearance; the recipe explains how to reproduce it. Your render is the photograph, and your design document is the recipe.
Engineering drawing conventions extend from Germany's DIN 6 in 1922 and the UK's BS 308 in 1927 to ISO 128, introduced in 1982, within the standardized documentation practices described by BSI's design and product specification guidance. The practical lesson is that technical information must be readable by a stranger, not just recognizable to its creator.
The supplier test: Could a supplier who never met the designer build a sample from your file without asking a question?
That's a useful readiness target, not a reason to discourage supplier feedback.
Product Design Document vs PRD and Tech Pack
| Document | Question it answers | Typical writer | Main readers |
|---|---|---|---|
| Product requirements document, or PRD | Why does this product exist, who needs it, and what counts as success? | Product manager or founder | Stakeholders and design team |
| Product design document | What must the product do, and how is it defined for manufacture? | Design engineer or technical designer | Sourcing, suppliers, and quality assurance |
| Tech pack | What instructions does the factory need to make this style? | Technical designer or product developer | Factory teams and pattern makers |
These documents overlap, and teams don't always use the same names. What matters is which decisions each document controls, rather than whether you maintain separate files.
The PRD establishes purpose and priorities. If you're still deciding who the product serves, Figr's guide to writing a product requirements document provides a useful starting point before you specify construction.
The product design document translates that purpose into a full technical definition. A tech pack is the manufacturing-facing package for a particular style, drawing from that definition.
Choose by the missing information
If nobody can explain why the tote needs a protective base, revisit the requirements. If the factory can't determine which base material to purchase, fix the product definition.
A tech pack can't compensate for unresolved design decisions. If the factory can't build from the file, investigate the design document rather than adding more pages to the export.
The Core Sections Every Product Design Document Needs
| Section | What it holds | Main reader |
|---|---|---|
| Overview and objectives | Purpose, target user, success criteria, and scope | Product lead and stakeholders |
| Requirements | Measurable functional and performance requirements, each with an ID | Designers and QA |
| Technical drawings | Front, back, and side views, exploded views, and dimensions | Pattern makers and factories |
| Materials and finishes | Fabric, hardware, coatings, and colours with specifications | Sourcing and suppliers |
| Bill of materials | Every part with quantity, supplier, and specification | Sourcing and costing |
| Construction notes | Stitch types, seam allowances, joins, and assembly order | Factory production teams |
| Testing and compliance | Test methods, acceptance criteria, and applicable regulations | QA and compliance |
| Revision history | Version number, date, change summary, and approver | Everyone who works from the file |
Build the document in this order because each section gives the next reader necessary context. The overview establishes the intended user and use case. The requirements translate that purpose into conditions the product must satisfy, rather than adjectives such as durable or premium.
Drawings establish shape, interfaces, and dimensions. Materials and finishes identify what those shapes are made from, while the bill of materials, usually shortened to BOM, gives sourcing a purchasable component list. Don't leave the coated base fabric identifiable only through a drawing annotation.
Construction notes explain how the components become a finished product. For the tote, show strap reinforcement, seam treatment, and assembly order wherever a different method could change the result. Testing then tells QA how to judge that result, while revision history identifies the approved definition.
Specify measurement methods, not just measurements
A dimension needs units, reference points, and an allowable tolerance. State whether the tote's width is measured flat, empty, and seam to seam. Otherwise, a designer and inspector can measure the same sample differently and both believe they're correct.
For apparel projects, Display Guru tips on garment sizing can help establish body-measurement practices. Keep body measurements separate from finished-garment measurements, which must account for the intended fit and construction.
A realistic render isn't a production specification
Moving to a digital model doesn't remove the need for technical detail. NIST's work on model-based definition describes product definition through geometry and topology, with the information needed for fabrication and inspection, including geometric tolerancing and surface-finish requirements.
A render may suggest brushed hardware without defining the finish. An annotated model can carry that definition, but only if someone adds and approves it.
For a prototype order, a complete tech pack includes drawings, dimensions, a BOM, and construction notes. Treat those as the baseline manufacturing package, with product-specific testing and acceptance instructions attached where needed.
How Requirements Trace from Customer Need to Test
Bidirectional traceability means you can follow a requirement upward to the need that justified it and downward to the component and evidence that satisfy it. The NASA Systems Engineering Handbook recommends recording these relationships as requirements are documented, rather than reconstructing them at the end.
Start with a stable identifier, such as REQ-WATER. Use that identifier in drawing callouts, supplier instructions, and test reports so people can refer to the same requirement without copying slightly different wording.
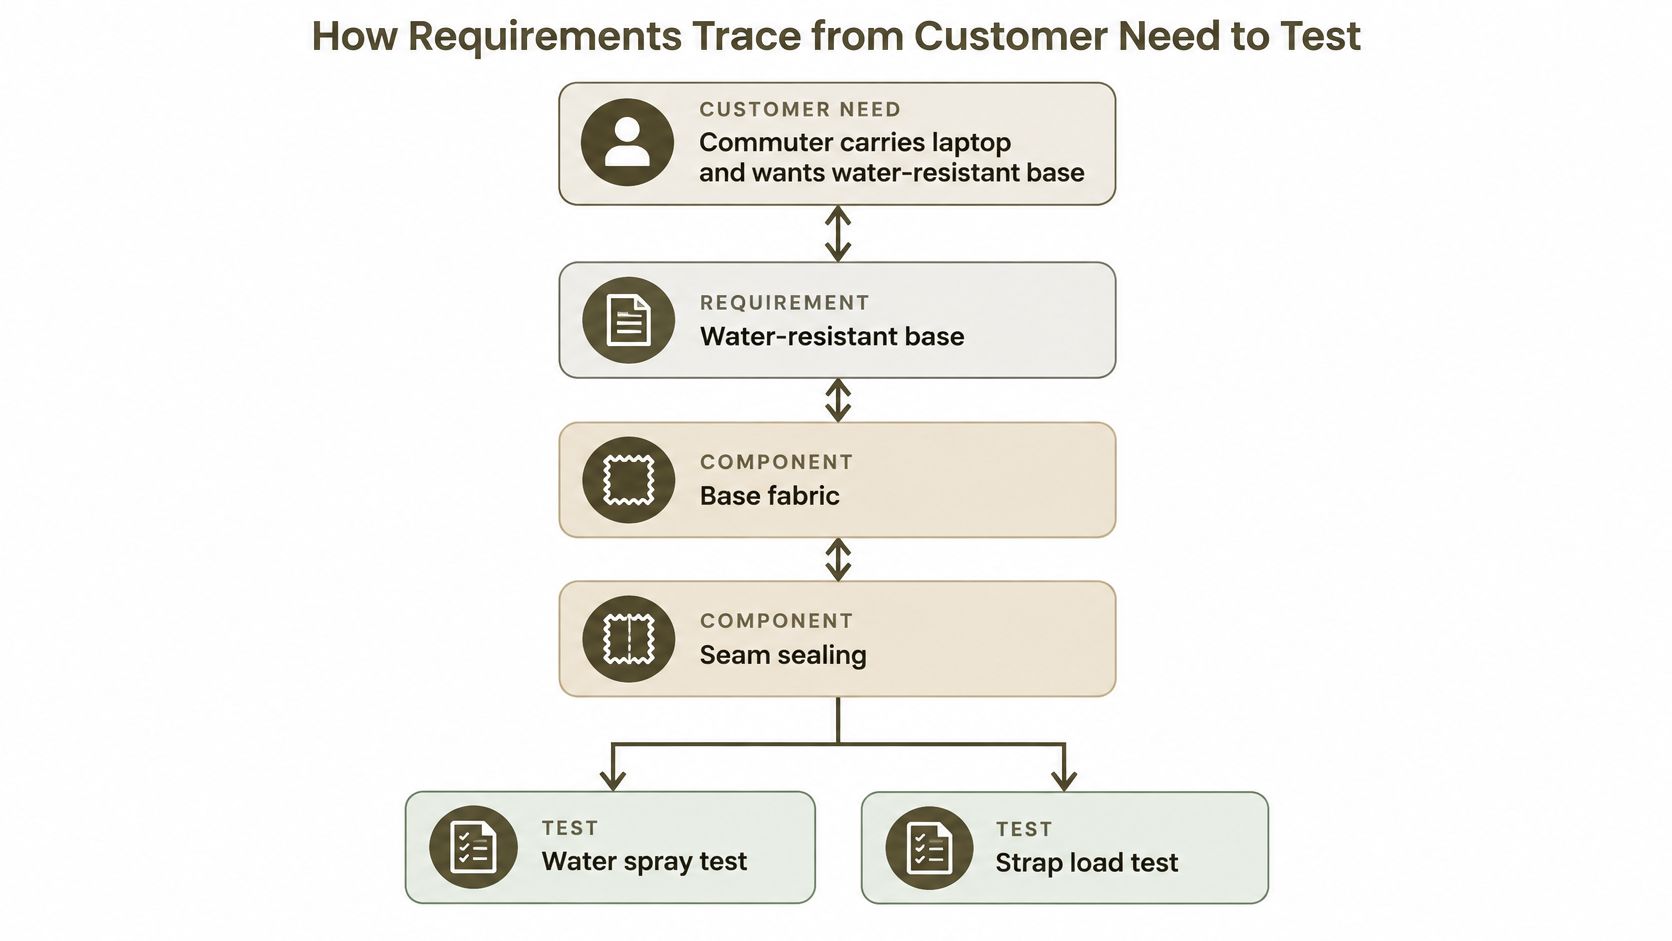
Follow a tote requirement through production
Say the customer needs protection from rain when setting the tote on a damp surface. Translate that into a requirement for the base assembly, supported by an agreed water-exposure method and a measurable acceptance criterion. Define the exposure conditions and permitted ingress before testing, not after seeing the result.
The drawing calls out the coated base material. Its BOM entry identifies the approved fabric specification; the supplier instruction defines the coating or treatment; receiving inspection checks the delivered material. A test report then records whether the assembled base meets the requirement.
Don't assume a water-resistant fabric makes the whole bag waterproof. Seams and joins need their own assessment, and a strap load test verifies a different requirement.
Keep the traceability matrix compact:
- Source: Customer need, stakeholder decision, or technical constraint.
- Requirement: Stable ID and precise requirement text.
- Design element: Affected component, drawing, or BOM entry.
- Acceptance criterion: The measurable pass condition.
- Verification method: Inspection, analysis, demonstration, or test.
- Responsibility: Named owner and current status.
This structure helps reviewers spot orphaned specifications, duplicate requirements, and features nobody can justify. If a decorative rivet has no functional or approved aesthetic purpose, the team can question it before purchasing tooling.
A spreadsheet is sufficient to begin. A structured product system may make maintenance easier, but the discipline is the same: update the relationships when the design changes.
Keeping a Released Spec Under Change Control
Switching zipper suppliers can look like a purchasing decision. Yet the replacement may have a different operating force, tape width, or installation allowance, affecting both the closing edge and the sewing instructions.
That's why a released specification is a controlled configuration baseline, not a file anyone can edit without authorization. NASA's configuration management handbook describes maintaining consistency between approved product attributes and their documentation, with identified items, change authority, and implementation records.
Record the impact before approving the change
For the zipper substitution, sourcing should identify the proposed component, technical design should check fit and installation, and QA should identify affected tests. Approval should cover the consequences, not just the replacement part's appearance.
Each change record needs:
- Revision number and effective date: Identify the release and when it applies.
- Change description: Explain what changed and why.
- Affected parts or variants: Name impacted components, colours, sizes, or assemblies.
- Approval authority: Record who authorized implementation.
- Supplier notification status: Confirm who received and acknowledged the change.
- Required re-verification: Specify inspections or tests that must be repeated.
Also decide what happens to work already underway. Can the factory consume existing zipper stock, or must it stop? Does the change apply to samples, the next purchase order, or all unshipped production? Record that decision explicitly so the factory doesn't have to infer it from an effective date.
A file marked final isn't a controlled release unless people know who approved it and where it applies.
Maintain the released drawings, specifications, component lists, inspection criteria, and change history together. A folder can work, provided its release permissions and naming rules are clear.
Archive obsolete versions and label them superseded. Don't delete the evidence needed to explain an earlier sample, but don't leave old files beside current instructions without a status label.
The practical test is straightforward: the factory should be able to identify which revision it's building, who approved it, and what must be retested before the next batch ships.
Turning Design Intent into Manufacturing Intent
In a 2025 survey of 233 product-development professionals, 65% identified miscommunication between design and manufacturing as a leading cause of delays, according to Tech-Clarity's State of Product Development report. The handoff deserves more attention than an export button.
Design intent describes the approved product. Manufacturing intent explains how a particular production setup will make and inspect it, including purchasing, operation sequence, packaging, and tooling.
| Attribute | Engineering BOM | Manufacturing BOM |
|---|---|---|
| Organised around | Product function and design intent | Assembly sequence and process steps |
| Typical owner | Design engineering | Manufacturing and sourcing teams |
| Typical contents | Part numbers, specifications, and drawing references | Adds routing, packaging, labels, and tooling |
| Change trigger | Design revision | Supplier substitution or process change |
In practice, routing and tooling may sit in linked production records rather than directly inside BOM rows. The important connection is between the approved component structure and the factory's complete manufacturing instructions.
Keep engineering and production aligned
- Mark fixed decisions and permitted proposals. A visible hardware finish might be fixed, while a supplier can propose an equivalent internal reinforcement. A proposal still needs approval before use.
- Record manufacturing assumptions. State whether the costing assumes stock fabric, a particular seam-sealing process, or factory-supplied packaging. Assign someone to validate each assumption.
- Connect critical requirements to operations and inspections. A reinforced strap attachment needs an assembly instruction, an in-process check, and a defined verification result.
For example, if a factory proposes installing the lining earlier to simplify sewing, ask which joins become inaccessible afterward. The design may remain visually unchanged while the inspection opportunity disappears. Record the agreed process and revised checkpoint together.
That's the practical work behind design for manufacturing: resolving how materials, specifications, and processes work together before production begins.
Completeness isn't the same as usefulness. A longer document can create more ambiguity when reviewers can't distinguish mandatory requirements from suggestions or identify which decisions affect other instructions.
A useful handoff makes those dependencies visible. The factory may still ask valuable process questions, but it shouldn't have to ask which version to build or whether an unapproved substitution is allowed.
Documenting AI-Generated Design Decisions
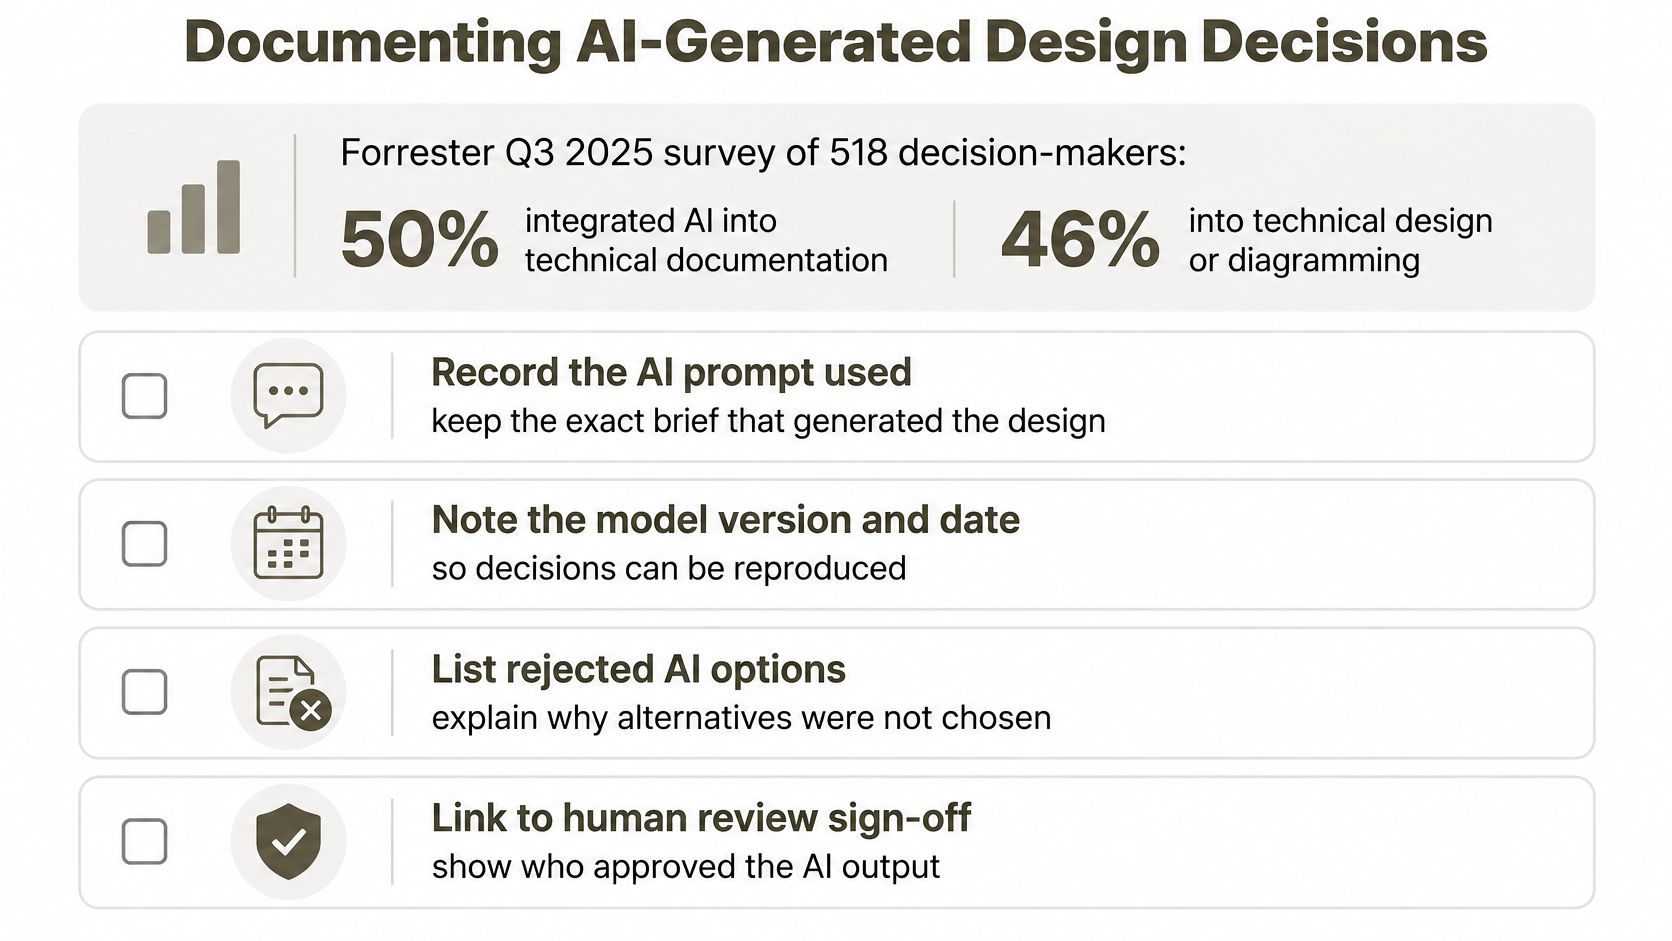
In Forrester's Q3 2025 survey of 518 product, IT, and business decision-makers across North America, Europe, and Asia-Pacific, 50% had integrated AI into technical documentation and 46% into technical design or diagramming. AI-assisted product work therefore needs more than an attractive output and a saved prompt.
You don't need to archive every generation. You need decision-relevant lineage, enough evidence to explain what was accepted, what humans changed, and why the approved specification is trustworthy.
Separate inferred details from approved specifications
A generated tote image might suggest a coated canvas base without identifying an actual coating. Label that as a material recommendation, not a purchasing commitment. Likewise, dimensions inferred from an image must remain unverified until a responsible person checks them.
For each accepted AI contribution, record:
- Inputs: Source prompt and reference images.
- Tool identity: Model or tool version and generation date, where available.
- Decision history: Human edits, rejected alternatives, and reasons for rejection.
- Evidence and uncertainty: Supporting specifications and labels for inferred values.
- Rights provenance: Origin and permitted use of reference assets.
- Approval responsibility: The person authorized to accept the result.
Use an AI contribution log to connect those records to the affected drawing or requirement. Attach evidence links and human sign-offs, then keep a change-diff view showing what changed between the visual concept and the factory-ready specification.
When evaluating AI product design tools, distinguish visual iteration from technical validation. If a generated assembly conflicts with a supplier's validated process, the responsible designer must resolve the conflict before release.
Preserve the lineage needed for safety, quality, intellectual-property review, and reproducibility. The factory shouldn't need to regenerate an image to discover an approved dimension. It should be able to reproduce the approved product even after the tool or prompt changes.
Worked Example of One Canvas Tote from Brief to Spec
Start with a commuter who carries a laptop, needs a water-resistant base, and prefers a muted palette. On Genpire, the brief is a prompt describing the product's target user, intended use, key features, material preferences, and brand aesthetic.
The overview turns that prompt into a defined use case. The requirements then identify the intended carrying load, base water resistance, and colour performance, each with an acceptance criterion and an agreed verification method.

Build the sample instructions
Prepare front, back, and side drawings, with an exploded detail showing the strap attachment and reinforcement. Mark measurement reference points so the pattern maker can distinguish finished dimensions from cutting dimensions.
The BOM lists shell fabric, coated base fabric, webbing, rivets, thread, and label. Enter the quantity or consumption unit, approved specification, and supplier reference for each item.
Construction notes specify the selected lockstitch seam, seam allowance, strap reinforcement pattern, and assembly order. Don't write reinforce securely where the sewing team needs an actual attachment detail.
Testing instructions connect the strap pull test to REQ-LOAD and the colourfastness check to REQ-COLOUR. The base test uses its own linked material and assembly evidence, rather than borrowing a fabric supplier's claim as proof of finished-bag performance.
Sample review rule: Record feedback against the instruction that must change, not just against the photograph.
Suppose the first sample's straps feel too narrow under the intended load. Technical design proposes wider webbing, checks the attachment geometry, and obtains approval. The revision updates the drawing and BOM, then requires the affected strap test to be repeated.
Use the same sequence for your own product: define the use, specify the parts and assembly, verify performance, and turn sample feedback into an approved revision.
Check Your Document Before the Factory Sees It
Run this readiness check before sending the manufacturing package:
- Requirements: Every requirement has a stable identifier and measurable acceptance criterion.
- Consistency: Drawing dimensions agree with component specifications and construction notes.
- Release status: The current revision is marked; superseded versions are archived and labelled.
- Change approval: Each change record names an approver and required re-verification.
- AI accountability: Generated content has logged inputs, human sign-off, and uncertainty labels for inferred values.
- Substitution rules: The BOM distinguishes fixed items from alternatives suppliers may propose.
For printed labels or packaging, the Custom Mark proof approval process is a useful reference when establishing a separate artwork approval checkpoint. Don't assume approval of the bag's construction also approves its printed assets.
Test the document with a supplier
Send the corrected package to a supplier for a sample and ask them to log every clarification they need. Separate missing instructions from useful manufacturing suggestions, then assign an owner to resolve each point.
A factory will build what the file says, not what you meant. Repeat the review until the supplier can build the approved sample without unresolved questions. Keep asking for feedback, but don't leave production-critical decisions in an email thread outside the released specification.
From a product prompt, we generate factory-ready tech packs with measurements, a BOM, and construction notes, plus a manufacturer match. Visit Genpire to turn your brief into a manufacturing package you can review, validate, and refine with your supplier.