Your jacket sample has arrived. The silhouette looks close, but the sleeves bind when you reach forward, the hood pulls backward, and the zipper doesn't sit flat. The factory followed the file, just not the interpretation you had in mind.
A useful jacket tech pack prevents that argument before cutting starts. It connects fit, materials, construction, and approval criteria so the factory can build the jacket and your team can judge the result against the same standard. The objective isn't a thicker document. It's fewer decisions left to interpretation.
Table of Contents
- Build Order for a Jacket Tech Pack
- How to Draw Flats and Number Every Callout
- Bill of Materials Every Jacket Needs
- Point of Measure Chart and Tolerances
- Construction and Performance Callouts Factories Can Verify
- File Formats and Revision Control for Factories
- Run the Pre-Sampling Check Before You Send
Build Order for a Jacket Tech Pack
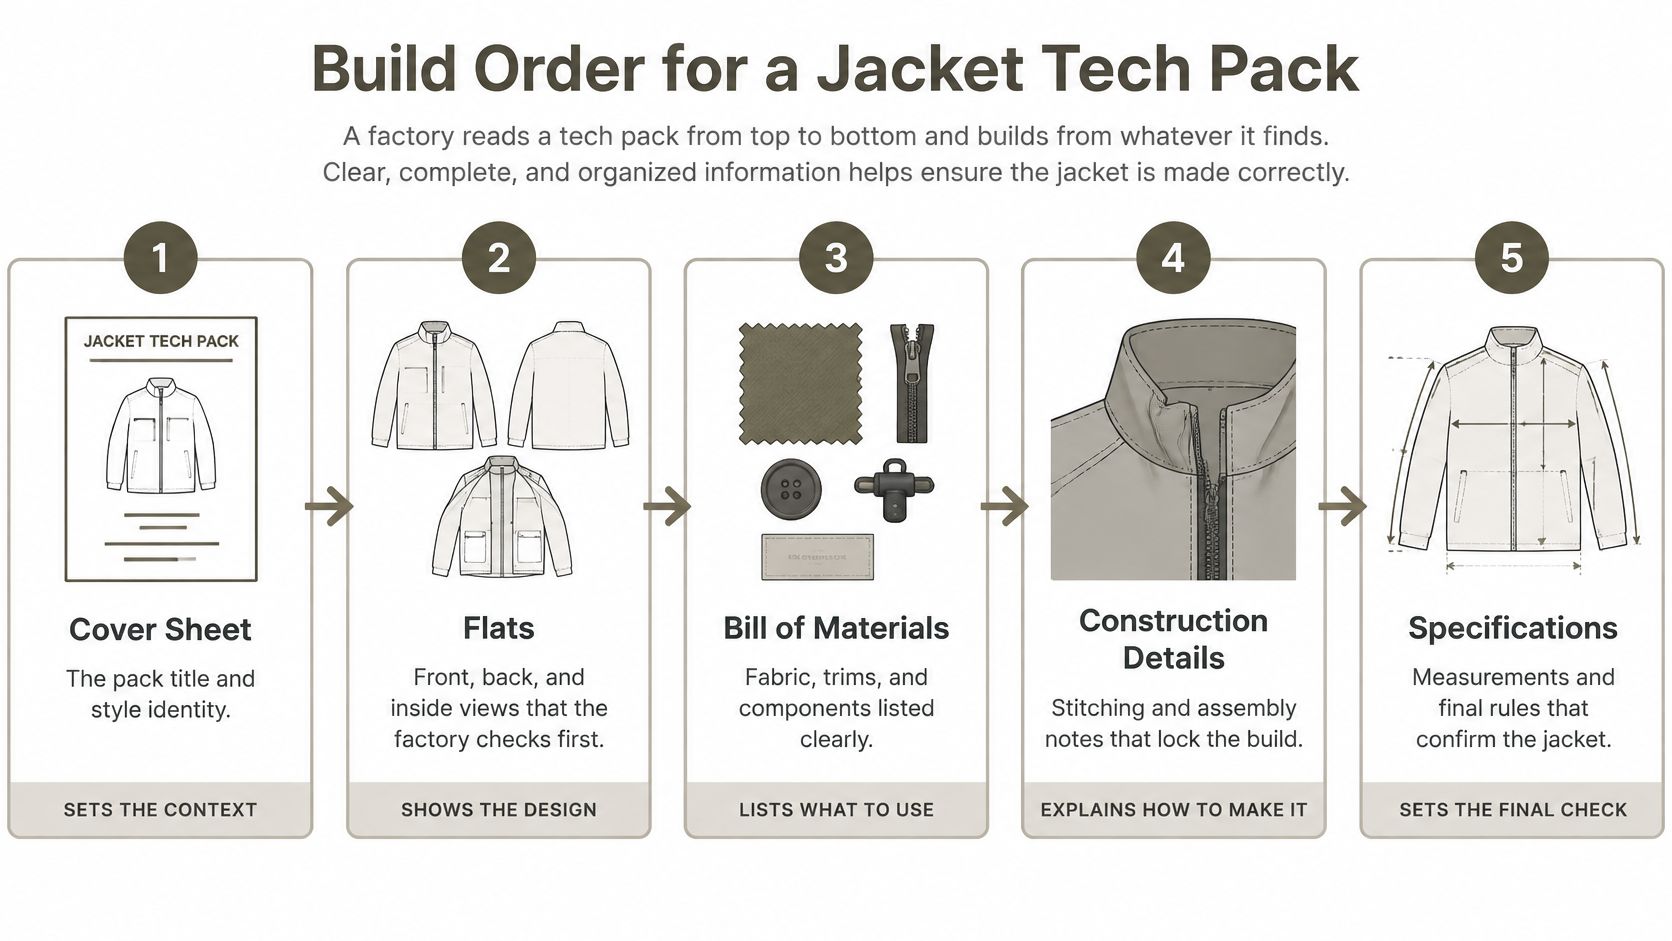
When a sample comes back wrong, check whether the factory received a complete set of instructions or a sequence of unfinished pages. Factories commonly read the pack from top to bottom, so unresolved decisions near the beginning can affect everything that follows.
Start with the style identity and revision number on the cover. Then work through the production specification in a controlled order, freezing each stage for issue while allowing documented changes during development.
Jacket tech pack build order
| Stage | Output | Done when |
|---|---|---|
| 1. Flats | Front, back and inside technical drawings with numbered callouts | Every callout has a matching drawing location |
| 2. Bill of materials | Shell, lining, interlining, zippers, snaps, labels, thread and packaging | Each component has a written spec and a named supplier |
| 3. Construction | Seam type, seam allowance, stitch density, bartacks, pressing | Each note is tied to a numbered drawing location |
| 4. Point of measure | Graded chart with target dimensions and tolerances | Measurement method is stated: flat, zipped, relaxed or stretched |
| 5. Colourway and approval | Colourways, artwork, care and legal labels, approval page | Revision number and approver are recorded |
A complete tech pack for a prototype order includes drawings, dimensions, BOM, and construction notes together. Sending the measurements first and promising the assembly details later gives the patternmaker an incomplete starting point.
The Newway Apparel sample-development guide describes structured packs as averaging about 1.8 sampling rounds versus 4.5 without one, an industry-reported benchmark rather than a guaranteed outcome. The practical lesson is completeness, not a promised round count.
Lock decisions without blocking development
A stage passes when the next person can use it without inventing missing information. If sourcing forces a different zipper or interlining, reopen the affected decisions deliberately rather than changing the BOM without notice.
Practical rule: Give the first draft a version number. Traceability starts before approval, not after the first mistake.
How to Draw Flats and Number Every Callout
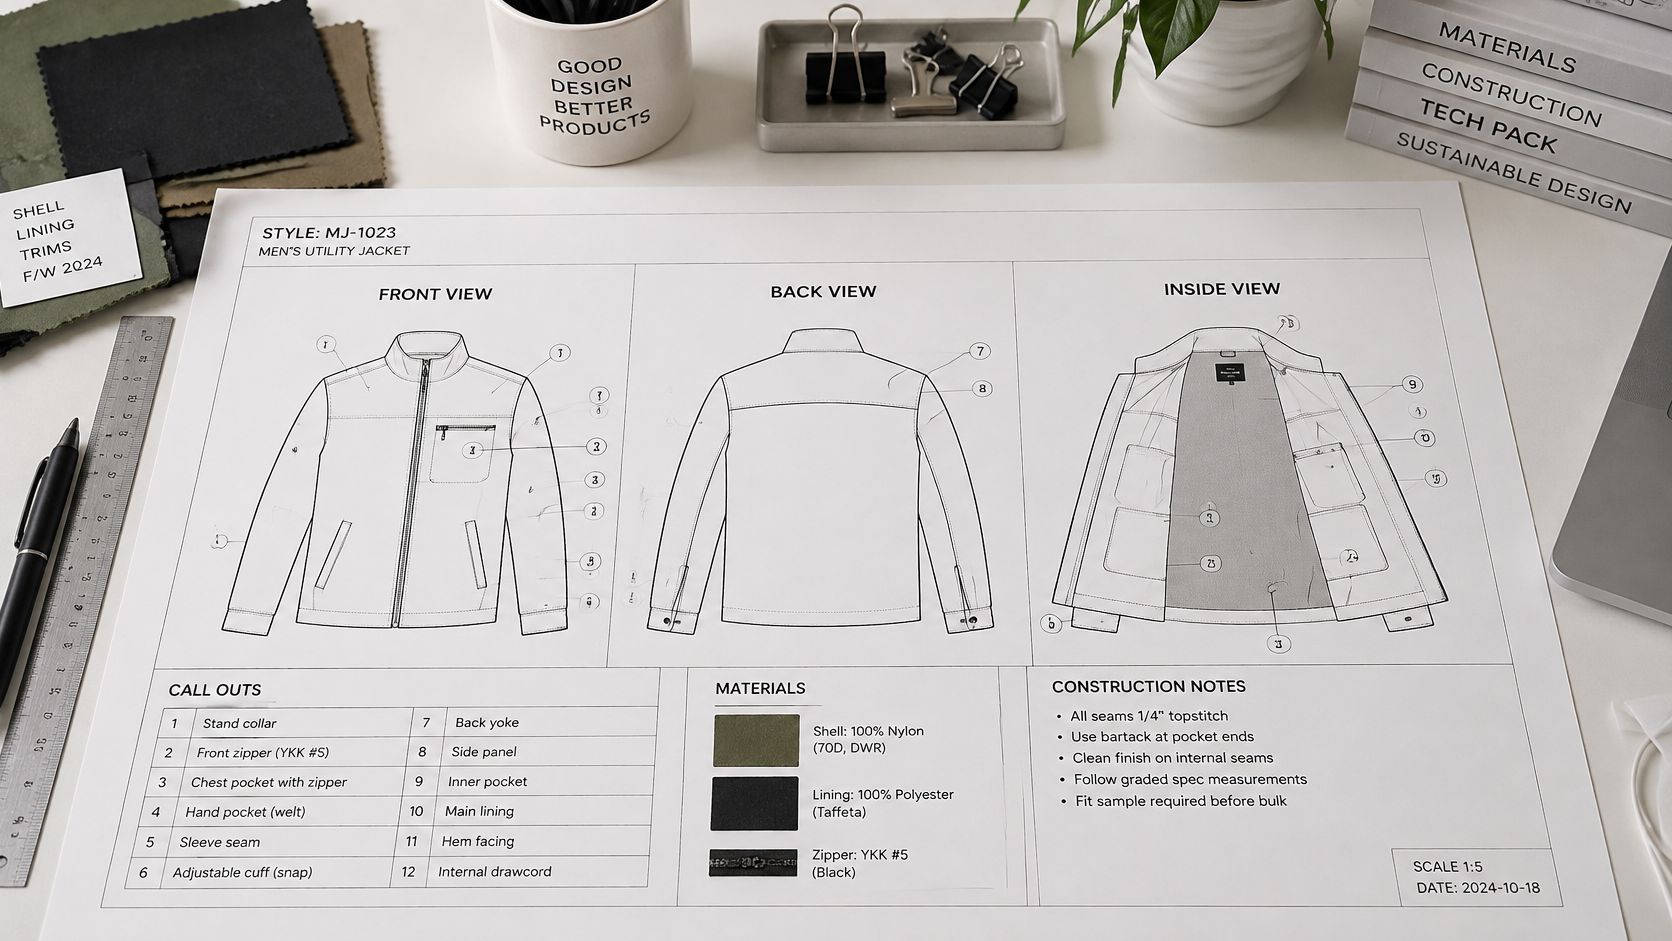
Technical flats are the factory's visual reference for the rest of the file. They must explain the jacket without relying on a designer to narrate what a line means.
Use Illustrator or another vector drawing tool for clean paths and legible annotations. Don't substitute a polished fashion illustration for a drawing that exposes seams, openings, and internal assembly.
Establish the drawing language
Align the views. Draw front, back, and inside views at a consistent scale and identify that scale on the page. Mark enlarged details separately, and state that written dimensions govern rather than inviting the factory to measure a printed drawing.
Set reference lines first. Mark centre front and centre back, then position seams, pockets, vents, zipper openings, and hem edges relative to them. A pocket that looks balanced in isolation may be misplaced against the actual closure line.
Number in a consistent direction. Use a predictable sequence around the garment and retain identifiers when details change. Renumbering every callout after a minor edit makes older fit comments difficult to trace.
Expose the inside. Show lining edges, pocket bags, label positions, interlining boundaries, and attachment points. Use cutaway details where overlapping layers would otherwise hide the assembly.
Resolve details that change state
Draw closures open and closed. Show the relationship between a collar stand, hood, storm flap, and neckline when the jacket is fastened and unfastened. A stowable hood also needs a detail showing its storage opening and attachment.
Define line conventions. Use a legend for seam lines, hidden details, and stitching. Dashed lines can identify stitch paths and a heavier treatment can distinguish topstitching, provided the same convention is used throughout.
Cross-check identifiers. Every construction callout needs a matching instruction. Any referenced material or trim must also resolve to a BOM item, although a sewing operation doesn't need its own material row.
Consider a hooded shell drawn with the attachment visible only from the front. The factory can place the front correctly while interpreting the back neckline differently, leaving the hood twisted or pulling away from the neck. That's a drawing gap, not a useful opportunity for factory discretion.
Add a back-neck detail showing the attachment seam, centre-back alignment, overlap, and relevant notches. The finished-flat test is straightforward: can the factory identify every feature and its governing instruction without guessing?
Clarification questions are welcome. Unrecorded assumptions aren't.
Bill of Materials Every Jacket Needs
A BOM row that says only “zipper” doesn't define a purchasable component. The supplier still has to choose its length, chain type, tape colour, slider, pull, and end construction, any of which can change how the jacket closes.
The bill of materials is the purchasing specification, not a list of component names. Each row needs a component identifier, supplier reference, colour reference, unit, quantity by size where relevant, and approval status.
Jacket BOM components and what each line must state
| Component | What the line must state | Example line |
|---|---|---|
| Shell fabric | Fibre content, weight in gsm, weave, finish, shrinkage | Nylon ripstop; gsm, DWR finish and shrinkage limits per approved supplier fabric specification |
| Lining | Fabric, weight, attachment method | Taffeta lining; weight per approved swatch; bagged hem with attachment detail referenced |
| Interlining | Fibre, weight, exact placement | Polyester fill; weight per approved material specification; quilted to body only, excluded from sleeves |
| Zippers | Type, length, tape colour, slider, pull | Open-end coil zipper; length by size schedule; tape matched to shell colour; locking slider and pull per approved trim sample |
| Snaps and buttons | Size, finish, strength requirement | Snap dimensions per approved trim drawing; nickel-free finish; attachment strength per agreed pull-test specification |
| Thread | Type, size, colour reference | Polyester thread; size per seam schedule; colour code assigned to each colourway |
| Labels | Size, content, placement, care wording | Main label at centre back neck; care label at side seam; dimensions and wording per approved artwork |
| Packaging | Bag type, folding method, hangtag position | Polybag per packaging specification; folded to approved reference; hangtag at left chest |
These examples show how rows should connect to controlled specifications. They aren't permission to leave the fabric weight, thread size, or test requirement unresolved in the issued file.
Separate material approval from purchasing convenience
A named supplier alone isn't enough. Record the supplier's article or part reference and match it to a physical swatch or trim sample so the factory can verify what arrives.
For insulation, distinguish the material from its distribution. Specifying polyester fill doesn't explain whether it belongs in the hood, sleeves, body, or collar, or how it's secured against migration.
Shell shrinkage also needs an agreed assessment condition. A result taken after one treatment can't be compared meaningfully with a result taken after a different treatment.
An available substitute is a proposal, not an approval. Record the replacement and assess its effect on fit, sewing, appearance, and performance before accepting it.
Check labels and packaging last because they're easy to overlook while resolving fabric and hardware. Confirm care wording against the final material assembly, reference approved artwork, and specify where the hangtag fastens so the factory doesn't puncture a weather-facing panel unnecessarily.
Point of Measure Chart and Tolerances
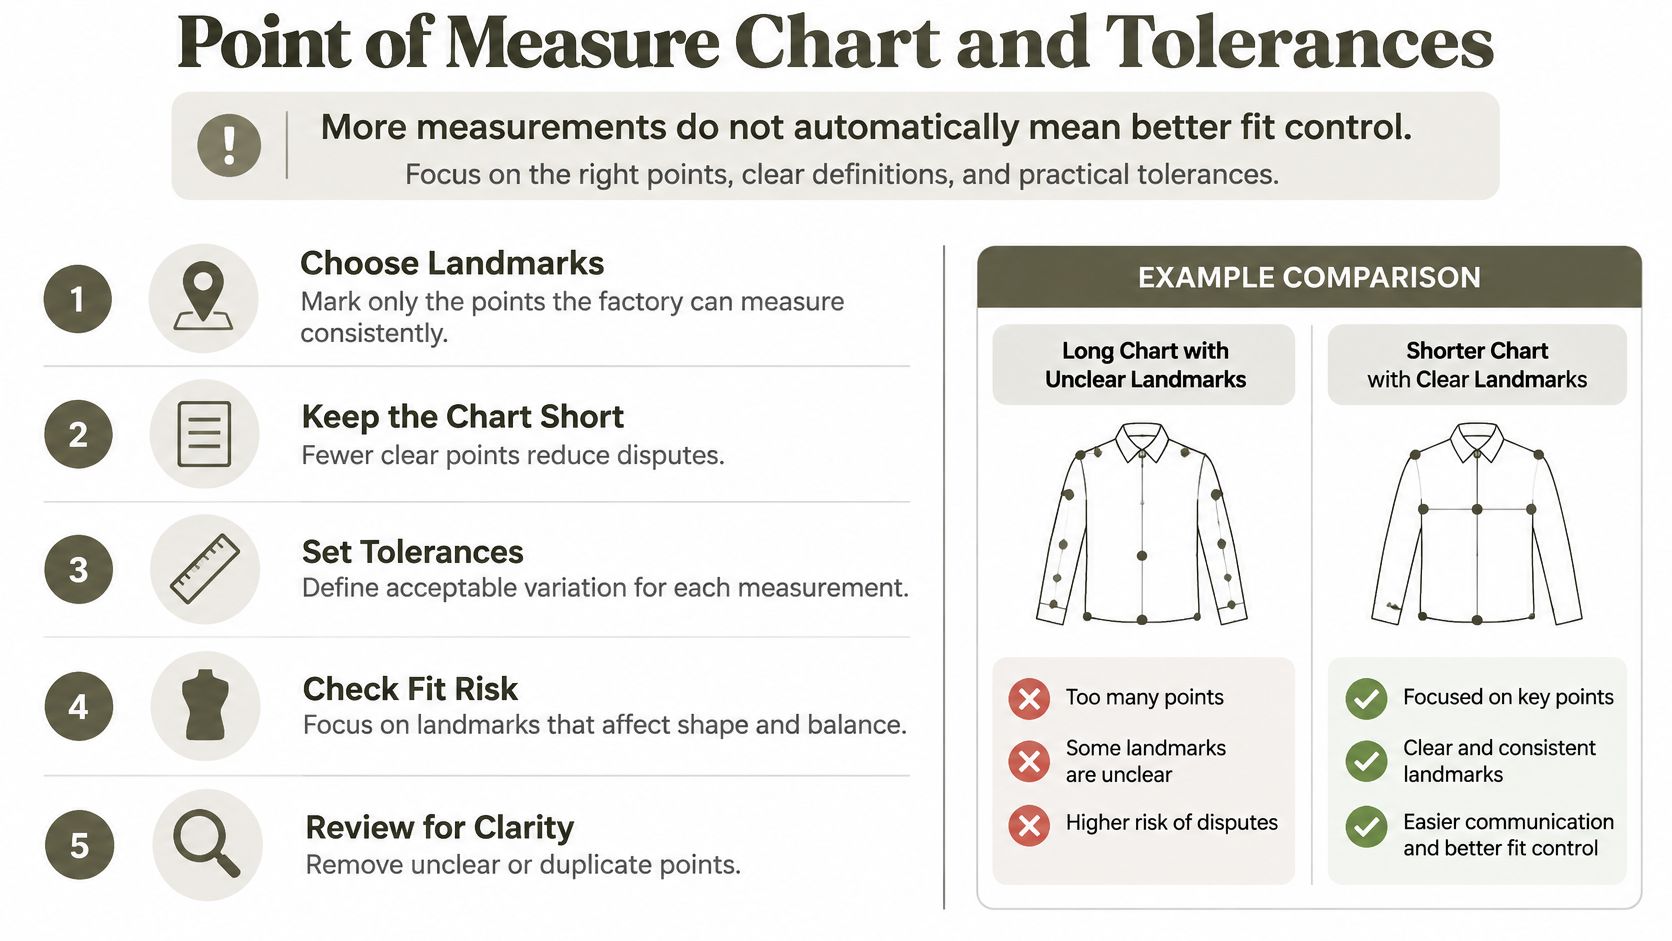
More measurements don't automatically create better fit control. A long chart with unclear landmarks produces arguments about technique instead of useful evidence about the garment.
Prioritise chest, hem, shoulder, armhole, sleeve length, and zipper placement. Add supporting points only when they control a meaningful feature of the silhouette, balance, movement, or assembly.
The Fitinline size-specification guide cites ISO 18890:2018 for principal garment measurement practice and gives approximate woven tolerances of ±5 mm for widths and ±6–8 mm for lengths. Treat those ranges as starting guidance, not a standard imposed on every jacket.
Define the method before the tolerance
Identify whether each value is a body measurement, finished-garment measurement, flat width, or circumference. State the base size, units, closure condition, and whether elasticated areas are relaxed or stretched.
Use a calibrated tape and a diagram with fixed landmarks. Where a method below calls for a defined offset, enter that offset in the issued diagram rather than leaving the operator to choose it.
Jacket point of measure and woven tolerances
| POM | Where to measure | Tolerance (woven) |
|---|---|---|
| Chest width | Armpit to armpit, garment flat and zipped | ±5 mm |
| Hem width | Flat across hem edge, closure condition stated | ±5 mm |
| Shoulder width | Shoulder point to shoulder point across back | ±5 mm |
| Across back | Between diagrammed back-armhole landmarks at the defined level | ±5 mm |
| Body length | High point shoulder to hem, path stated | Select ±6–8 mm |
| Sleeve length | Shoulder seam to cuff edge, path stated | Select ±6–8 mm |
| Bicep width | Flat below armhole at a diagrammed offset | ±5 mm |
| Cuff opening | Flat or relaxed, state which | ±5 mm |
| Collar or hood height | Diagrammed stand or hood landmarks | Select ±6–8 mm |
| Zipper length | Tape end to tape end, with functional opening recorded separately | Select ±6–8 mm |
| Pocket placement | From hem or centre front, using approved landmarks | Set by brand |
Choose a single tolerance for each issued length row. For purchased zippers, confirm that the component specification and its functional opening support the assembly rather than accepting tape length alone.
Approve fit across the size range
Set grade rules explicitly instead of letting the factory select its house grade. Review the smallest and largest sizes for armhole shape, pocket access, hood proportion, and sleeve mobility, not just arithmetic consistency.
Stretch and insulation change how a garment behaves during measurement and wear. Keep the fit model and intended underlayers consistent; if you're planning over knitwear, Cashmere Boutique's cashmere clothing size guide offers a consumer sizing reference, but it doesn't replace measuring the actual layering garment.
Record target, actual, deviation, and pass/fail by size. Fit comments should identify the affected POM and pattern area rather than asking the factory to make the jacket looser.
Use a documented completeness review before quotation and sign the measurement and construction requirements before sampling. Genpire's spec-sheet essentials for fashion designers provides a useful framework for organising those fields.
Construction and Performance Callouts Factories Can Verify
Every construction note needs a drawing location and an acceptance standard. “Clean finish” expresses a preference; a seam detail identifying the assembly, allowance, stitch density, reinforcement, and inspection requirement gives the sewing team something usable.
Specify pocket and strap bartacks, collar or hood attachment, sleeve setting, interlining placement, and pressing conditions. Choose values for the actual material combination rather than copying a seam schedule from an unrelated jacket.
Turn a claim into an inspection requirement
List the functional claims. Identify what the customer is being promised, such as weather protection, ventilation, or lightweight warmth. Separate those claims from purely visual features.
Map each claim to its components and operations. Water protection may involve shell material, seam sealing, zipper construction, and cuff or hem closures together. A fabric specification alone doesn't describe the assembled jacket.
Assign an agreed test method. Name the procedure, conditioning, equipment, and specimen or garment configuration. For specialist testing, agree the method with the testing laboratory before issuing the requirement.
Write the pass/fail threshold. Include exposure conditions and the permitted outcome, not merely an instruction to test. Don't invent a threshold to justify a marketing phrase after development.
Name the owner and sample stage. State who submits samples, who tests them, and who accepts the result. Identify whether approval applies to material, a seam assembly, or the finished garment.
Record results and revisions. Keep the report reference and disposition alongside the requirement. A changed coating, tape, zipper, or construction may require reassessment.
Don't confuse construction with proof
A taped seam is an instruction, not proof of waterproof performance. The tape must be compatible with the fabric and correctly applied, and the finished assembly must meet the agreed test.
Textile Research Journal's work on apparel digital twins identifies digital development as an emerging research direction. Digital product information still needs a physical verification plan before a brand can approve functional claims.
A category reference such as Zero Sports' custom cycling jacket design can help frame a use-case discussion. Translate the intended riding posture and exposure into your own requirements rather than assuming a reference design proves performance.
Approval boundary: A seam can pass appearance inspection and fail functional testing. Keep those decisions separate.
Use a design-for-manufacturing review to resolve whether the proposed operations suit the materials and production process. More callouts won't help if the factory can't execute or verify them consistently.
File Formats and Revision Control for Factories
A PDF, spreadsheet, and vector drawing can describe the same jacket without serving the same purpose. Problems start when teams treat each export as an independently editable master.
Use PDF for review and sign-off because the page layout remains fixed. Check the exported file itself: clipped columns, missing symbols, and illegible callouts can disappear during export even when the source looks correct.
Give each format a defined job
| Format | Best use | Control to apply |
|---|---|---|
| Complete review package and approval record | Export the entire release together and verify every page | |
| Spreadsheet | Measurement charts, BOM calculations, sortable component data | Protect formulas and identify units, revision and approval status |
| Vector file | Editable flats, artwork and enlarged construction details | Retain callout identifiers and distinguish artwork from technical annotations |
Choose a single controlled source of truth, even if the working package contains several linked files. Record the release number and date on the cover and relevant worksheets, then identify the owner responsible for issuing the package.
A short change log should state the previous requirement, new requirement, reason, affected pages, and approver. Keep decisions beside the relevant drawing or measurement record instead of leaving final instructions buried in email.
Handle a mismatch before it becomes a sample
Say a designer changes zipper length in Excel but sends the earlier PDF with the updated spreadsheet. The factory now has conflicting instructions and may reasonably use the document its sample room normally follows.
The fix isn't another email saying which value is right. Withdraw the inconsistent release, reconcile the source, export the complete package again, and obtain confirmation that the factory has replaced the superseded files.
For a returned sample, log each observation against its size, POM, drawing callout, actual value, and approved limit. Distinguish an out-of-tolerance sample from a design change: one requires correction to the existing target; the other requires approval of a new target.
Preserve the approved record. A later edit belongs in a new revision, not inside a file that still carries the old approval.
Lock the approval page after measurement and construction sign-off. Any subsequent change needs its own disposition, including whether it affects cost, materials already ordered, testing, or samples already in work.
The operating habit is simple: one controlled source, one release approval page, and one named revision owner. Editable files remain useful, but they must never leave the factory deciding which version governs.
Run the Pre-Sampling Check Before You Send
Don't use the first sample to discover whether the file was complete. Run a release check before requesting quotations, then confirm that the factory's technical team has resolved any remaining questions before authorising sampling.
Use the tech-pack checklist before you send as a release gate, not a reminder to finish the paperwork later.
Check the package as a factory would
- Flats: Front, back, and inside views have legible callouts that resolve to construction instructions.
- Materials: Every BOM row identifies the component, specification, supplier reference, colour, and approval status.
- Measurements: Each POM has a target, method, unit, grade rule, and acceptance tolerance.
- Fit risks: Chest, hem, shoulder, armhole, sleeve length, and zipper placement are clearly identified.
- Verification: Construction and performance requirements point to drawing locations and define how acceptance is checked.
- Colourways and labels: Material colours, artwork, care wording, placement, and applicable label approvals are referenced.
- Release control: The revision, change log, owner, and approval page agree across the issued files.
If every item passes, send the package for quotation. If an item fails, correct the underlying drawing, material specification, measurement method, or verification requirement before commissioning the prototype.
Apply the same standard to generated files
A generator changes how you create the first draft, not who is accountable for approval. Review inferred measurements, hidden construction, grade rules, and functional requirements with the same discipline you'd apply to an in-house file.
From one prompt, Genpire generates factory-ready tech packs with measurements, BOM, and construction notes, plus a manufacturer match. We send the customer's tech pack as an RFQ to vetted prototype manufacturers; the release checklist still applies before that handoff.
Run the check today, assign an owner to each failed item, and issue the corrected package as a controlled revision. The factory should receive a buildable specification, not a collection of decisions it must make for you.
Turn your jacket idea or sketch into technical drawings, measurements, a BOM, and construction notes with Genpire. Review the pack against your fit and verification requirements, then use the manufacturer connection to request a prototype quotation.