A production-ready technical flat typically uses front and back views plus point-of-measure callouts for 5 to 8 core dimensions, each with tolerances. Add extra views and construction callouts whenever the standard pair can't show how the garment is assembled.
The sample arrives with the hood opening finished differently from the approved design. The pocket bag is visible through the opening, the zipper tape sits too close to the seam, and the factory insists the drawing never specified the topstitch width. Everyone has worked from the same concept sketch, yet the sample still fails because the sketch communicated appearance, not construction.
Technical flats are 2D orthographic garment drawings intended to communicate construction, not styling. They show seams, stitch types, closures, pockets, hardware placement, and accurate proportions without perspective, shading, or body shape. A manufacturer should be able to read the drawing and understand what must be cut, joined, stitched, and positioned without filling the gaps with factory defaults.
Table of Contents
- What Technical Flats Actually Are
- Anatomy of a Production-Ready Flat
- When Standard Views Are Not Enough
- Tools and Templates for Efficiency
- Examples of Footwear and Hybrid Products
- Closing the Gap Between Concept and Factory
What Technical Flats Actually Are
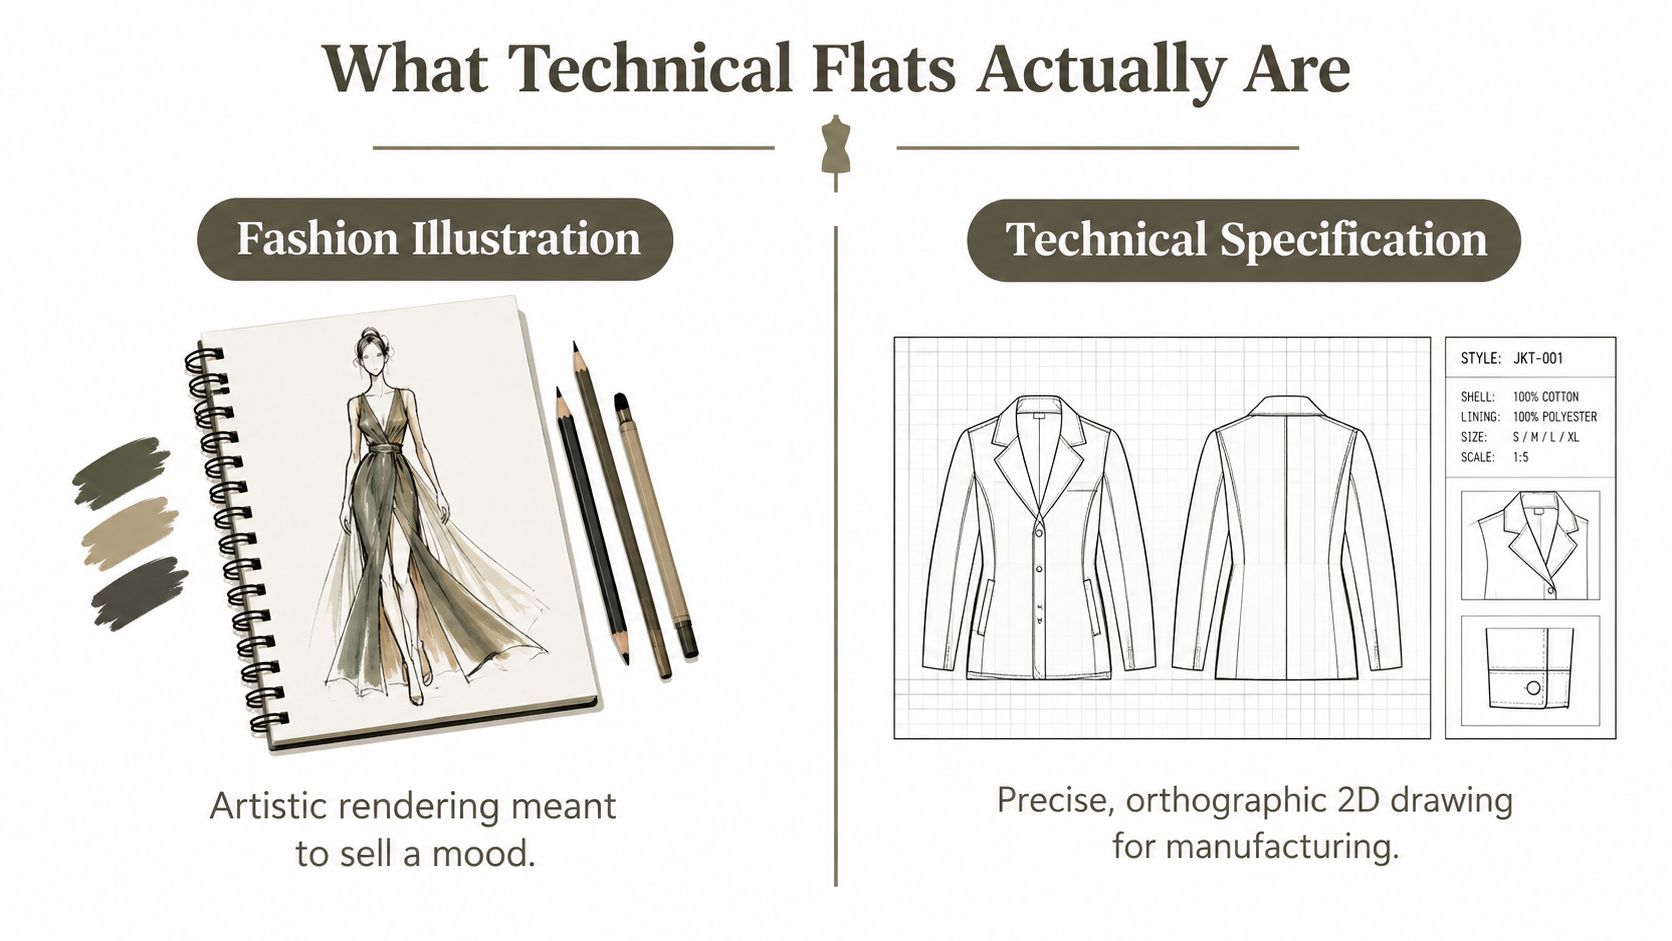
A fashion illustration answers, “What should this garment feel like?” A technical flat answers, “How should this garment be built?”
That distinction changes every line you draw. An illustration can use a bent pose, dramatic proportions, shadows, and fabric movement to sell an idea. A flat removes those devices and presents the product as a clear, orthographic drawing. The garment is shown without perspective, shading, or a body shape, so the viewer can inspect its construction rather than admire its styling.
According to this technical flat sketch guide, the drawing communicates practical details such as seams, stitch types, closures, pockets, hardware placement, and proportions. Those details matter because a factory doesn't sample a mood. It samples a pattern, a set of components, and a sequence of operations.
Readability comes before beauty
A good flat isn't trying to look like a finished product photograph. It uses linework to separate construction layers:
- Outer contour: Shows the silhouette, hem shape, neckline, cuff, and overall proportions.
- Seam lines: Identify where panels join and where the pattern must be divided.
- Stitch lines: Distinguish visible topstitching from structural seams.
- Hardware marks: Locate zippers, snaps, buttons, buckles, eyelets, and adjusters.
- Callout leaders: Connect the drawing to precise notes, measurements, or construction instructions.
Line hierarchy is useful here. A panel seam shouldn't look identical to a decorative topstitch, because the factory needs to know whether the line represents a cut edge, a joining operation, or a visible finish. If every line has the same visual weight, the manufacturer has to interpret your priorities.
The drawing is part of a larger specification
A flat rarely carries the full production instruction by itself. It works inside a tech pack with measurement charts, materials, construction notes, color references, and revision information. A useful overview of that wider document structure is available in this guide to what a tech pack includes.
The practical test is simple. Hand the flat to someone who wasn't in the design meeting and ask them to identify every visible construction decision. If they can't tell whether a pocket is patch, welt, or inserted into a seam, the drawing isn't ready. If they can see a zipper but can't determine whether it sits under a placket, that omission belongs in the flat or its callouts.
Factory test: If a line changes the way a pattern piece is cut, joined, or finished, it needs to be visible or explicitly called out.
Technical flats fashion teams use for production should therefore be treated as visual engineering documents. Their success isn't measured by how expressive they are. It's measured by how little room they leave for two competent manufacturers to produce different interpretations.
Anatomy of a Production-Ready Flat
A production-ready flat has several information layers. The silhouette is only the first layer, and often the easiest one. The difficult work starts when you document the relationships between panels, measurements, materials, and operations.
Start with the views. A front and back view should be the default for an apparel style because the factory needs to see the complete exterior construction. Side, interior, and detail views become necessary when the front and back cannot show the relevant information clearly. A hood, lining, internal pocket, shaped waistband, or unusual closure can hide a production decision from both primary views.
The manufacturer-focused guidance on fashion design sketches recommends front and back views, additional views where necessary, and point-of-measure lines for 5 to 8 core dimensions with tolerances. It also discusses stitch families and seam classes including ASTM D6193, ISO 4915, and ISO 4916. These references give the factory more precise language than a note such as “use standard stitching.”
Build the outline before adding decoration
The outer shape should be clean, symmetrical where intended, and proportionally consistent between views. Confirm the relationship between shoulder width, body length, sleeve length, hem depth, and opening shape before adding small details. A beautifully annotated flat with a distorted back view still creates patternmaking problems.
Next, map the construction:
- Panel breaks: Mark yokes, side panels, princess seams, gussets, and shaped inserts.
- Openings: Show necklines, plackets, fly fronts, cuffs, vents, and zipper paths.
- Functional components: Place pockets, drawcords, adjusters, labels, and hardware.
- Visible finishing: Differentiate topstitching, bartacks, edge stitching, binding, and coverstitching.
- Hidden construction: Add an interior or enlarged detail view when the exterior doesn't explain the assembly.
Measurement callouts should connect to unambiguous points. “Length” isn't enough. Identify where the measurement begins and ends, such as high point shoulder to hem, edge to edge at a specified level, or seam to seam across a panel. Add the tolerance beside the measurement rather than burying it in a separate note where it can be missed.
Use notation the factory can execute
Construction notes need to describe an operation, not a preference. “Clean finish” can mean different things to different factories. A note that identifies the seam class, stitch family, seam allowance, thread behavior, or finishing method gives the production team a machine-sewable instruction.
This is especially important when the garment uses a material with structural behavior. A leather bag, for example, may need notes covering edge paint, turned edges, reinforcement, skiving, hardware attachment, and lining transitions. A practical companion resource is Grainmark Leather's 2026 leather craftsmanship guide, which is useful when your flat needs to connect visible design decisions with material-specific workmanship.
Keep the main drawing uncluttered. Put a numbered callout on the flat, then place the fuller instruction beside it or on a detail page. The manufacturer should be able to trace each note back to a visible feature without hunting through unrelated pages.
Check the flat against the rest of the pack
Before sending the file, run a consistency check:
- Every visible component appears in the materials information. If the flat shows a cord lock, binding, or metal badge, the specification should identify it.
- Every measurement has a location. A point-of-measure chart should correspond to a line or reference point on the drawing.
- Every construction-critical feature has a method. A pocket opening, zipper, seam, or closure should not rely on the phrase “as standard.”
- Every view agrees. The pocket shown on the front must align with the side and back construction where relevant.
- The revision is identifiable. Date the document and make clear which version the factory should use.
A structured page-by-page tech pack template can help organize these layers. The template won't make design decisions for you, but it can prevent a missing view or orphaned callout from disappearing during handoff.
A flat is ready when the factory can convert its lines into pattern pieces and operations without asking what you meant.
When Standard Views Are Not Enough
The front-and-back pair works for a simple product when both views expose the important construction. It stops working when a feature is hidden, layered, three-dimensional, or dependent on an internal assembly sequence.
A hood is an obvious example. The front view may show the opening and the back view may show the hood shape, but neither view necessarily explains the lining turn, seam placement, cord channel, or attachment to the neckline. An interior view or a hood detail can remove that ambiguity with far less effort than correcting a failed sample.
The same threshold appears with pockets. A patch pocket may need only its position, dimensions, and topstitch note. A welt pocket, cargo pocket, hidden zip pocket, or pocket integrated into a panel needs more. The factory may need to see the opening construction, flap relationship, bag direction, reinforcement, and whether the pocket is lined.
Use complexity as the decision filter
Don't add views because a tech pack looks more professional with more pages. Add them when the existing views fail to answer a construction question.
| Garment Complexity | Minimum Views | Required Callouts |
|---|---|---|
| Simple, single-layer cut-and-sew item | Front and back | Silhouette, core seams, closures, measurements, and visible stitch lines |
| Item with shaped panels or multiple openings | Front, back, and the side most affected by construction | Panel joins, seam direction, opening dimensions, topstitching, and hardware |
| Hooded or lined garment | Front, back, plus hood and interior views | Lining attachment, seam turns, cord channel, facing, hem finish, and internal labels |
| Complex pocket or utility garment | Front, back, plus enlarged pocket details | Pocket bag, welt or flap construction, reinforcement, closure method, and placement |
| Unusual structural or layered product | Front, back, side, interior, and focused detail views | Assembly order, hidden supports, material transitions, edge finish, and tolerance-sensitive areas |
This escalation model follows the production gap identified in guidance on technical flats for fashion, where additional views are noted for hoods, linings, pockets, unusual construction, and close-up callouts. The important decision isn't whether the garment is visually complicated. It's whether a factory can infer the construction safely from the current set.
Stop before the pack becomes noise
Over-documentation has a cost. Redundant views slow quoting, make revisions harder to track, and can cause the factory to overlook the one callout that matters. A detail view should answer a question that the main views can't answer, not repeat the same silhouette at a different scale.
Use a detail view when:
- The feature is occluded: An exterior pocket hides its bag or reinforcement.
- The operation is non-standard: A seam, edge, or closure can't be described with familiar notation.
- The material changes behavior: A rigid overlay meets stretch fabric, or a leather edge meets a textile lining.
- The product has an inside-out requirement: The interior finish affects fit, durability, or assembly.
- The feature controls function: A hood adjustment, protective flap, reflective element, or support structure must work as specified.
A useful review question is, “What could the factory reasonably build two different ways?” Each answer becomes a candidate for a callout or extra view. If no alternative interpretation exists, keep the primary flat clean.
Tools and Templates for Efficiency
The fastest workflow isn't the one that draws the first flat quickest. It's the one that keeps the drawing, measurement callouts, construction notes, and revisions aligned when the sample changes.
Adobe Illustrator remains useful for precise vector linework and reusable base blocks. A spreadsheet remains useful for measurements and component lists. PDF remains useful for factory sharing. The risk appears when those files become disconnected. A measurement changes in the spreadsheet, but the callout on the flat doesn't. A zipper specification changes in an email, but the drawing still shows the earlier version.
Start with a controlled base
Use a category-specific blank rather than drawing every garment from an empty artboard. The starting point should include consistent front and back proportions, a clear layer structure, and space for callouts. That doesn't mean the blank dictates the design. It means repetitive setup work doesn't consume the time needed for production decisions.
A practical sequence looks like this:
- Import the concept: Bring in a sketch, reference image, or plain-language description as a starting point.
- Build the silhouette: Refine the outline, proportion, openings, and panel structure.
- Create the view set: Duplicate the base into front, back, side, interior, and detail views only as needed.
- Add construction layers: Mark seams, topstitching, closures, pockets, hardware, and reinforcement.
- Attach measurements: Connect point-of-measure lines to precise locations and add tolerances.
- Write factory notes: Describe seam behavior, stitch family, edge finish, material transition, and assembly requirements.
- Run a cross-check: Compare the flat, materials, measurement chart, and revision notes before export.
Use AI for iteration, not approval
AI-assisted tools can accelerate silhouette exploration, material changes, and multi-view concept development. They can also introduce a dangerous illusion of completeness. A generated drawing may show a convincing pocket or zipper without resolving how the pocket bag is cut, how the zipper is secured, or where the seam allowance turns.
Use AI to produce options and revisions, then apply technical judgment to the selected version. Inspect every feature that affects patternmaking or assembly. If the tool generates a reflective overlay, for example, verify its edge, attachment, backing, and relationship to the base material instead of treating the visual effect as a specification.
One option is Genpire, which combines prompt and reference-based product creation with editable blanks, multi-view technical sketches, an AI editor, and an agentic tech pack workspace. Its stated exports include SVG, PDF, and Excel, which can support different downstream users, but the technical designer still owns the final interpretation and factory review.

Protect the handoff
Export formats serve different purposes. SVG keeps linework editable for teams that need to revise the flat. PDF provides a controlled review document for the factory. Excel supports measurement and component data when the supplier works in a tabular format. The export is only useful if the files carry matching style names, dates, and revision identifiers.
Keep the working file separate from the approved factory issue. When a factory sends feedback, update the source, revise the relevant flat and notes together, then issue a new controlled version. Don't send an isolated screenshot of one changed pocket while leaving the rest of the pack unchanged.
The best automation removes repetitive drafting. It doesn't remove the technical review that decides whether the product can actually be made.
Examples of Footwear and Hybrid Products
Footwear exposes the limits of a basic apparel flat because the product's performance often depends on layered materials, bonded components, reinforcement, and controlled flex. A side view may show the silhouette, but it won't automatically explain which panel is ripstop mesh, where a TPU overlay terminates, how reflective webbing is anchored, or whether a glow element is decorative or functional.
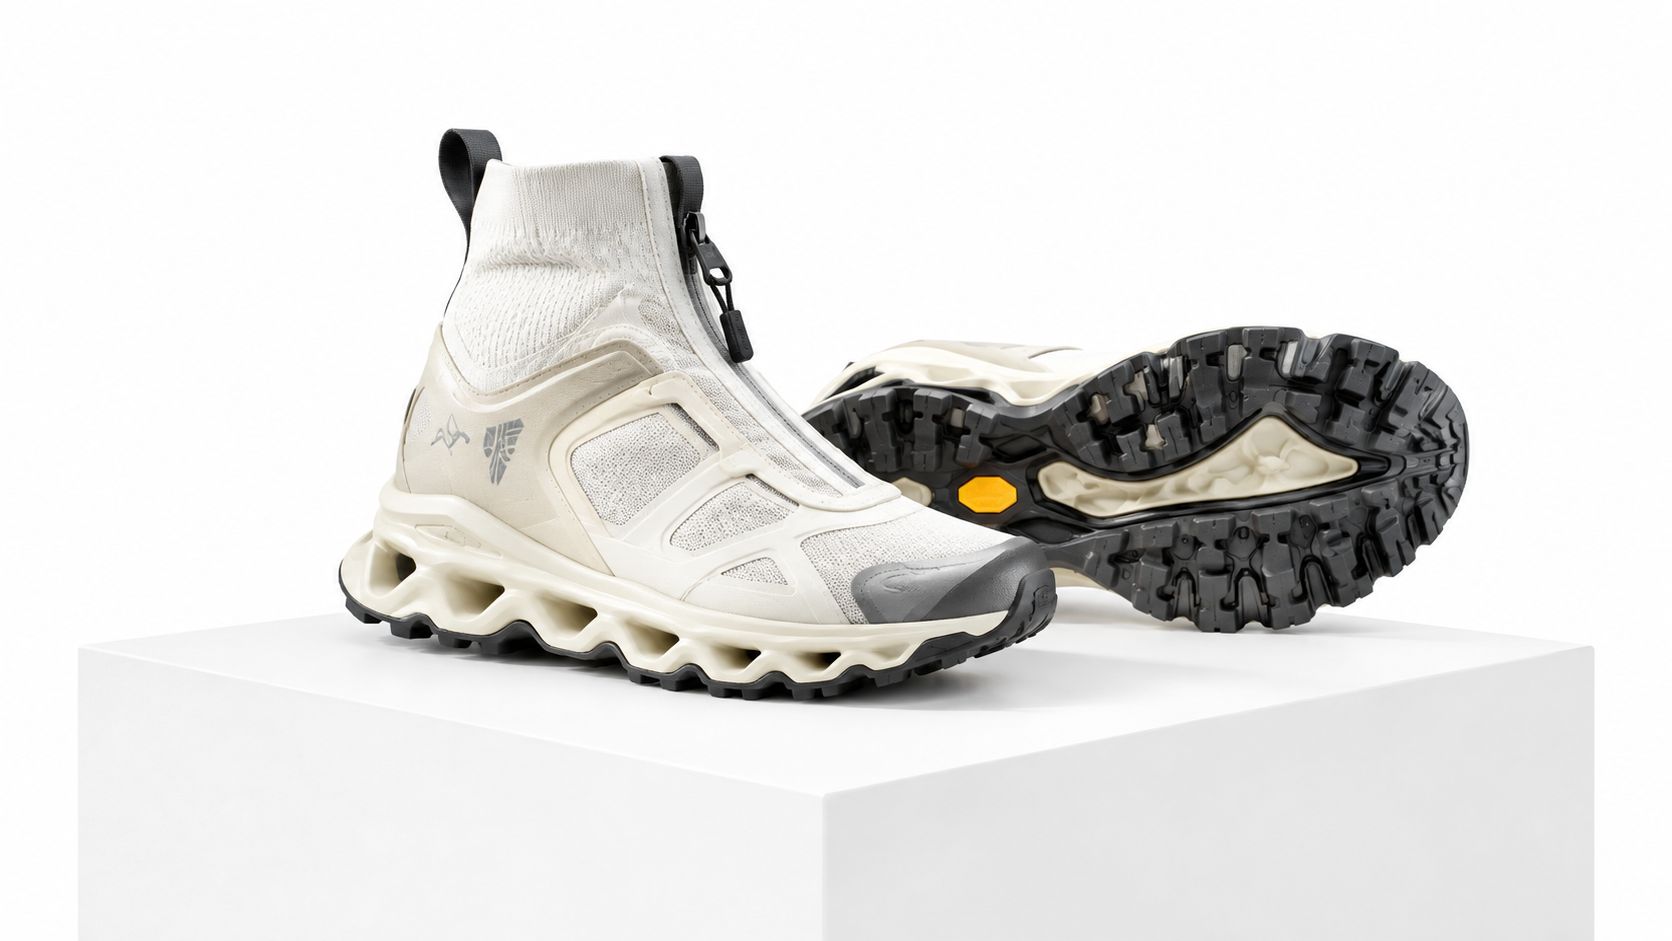
The footwear example above needs more than a clean outline. A production-oriented flat should separate the upper, overlay, closure, collar, tongue, eye stay, outsole, and any external webbing. Use hatch, pattern, or labeled callouts consistently to distinguish materials, but don't rely on color alone. A supplier reviewing a black-and-white PDF must still know where each material begins and how it attaches.
Coverage of global footwear trends for SS26 highlights technical trainers using ripstop mesh, TPU overlays, reflective webbing, and glow-in-the-dark accents. Those combinations create a documentation problem because shape, material behavior, safety or visibility, and styling all occupy the same visual field.
Annotate the material behavior
For a mesh and TPU trainer, the flat should answer several separate questions:
- Where does the mesh flex? Mark the breathable or stretch area and its relationship to the last.
- Where does the overlay stabilize? Show the TPU boundary, thickness or construction note, and attachment method.
- Where does reflective material sit? Identify the webbing path, width, overlap, and anchoring points.
- What does the closure control? A zipper, lace system, or strap needs placement, reinforcement, and opening direction.
- How does the sole interface work? Distinguish the upper edge, foxing or midsole line, outsole, and bonding or stitching requirement.
The point isn't to crowd every note onto one hero drawing. Use a lateral view for the overall product, a medial view when the construction differs, a top view for lacing and opening geometry, and enlarged details for overlays, closure ends, and sole transitions. Each view earns its place by exposing a different production decision.
For additional context on how “flat” products can also refer to performance footwear rather than only apparel documentation, Swift Running's resource on top racing flats provides useful category context. The technical principle remains the same. The drawing must communicate what the factory needs to reproduce, not merely what the customer sees at a distance.
The following video can be useful as visual context for footwear construction and product detailing:
Treat hybrid products as systems
Hybrid products combine categories and therefore combine documentation habits. A sneaker with apparel-like webbing needs footwear views and textile trim notes. A technical bag with molded panels needs accessory views plus material transition details. A garment with bonded protective components needs interior construction information that a standard apparel flat may not show.
The tech pack workflow for bags, jewellery, and footwear is a useful reference when the product crosses category boundaries. Start by identifying the product's functional zones, then assign a view or callout to each zone. Don't force every material, finish, and operation into the same line drawing.
For hybrid products, the material map is part of the silhouette. If the factory can't tell where one material stops and another begins, the flat is incomplete.
Closing the Gap Between Concept and Factory
A technical flat succeeds when it converts an idea into a sequence of decisions that another team can execute. The outline communicates proportion. The views expose construction. The callouts define operations. The measurements establish control points, and the revision record protects the approved interpretation.
The most reliable workflow uses detail proportionally. A simple item shouldn't receive a dense set of redundant diagrams, while a hooded, lined, pocket-heavy, or multi-material product shouldn't be forced into a front-and-back template. The right question is always, “What could the manufacturer misunderstand from this view?”
Make the drawing accountable
Before release, inspect the flat as if you were preparing the sample yourself. Check every seam, opening, closure, pocket, hardware position, material change, measurement line, and stitch note. Then compare the drawing with the rest of the tech pack so the factory receives one coherent instruction set.
AI-assisted tools and reusable templates can make that process faster, particularly when they keep views and specifications in one working environment. They don't replace the senior technical decision about whether a feature needs a side view, an interior diagram, or a close-up callout. That decision is what closes the production gap.
Technical flats fashion teams create are more than presentation assets. They're the working language between design, patternmaking, sourcing, sampling, and manufacturing. When each line carries a clear instruction, the factory has fewer assumptions to make and the approved concept has a much better chance of surviving the sample room intact.
Use Genpire to turn sketches, references, or garment descriptions into editable multi-view concepts and structured tech pack assets, then refine the construction details before sending them to a supplier. Visit Genpire to build clearer technical flats and keep your production documentation in one workflow.